
Incident Response On AWS
17 minutes to readTLDR;
As in on-prem environments, security in cloud environments should be considered as a whole. As it can happen in any environment, hacking cases can occur in AWS environments. We see examples of this situation from time to time. In this article, I will not go into the details of Incident Response processes. I will mostly explain how you can run Incident Response processes on AWS.
Is It So Different from Incident Response?
In essence, no. Of course there are some differences. But it is important to remember that cloud systems are not much different from normal computer systems. Without going deeper, I should mention that I will not talk about Incident Response processes in this article. I will talk about how Incident Response processes are implemented in AWS. If you do not have basic knowledge about Incident Response, I recommend you take a break here and read a short articles about Incident Response processes.
AWS Incident Manager
There is a service offered by AWS that allows you to easily manage Incident Response processes. Incident Manager. With the Incident Manager service, you can plan your Incident Response processes, define Runbooks, send notifications to relevant teams and review incident details for up-to-date information during an incident. Incident Manager does all this by leveraging other AWS services.
Let’s examine how Incident Manager is configured and how to use it.
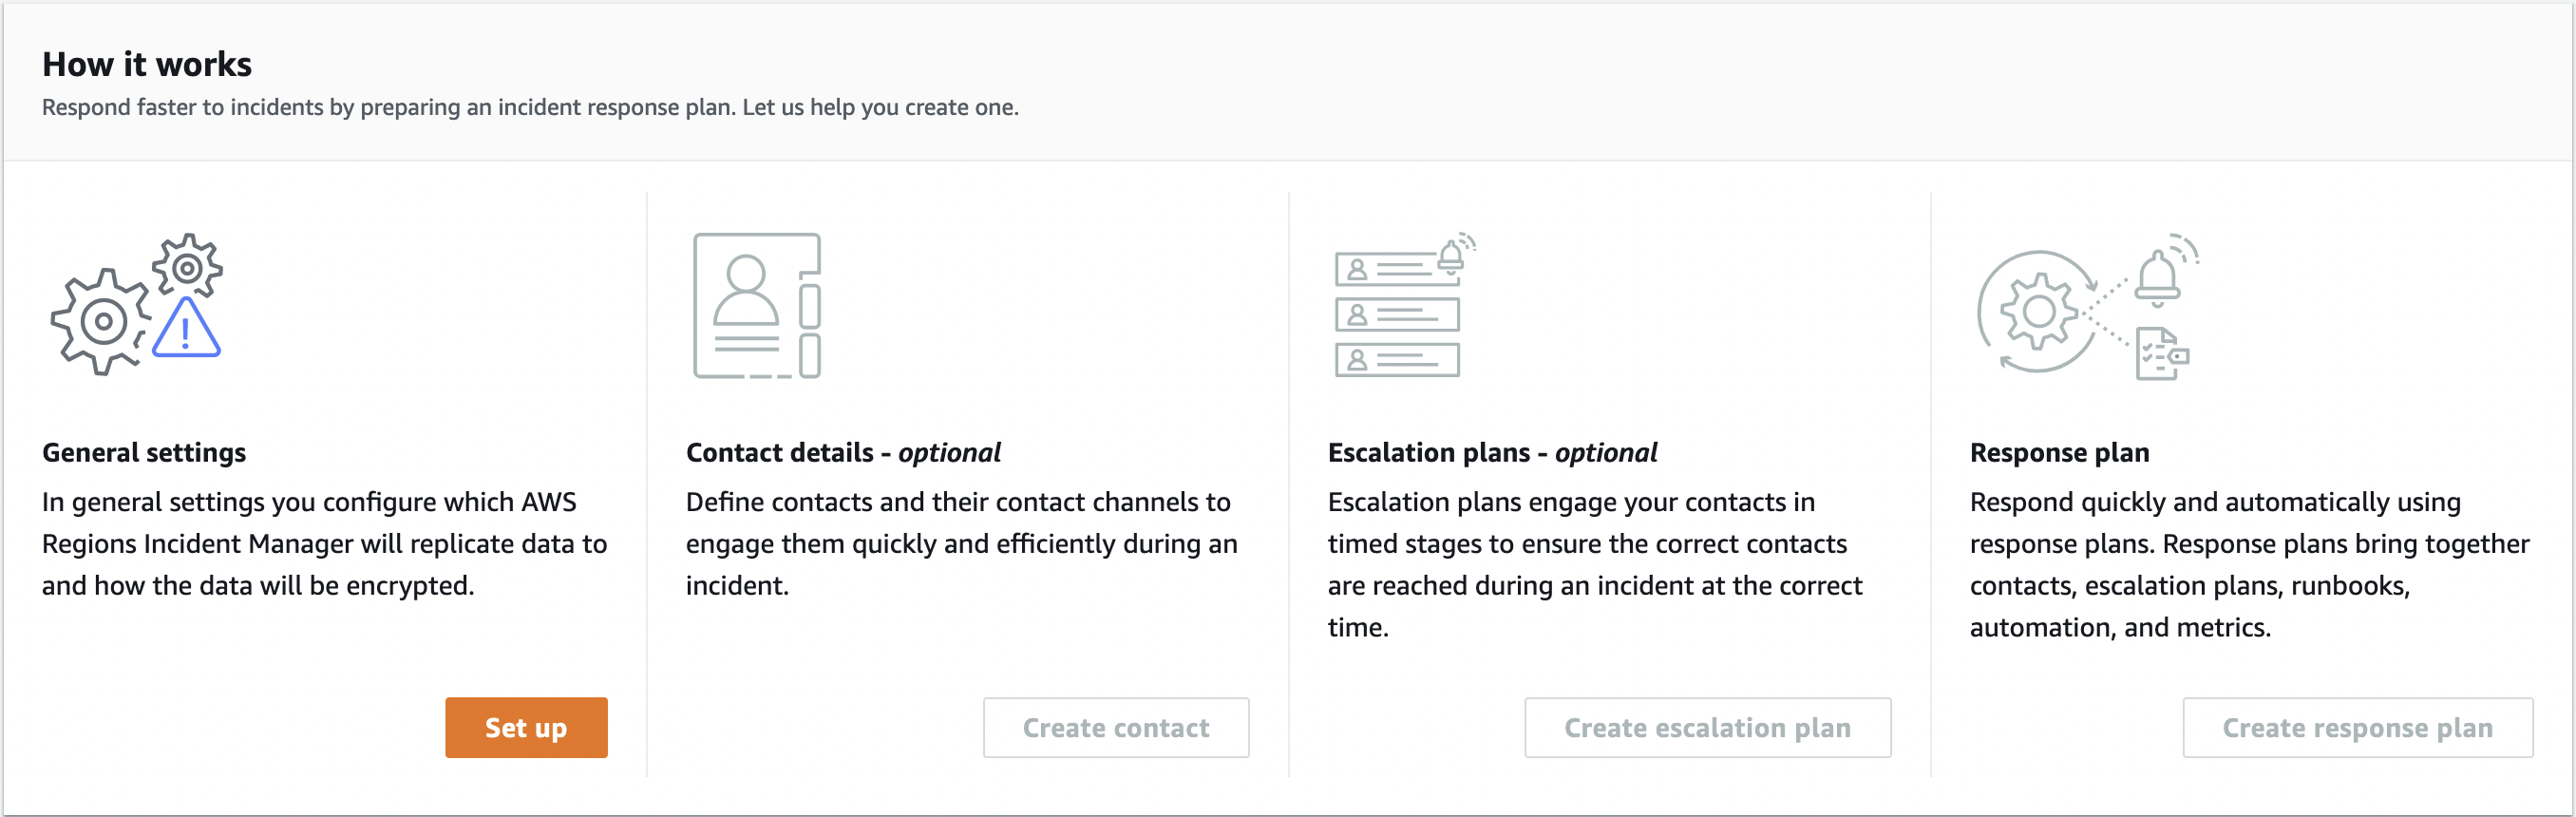
Setting Up Replication
After entering Incident Manager’s panel, we can start configuring it by clicking the Set up button under General Settings. Then let’s continue by confirming the Terms and conditions.
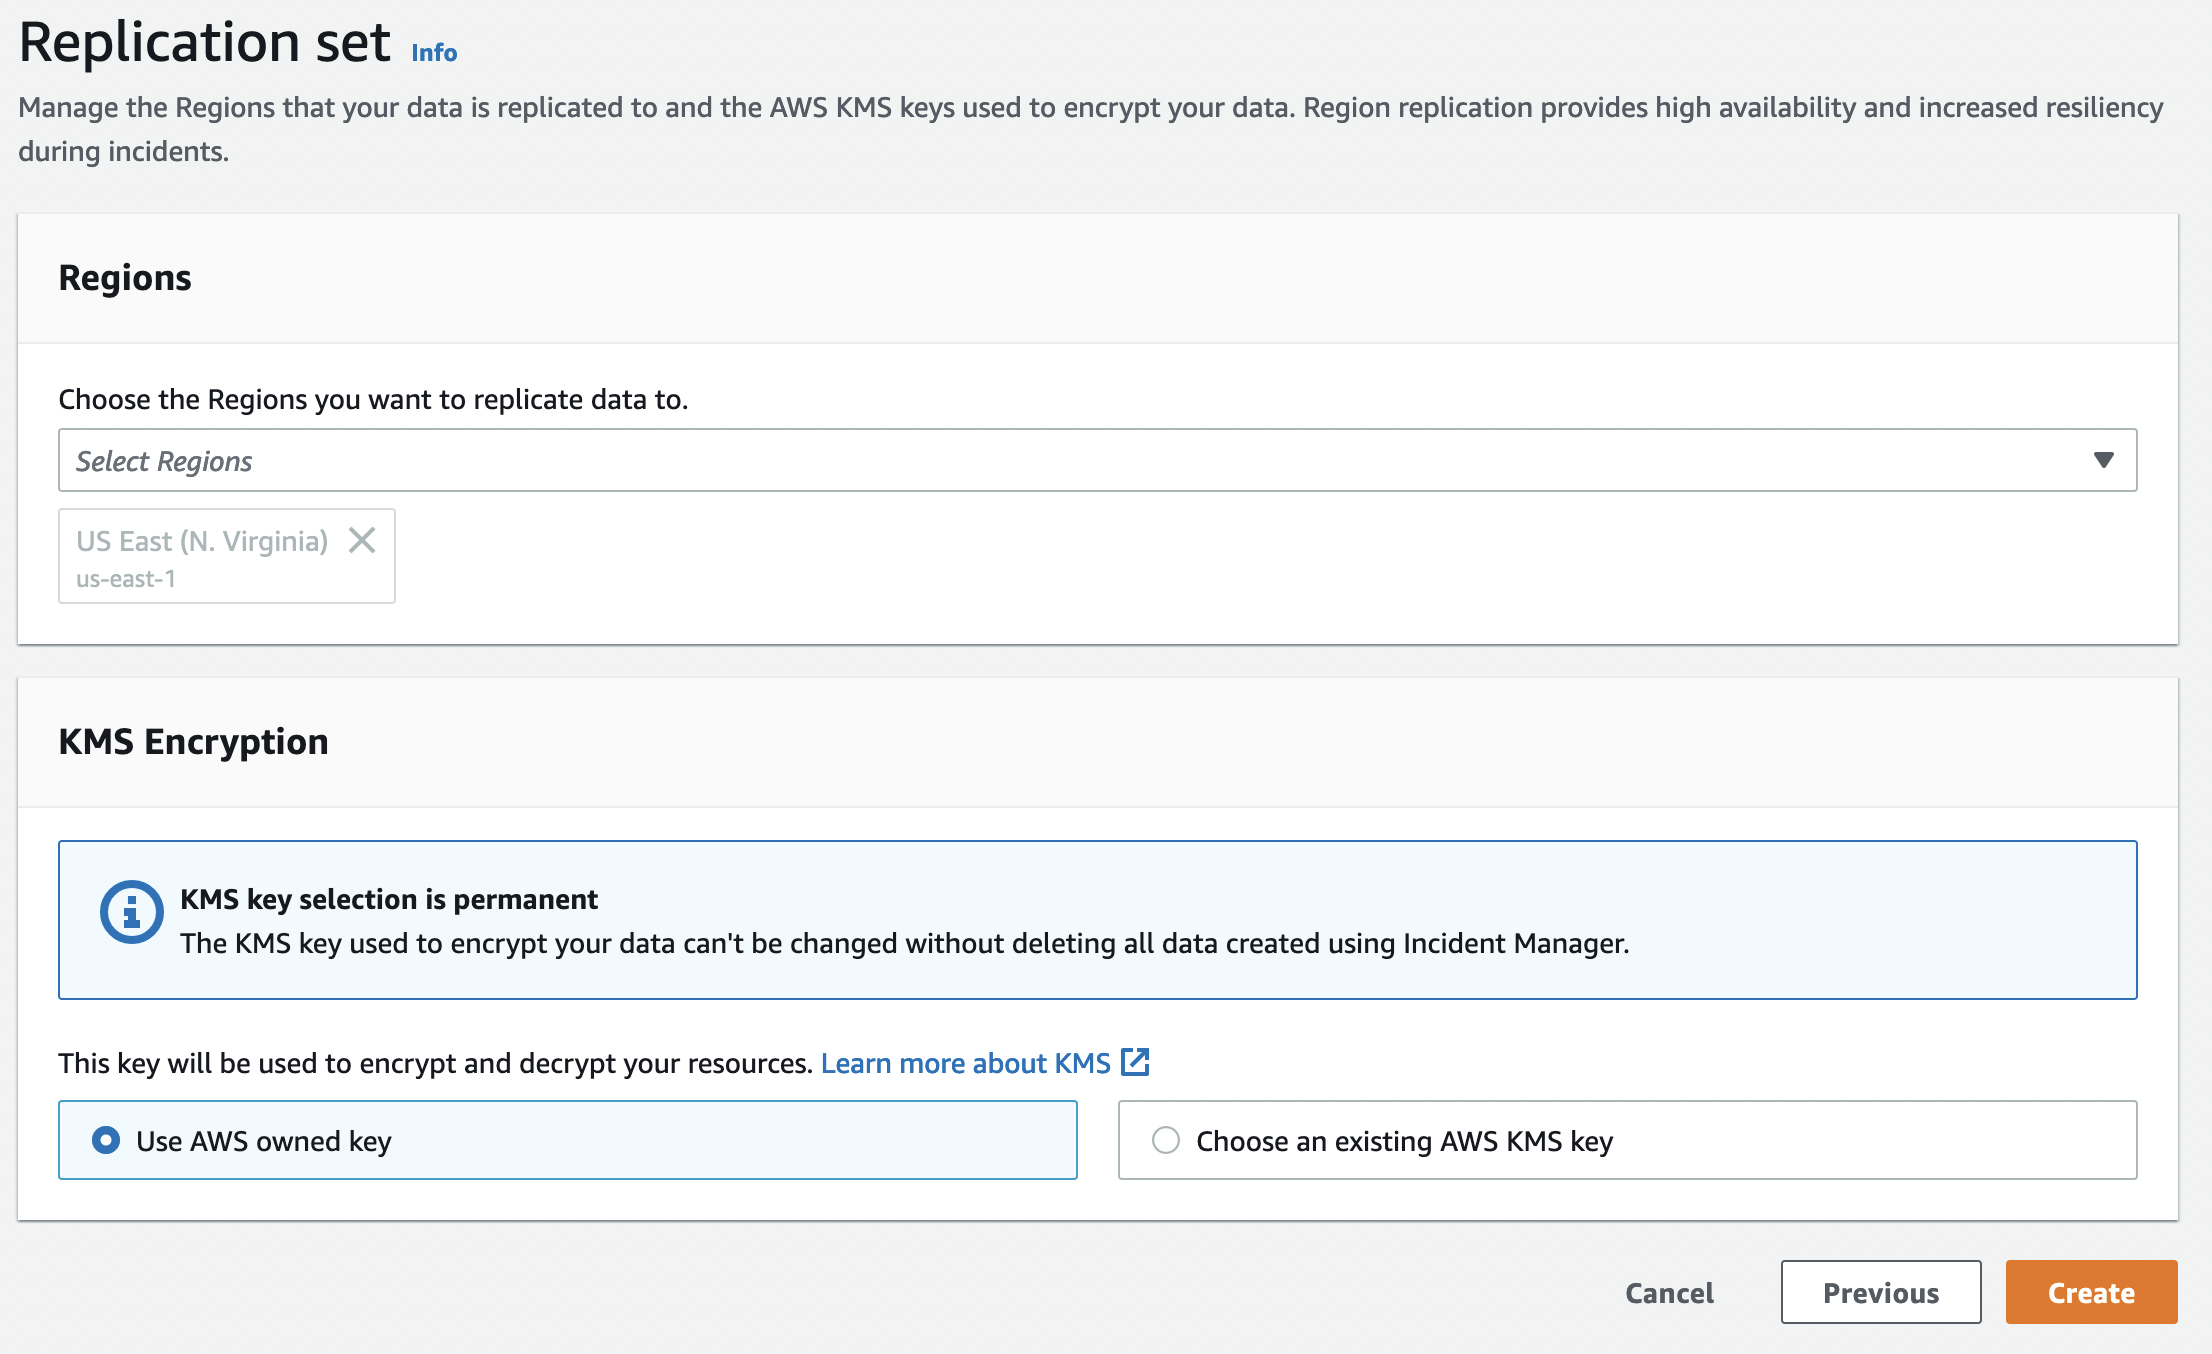
At this point, we make general adjustments to Incident Manager. In the Regions field, we determine in which Regions we will use Incident Manager. We need to select at least one Region. But there is no upper limit to the number of Regions we will select.
You can use the KMS Encryption field to guarantee that the data stored in Incident Manager is protected and cannot be changed without deletion. Once you have done this, it can take up to 5 minutes to set up Replication (but it usually takes a few seconds). You can get yourself a cup of coffee.
Setting Up Contact Details
This stage is optional. You do not have to set it. But I recommend you to follow every step in Incident Manager to run a good Incident Response process. This is the area where we set the people and communication channels to respond to the Incident.
In the Contact details field, the name of the person who will deal with IR processes and an alias are specified.
In the Contact channel field, we specify how to contact the person we specified in the Contact details field in case of a case. In this field, we can specify a communication channel via E-mail, SMS, or Voice. We can also specify more than one communication channel. My recommendation is to specify at least two communication channels. Thus, if the relevant person cannot be reached through one channel, they can be reached through the other channel.
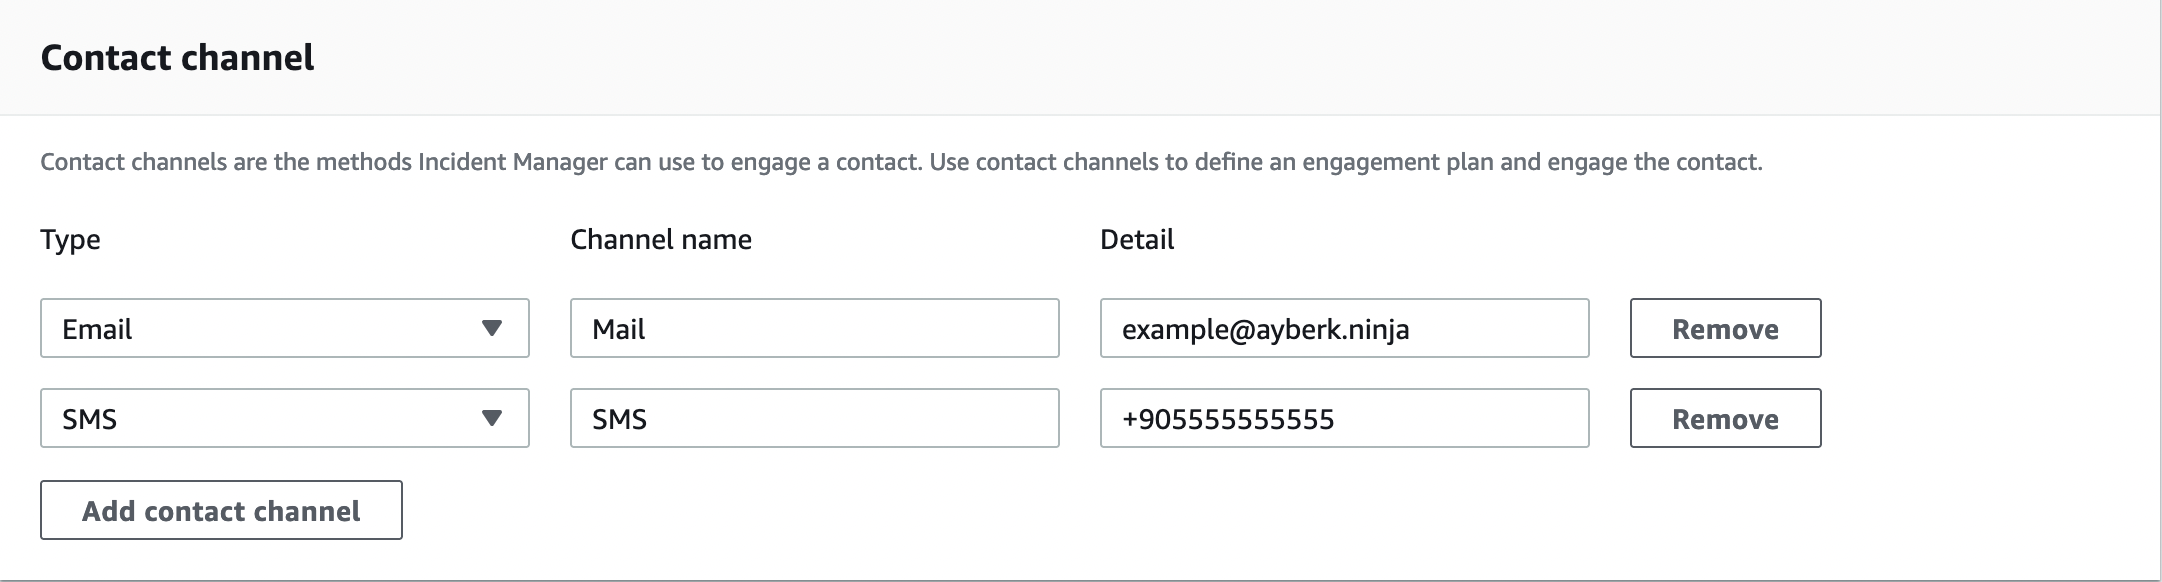
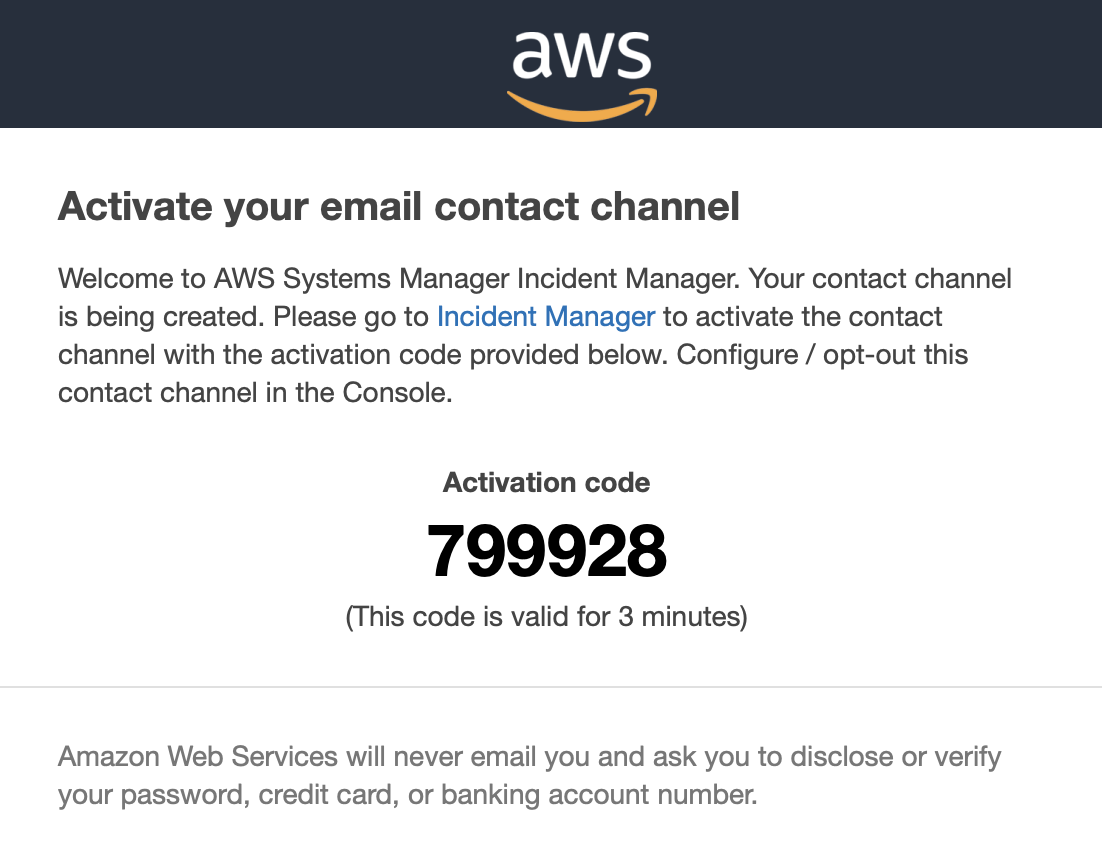
In the Engagement area, you can specify when to contact the relevant contact(s) in case of an incident. Note that after you have set up the contact channels, a validation will be sent for each contact channel you have set up.
If you want to set more than one contact you have to repeat the same procedure.
Setting Up Escalation Plans
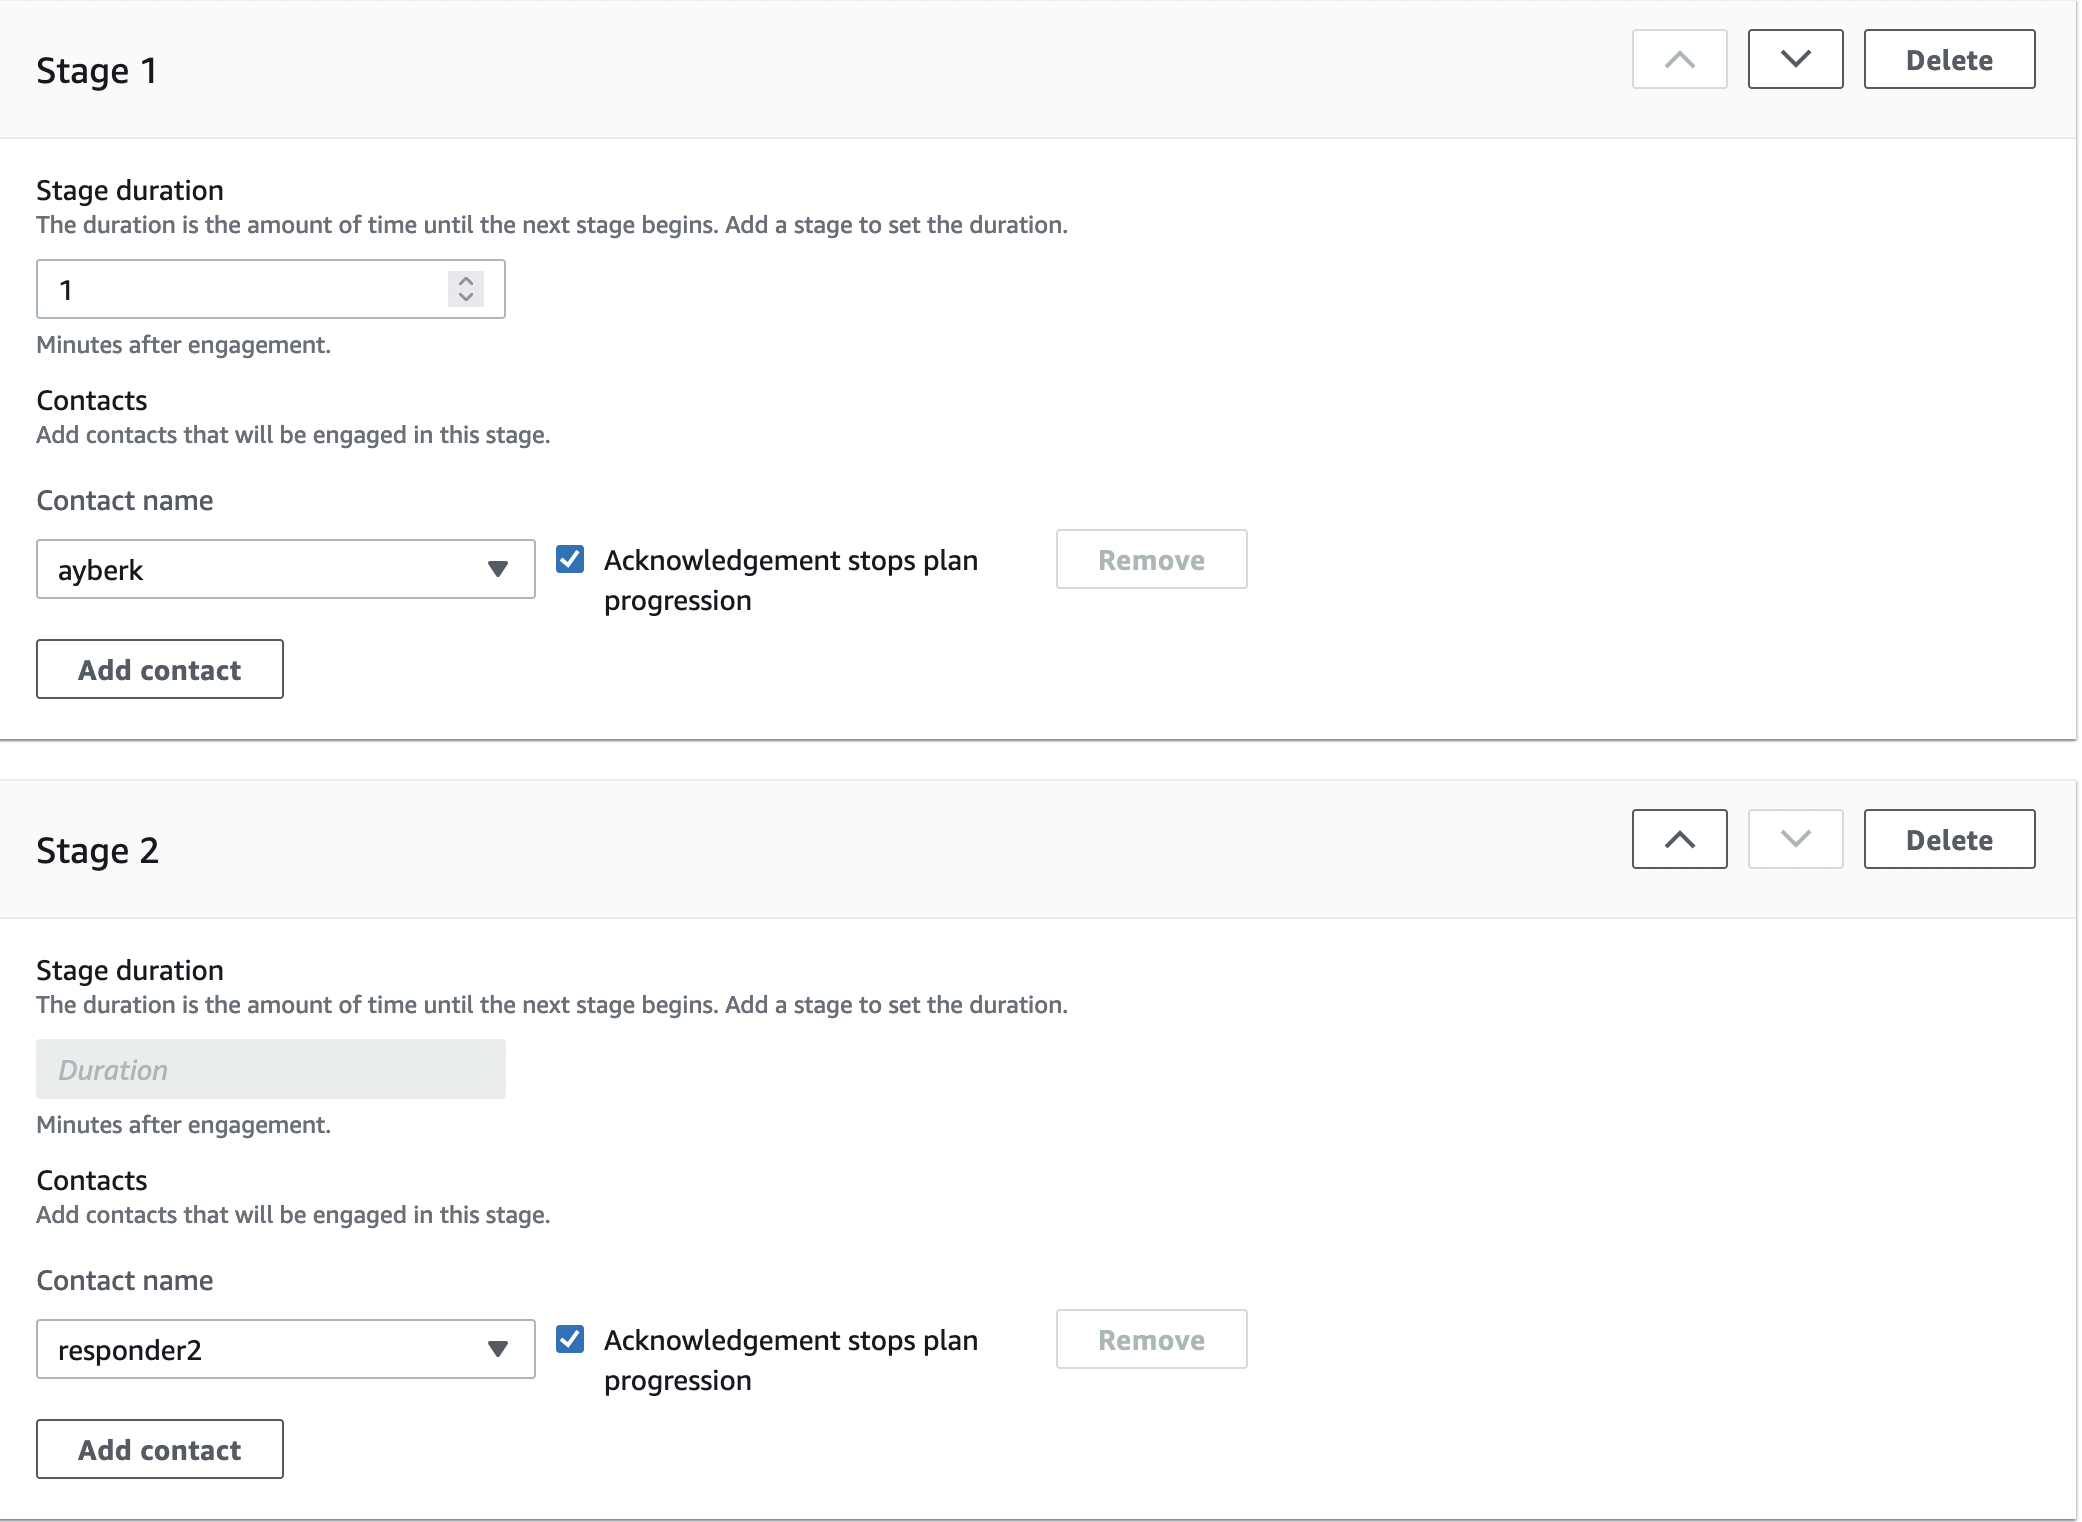
Creating an escalation plan is optional, just like creating a contact. But this time, if you want to create an escalation plan, you need to have already created a contact. You can use it in situations where you want more than one person to deal with a case at the same time. You can designate more than one person and forward the case to the other person(s) in case the first person does not respond to the case.
In the Escalation plan details field you must assign a name and alias to the related plan. In the Stages field, you can specify which people will deal with the case, and with the Duration parameter, you can specify how long in minutes it will be escalated to the next Responder. Duration must be 30 or less than 30.
If you want to create more than one Escalation plan you should repeat the same steps.
Setting Up Response Plan
I think the most crucial part is the Response Plan. You can use this area to plan how to respond to incidents, determine the severity of incidents, determine which contacts to contact, select metrics to track, and determine the automated runbooks to start.
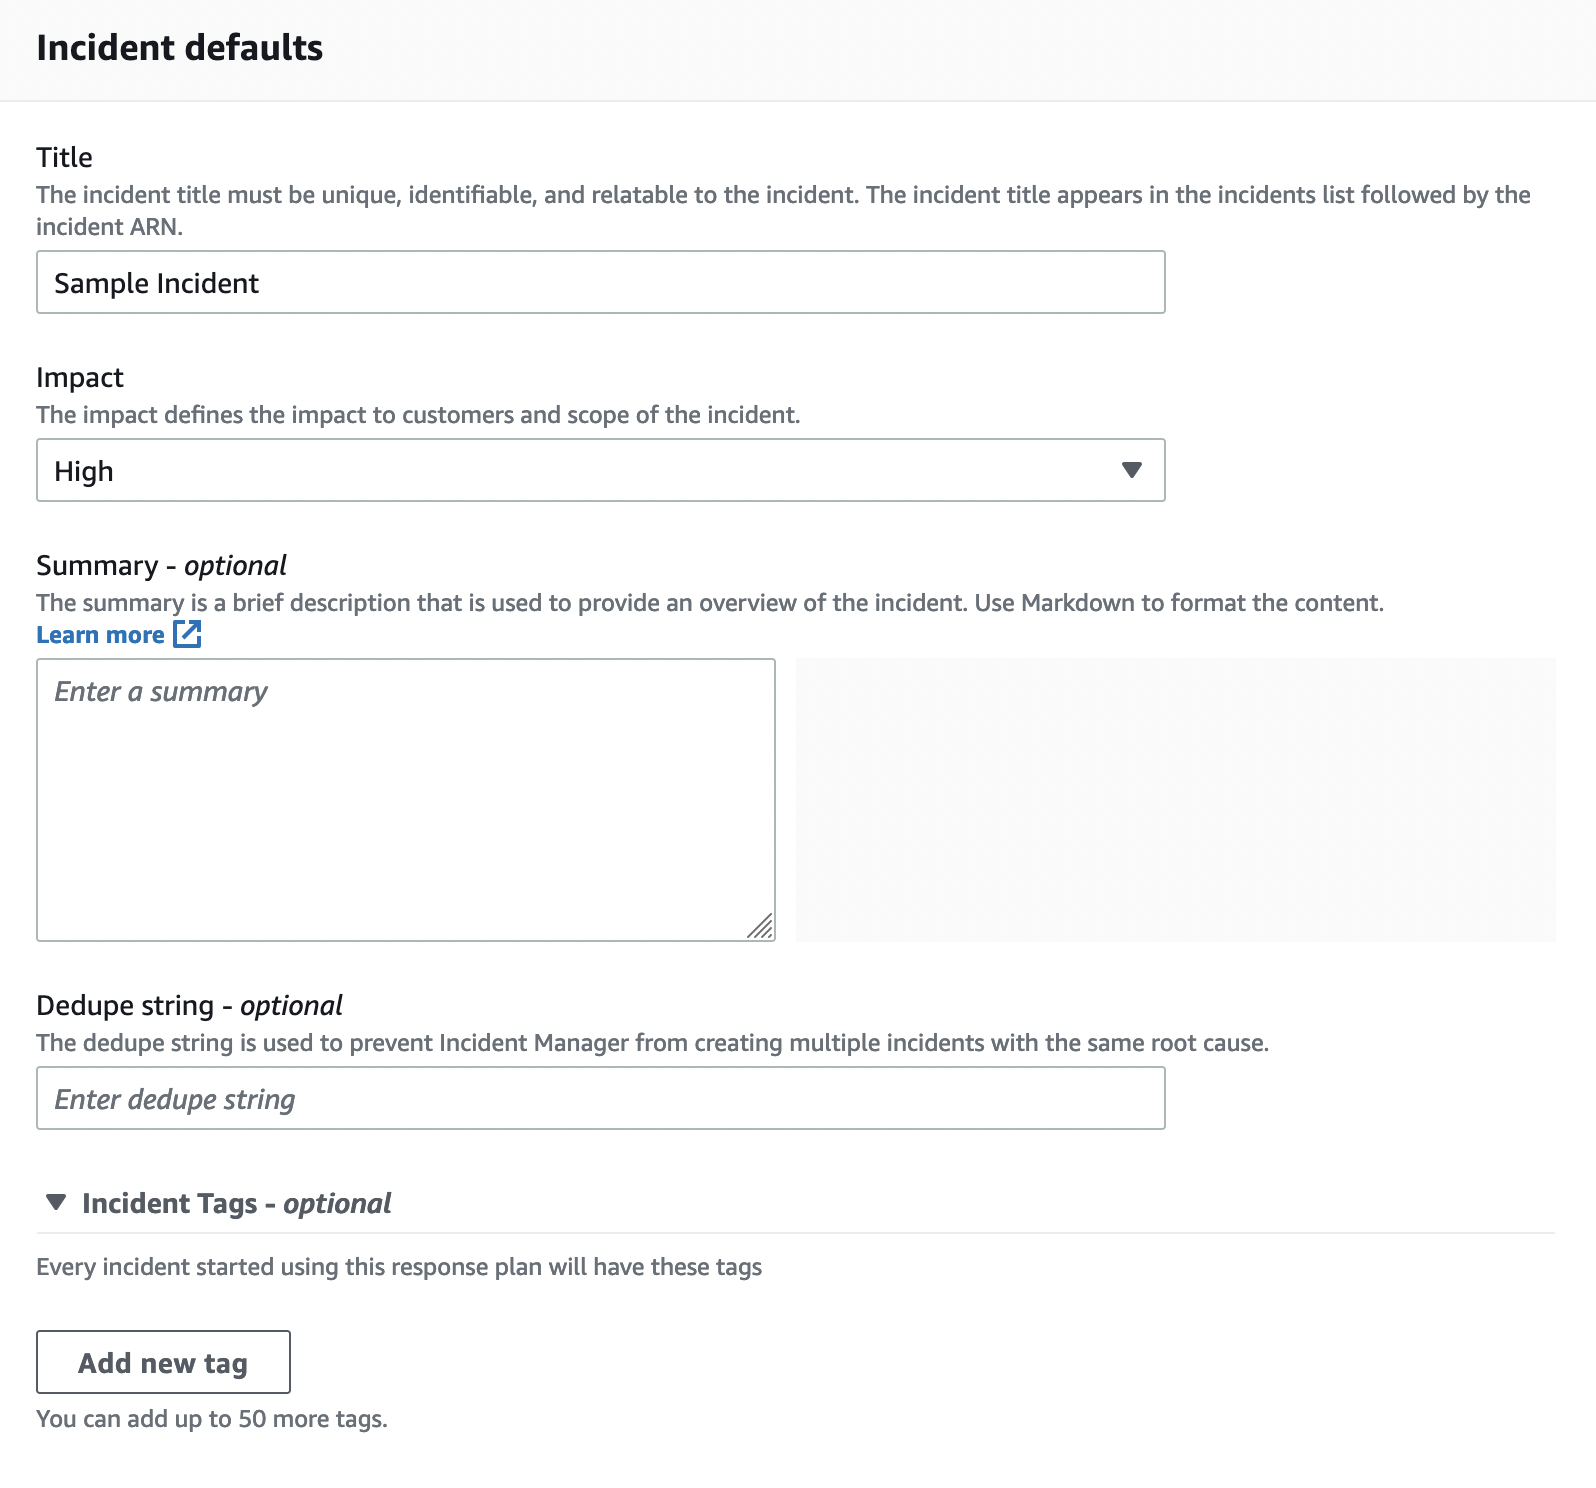
As always, we start by specifying a name and alias for the Response plan in the Response plan details field. The values in the Incident Defaults field and their descriptions are as follows:
- Title: The incident title helps to identify an incident on the incidents home page.
- Impact: It allows you to identify an impact to determine the potential risk of the case.
- Summary: It allows you to write a summary of the case. It is an optional field.
- Dedupe String: Incident Manager uses the dedupe string to prevent the same root cause from creating multiple incidents in the same account. Incident Manager deduplicates Incidents created from the same CloudWatch alarm or EventBridge event into the same incident. (Source: AWS Docs.)
- Tags: If you are familiar with AWS, you should be familiar with the tagging structure. Every event that starts using this response plan will have these tags. This will make it easier for you to do things like reporting.
The chat channel field is optional but very useful. Select a chat channel for responders to interact during the case. Currently, only Slack and Chime are supported. In order to use this area, you must first configure a Chatbot Client. For more detailed information, you can review the AWS document.
I explained the Engagements section in the previous chapter, so I will continue by skipping this section.
Runbooks allow you to automate some processes. You can create and use a Runbook, use one of the Runbooks created by AWS, or use another Runbook that has been shared with you. I should mention that for Runbooks to work, you must assign an IAM role with ssm:StartAutomationExecution authorization. Also, if you are going to use Runbook in Cross-Accounts, you must have sts:AssumeRole role.
Creating A New Runbook
Creating a new Runbook is quite easy. You need to enter a description in Markdown format and set up the Runbook steps.

Again, it contains a lot of detail. For detailed information on how to create a Runbook in AWS, you can check the AWS documentation.
Finally, you can tag the Response plan you created if you want. After all these steps, you can create the Response plan with the “Create response plan” button. You can also edit and delete the Response Plan, Escalation Plan and Contacts you created later.
Starting A Incident
Now that we have done our preliminary preparation, we can return to the Incident Manager dashboard and start a new Incident. There are three ways we can start an Incident. These are:
- Automatically create incidents with CloudWatch alarms
- Automatically create incidents with EventBridge events
- Manually create incidents
In this article, I will talk about how to start an Incident manually and automaticly via CloudWatch.
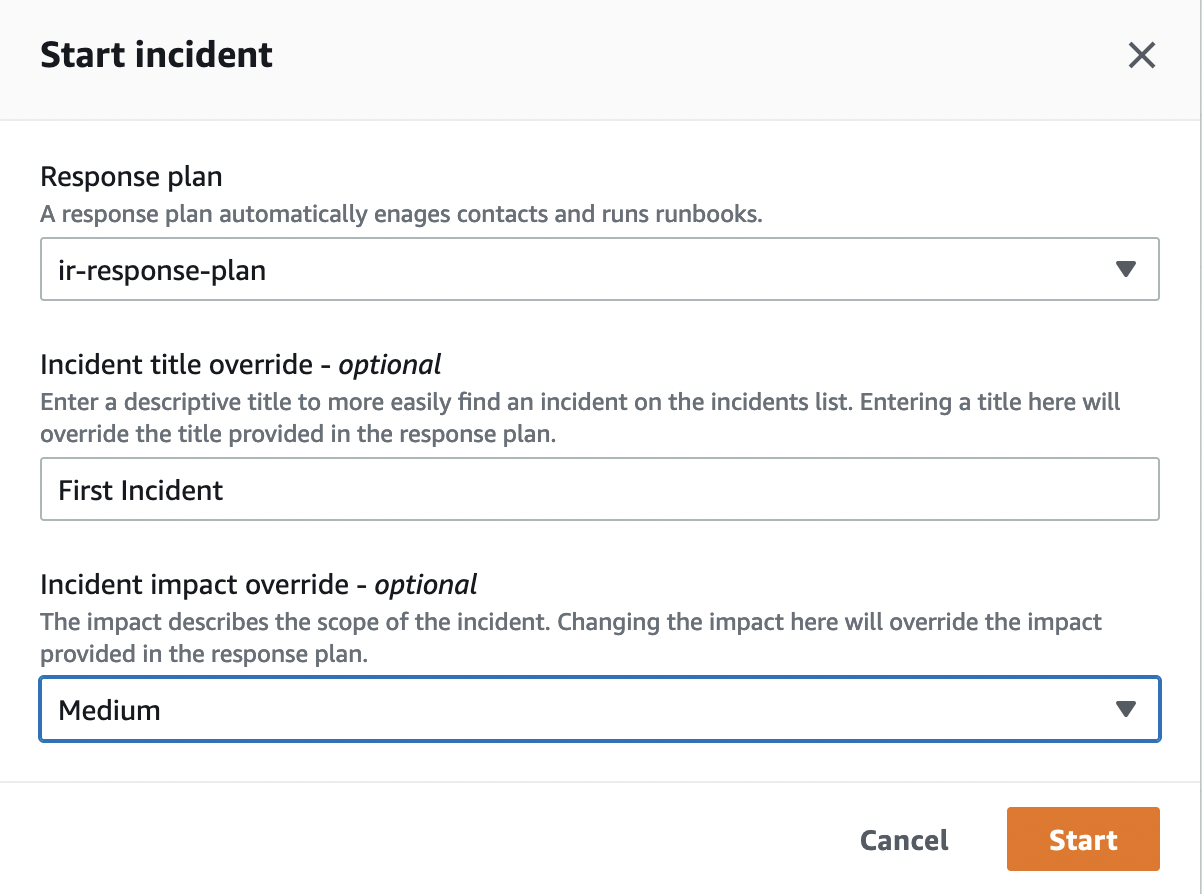
Manually Create Incidents
Starting an Incident manually is quite easy and does not require much information. Click the “Start Incident” button on the Incident Manager dashboard. Select the Response Plan we prepared before and optionally give a title to the Incident and determine its Impact. Immediately afterward, the Incident is started by clicking the “Start” button.
Automatically Start Incidents With CloudWatch Alarms
With CloudWatch, we can track metrics and ensure that cases are automatically created in line with the conditions we want. For this, you must first create an Alarm from the CloudWatch panel. When creating an alarm, select Create Incident under Systems Manager Action menu and then select Response Plan to create an alarm.
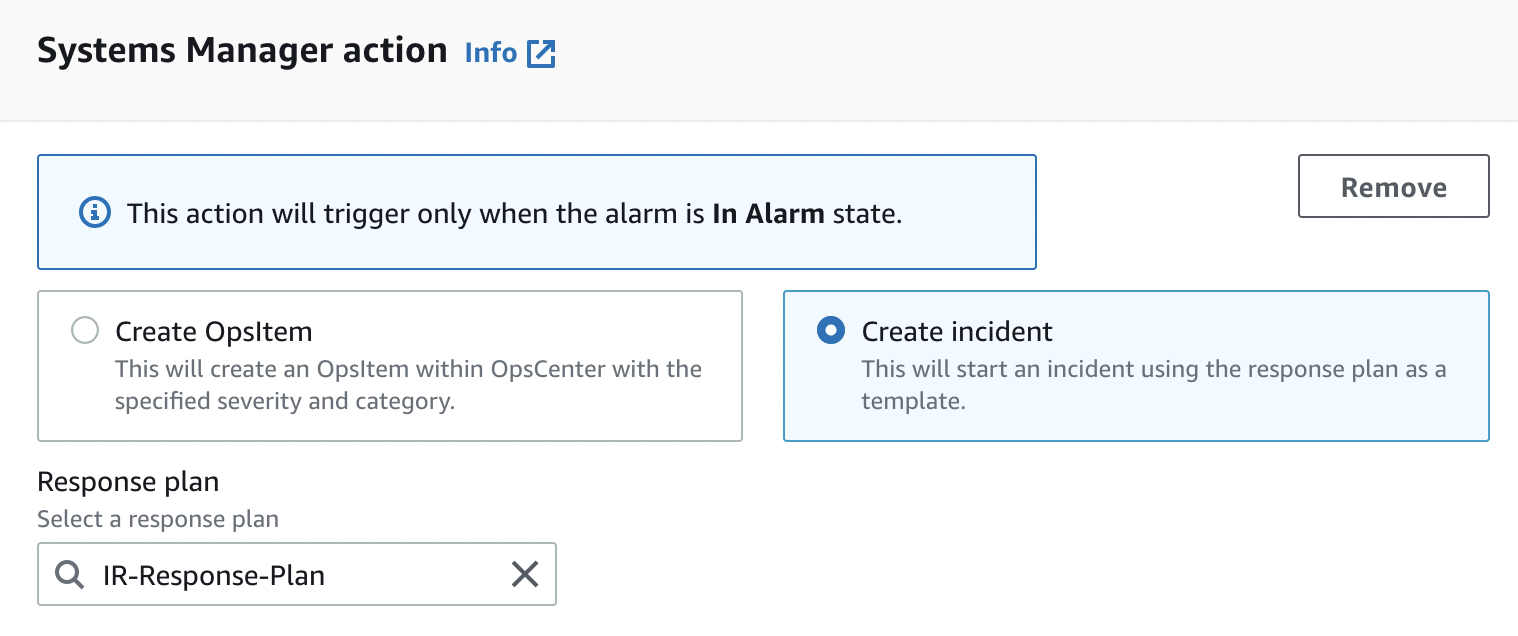
From this moment on, an Incident will automatically occur in every situation that matches the condition you set when creating the Alarm.
Tracking And Resolving Incidents
You can follow the created cases from the Incident Manager dashboard. Here you can see general data about the cases, metrics, timeline, runbooks, engagements and you can edit some of them.
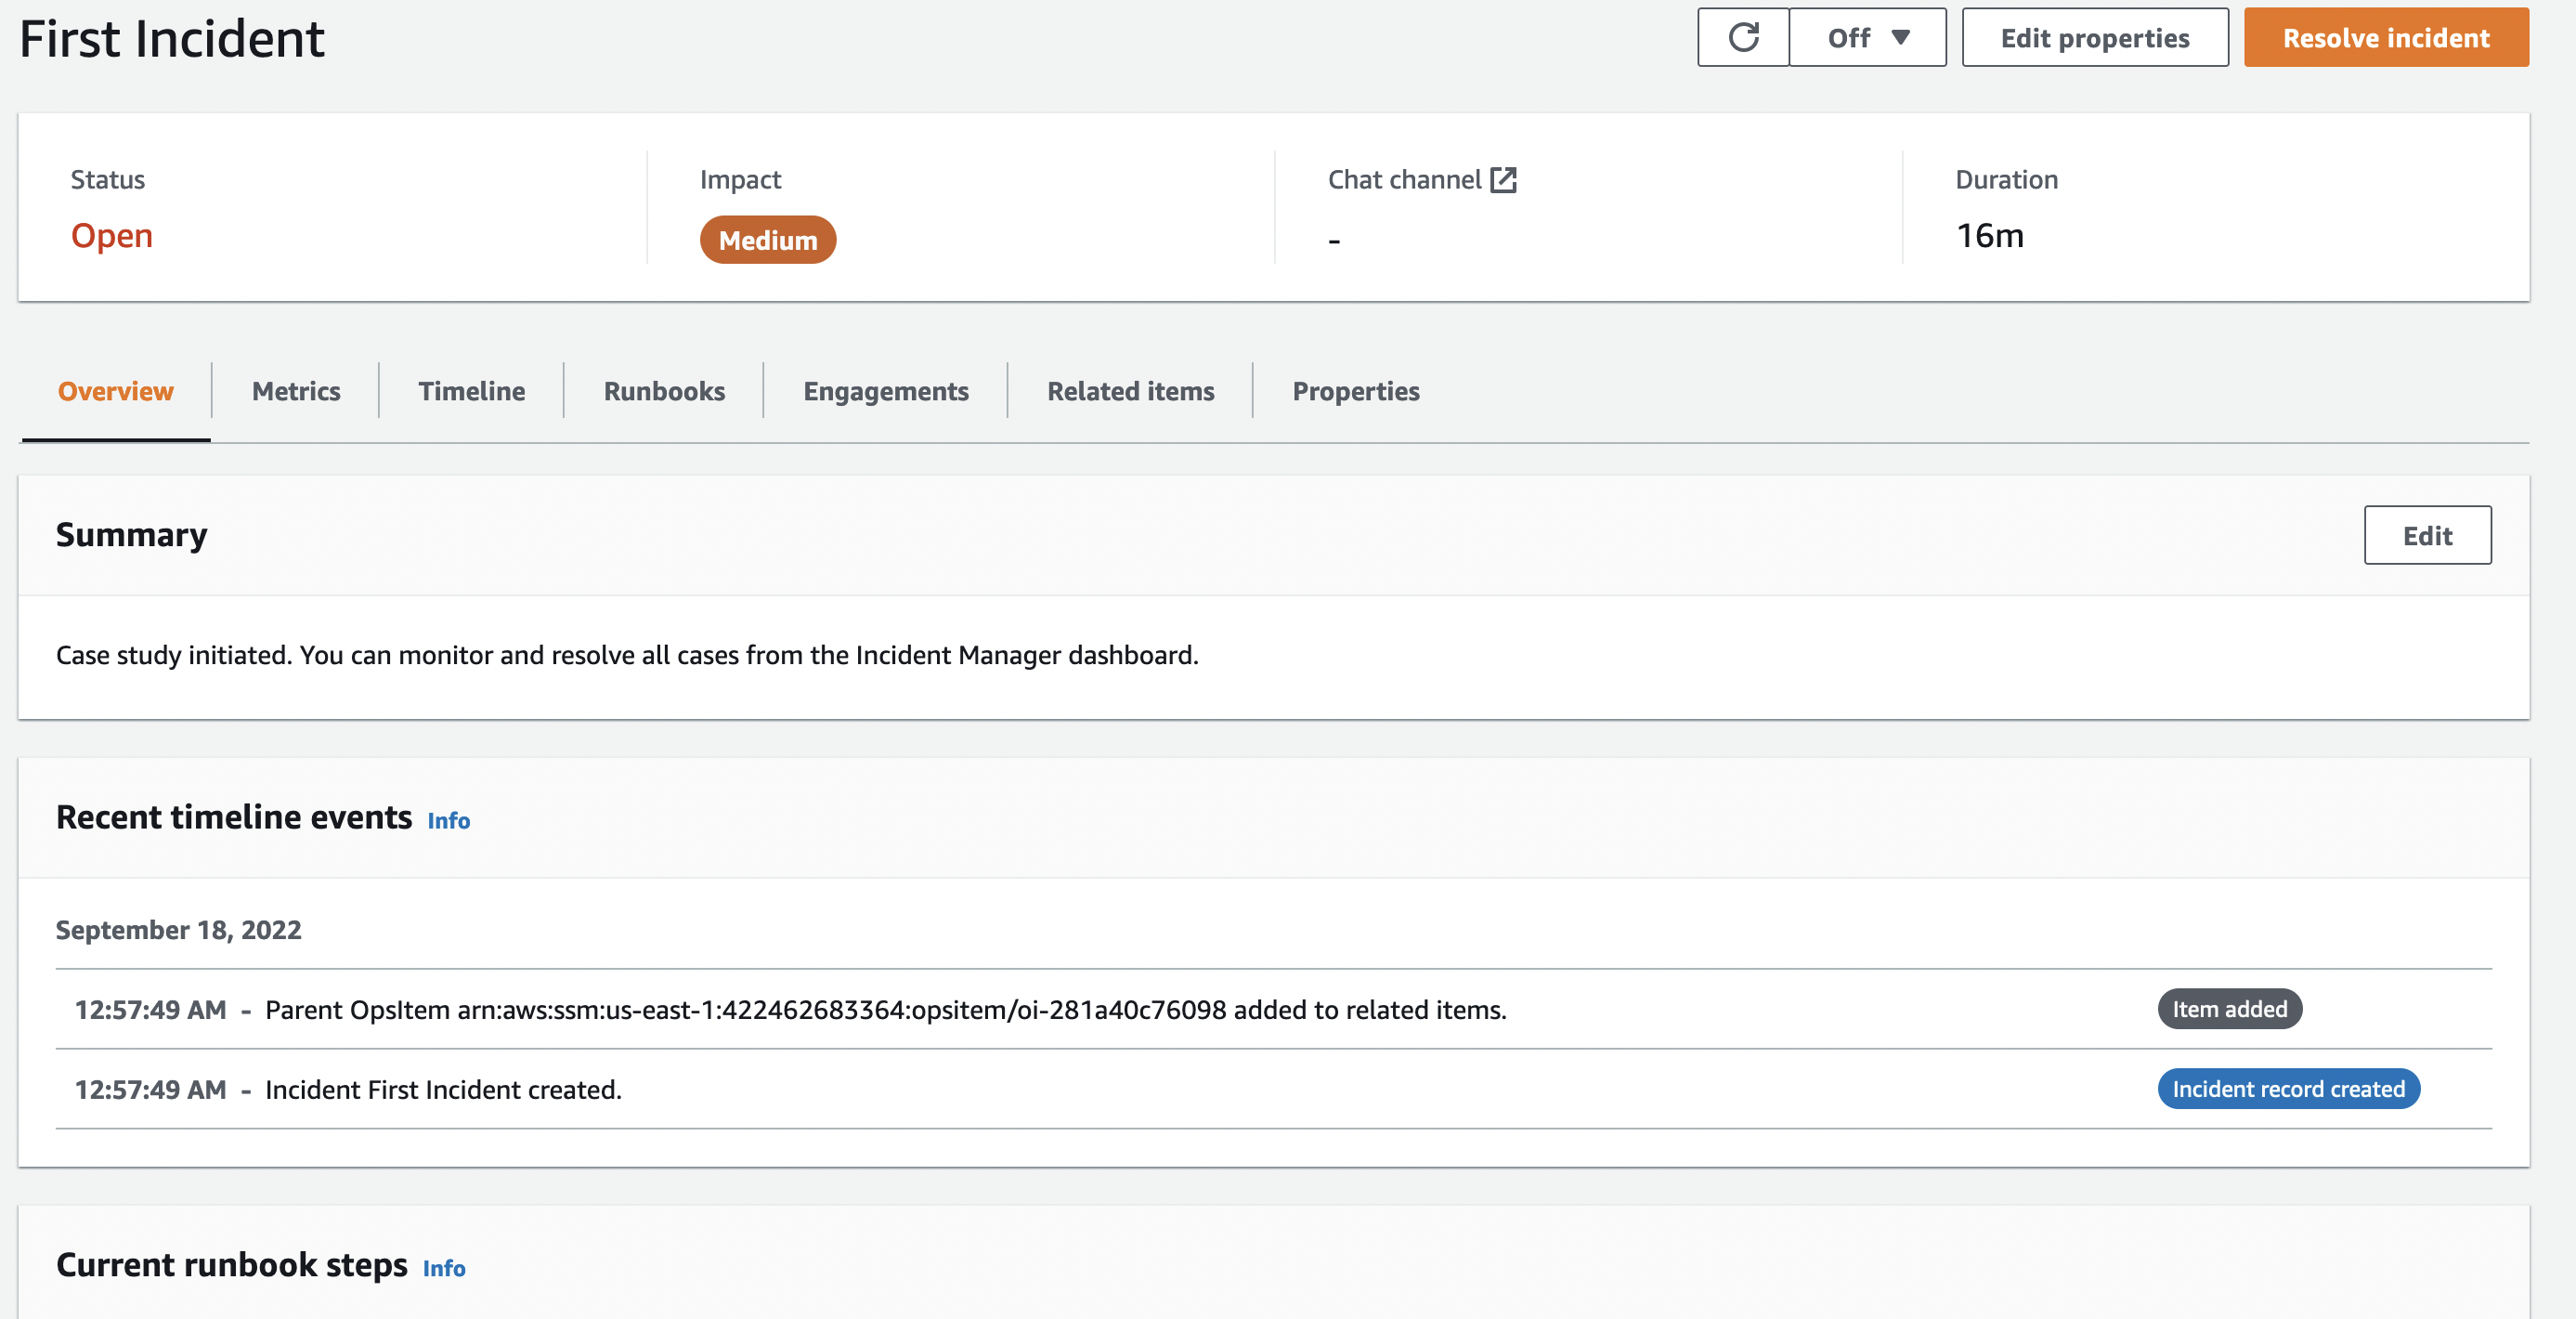
In order to Resolve the Incident, all you need to do is to click on the “Resolve incident” button on the top left.
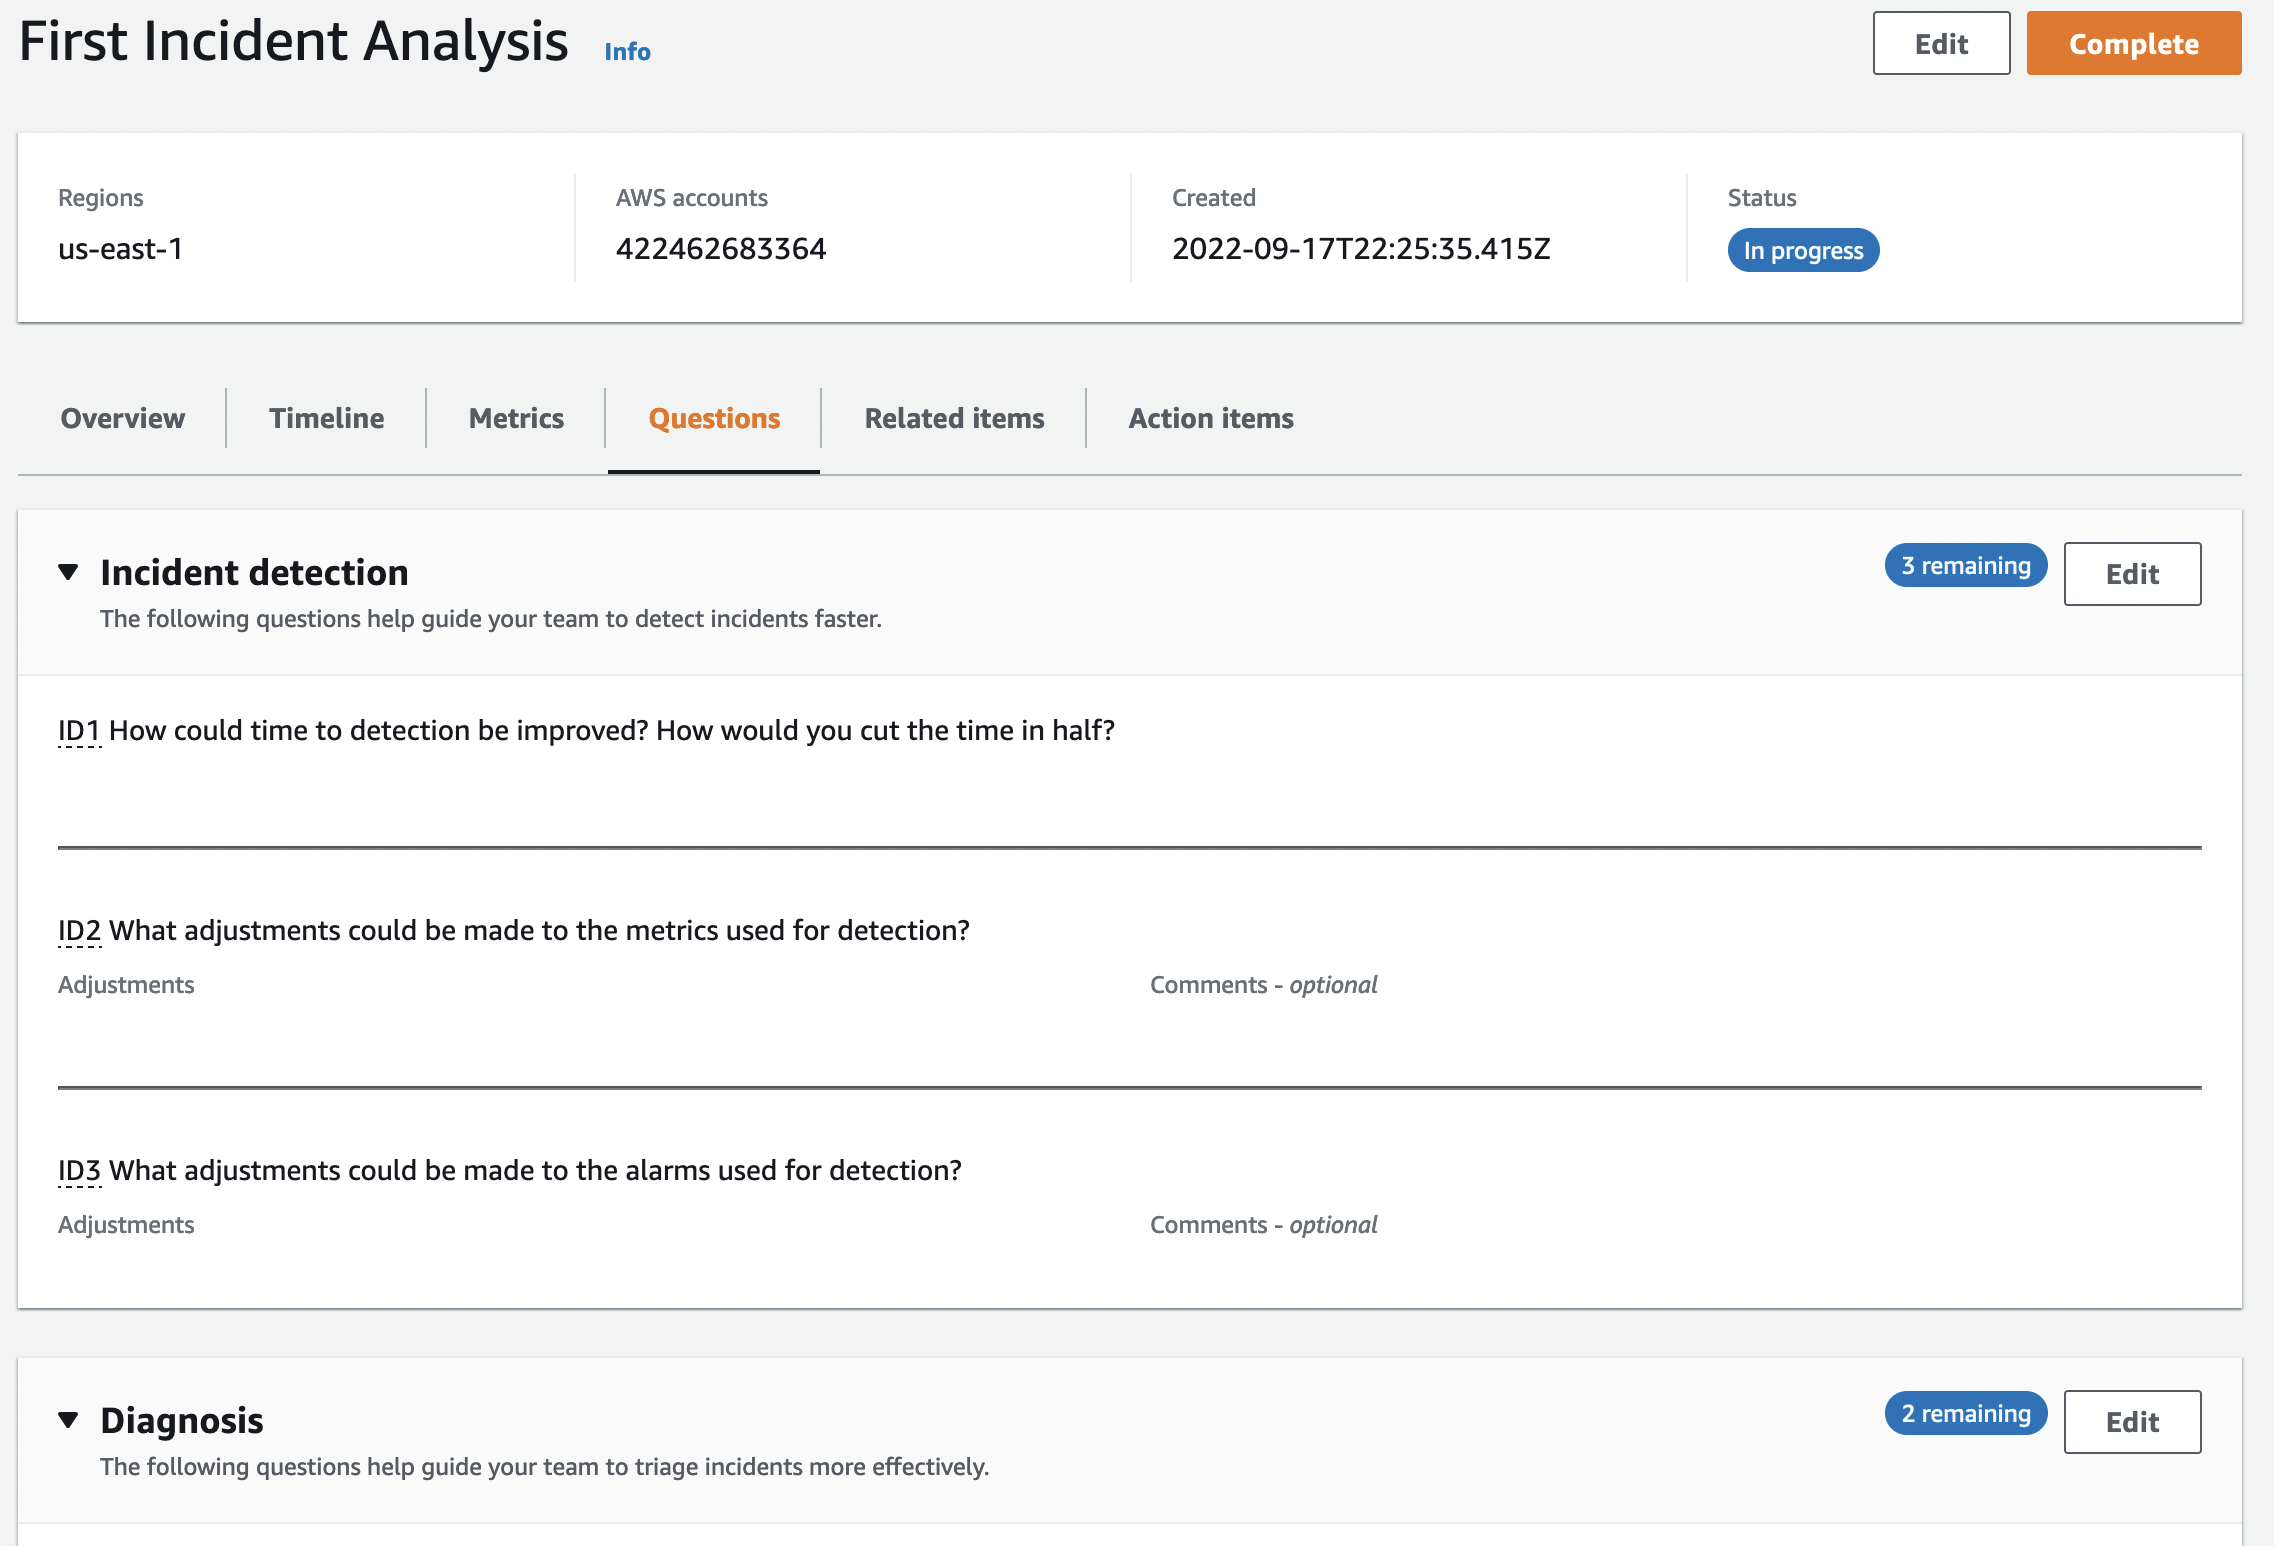
Post-Incident Analysis
After the relevant case is resolved, you can start an analysis of this case and review the issues related to improving your processes. This analysis process is done with Templates. You can create your Template or use the Template created by AWS. Analysis details include metrics, timeline, question set, actions and a checklist. Once an analysis has been created, some areas, such as the question set, can be edited later.
Isolating EC2 Instances
In the event of an incident on an EC2 Instance, it is critical to isolate that Instance from the network. The steps to be followed at this point are as follows:
- Detach the related Instance if it belongs to an Autoscaling group.
- Create a new Security Group that denies all Inbound and Outbound traffic so that in case of an Incident the related Instance will not communicate with any address.
- Detach the existing Security Group of the related Instance and attach the Security Group you created in the previous step.
- Detach if an IAM role is defined on the related Instance. This will allow you to minimize the damage. Make sure that no IAM role is defined on the related Instance.
- Take a Snapshot of the root volume of the respective Instance. You will need this Snapshot during the analysis. It will help you understand the root cause of the incident.
- Finally, again create the AMI of the relevant Instance for analysis.
- Remember that using tags at these stages will be very useful for you in stages such as analysis and report generation.
I mentioned that I will not go into the details of Incident Response processes or AWS in this document, but the steps described (such as creating a new Security Group) are quite simple. If there are any missing points here, you can use AWS’s documents.
Open Source Incident Response Toolkit
There are some open open-source toolkits created by Andrew Krug, Alex McCormack, Joel Ferrier, and Jeff Parr that streamline our Incident Response processes in cloud environments.
Margarita Shotgun
Margarita Shotgun is a very simple to use memory dump tool written in Python programming language. It is designed to work in AWS environments. Detailed information is available in its own documentation.
Incident Pony
Incident Pony is a first of its kind case management and Incident Response orchestration tool specifically designed for AWS (Source: ThreatResponse).
AWS_IR CLI
AWS_IR CLI is the third and final Incident Response tool written by the ThreatResponse team. The purpose of the tool is to automate Incident Response processes. You can review the Black Hat document about the AWS_IR tool and other tools.
Yet Another Automation
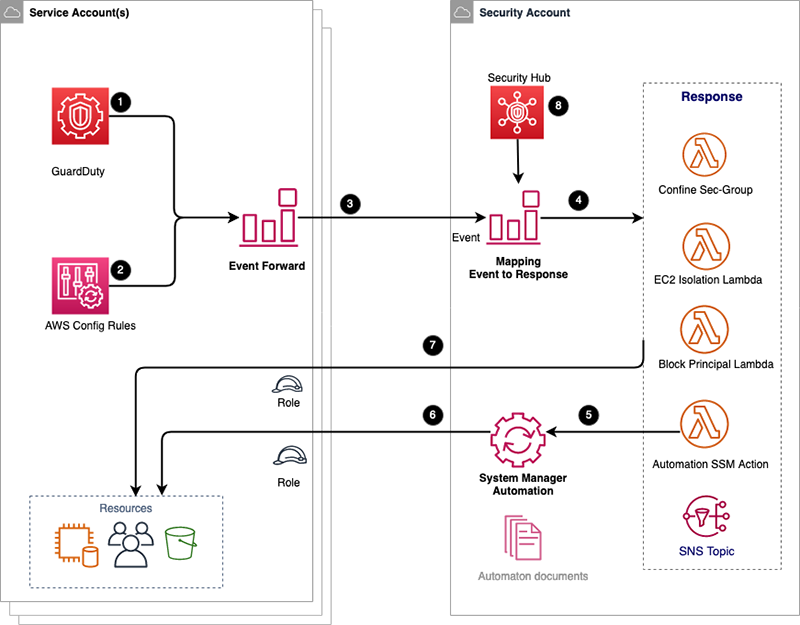
There are many ways to automate Incident Response processes in an AWS environment. These processes can be automated with third-party tools and/or AWS’s own services. At this point, it is important to choose the most suitable solution for your needs. In this blogpost, I will show you an automation that AWS describes in their Security Blog and I will also link to some other automations.
The automatization we will use takes the necessary actions by following AWS GuardDuty and AWS Config controls. The architecture is as in the image below.
The installation steps are quite easy. Because we don’t do the installation manually. We can quickly install it with CloudFormation Stack. CloudFormation Stack
In the Stack Parameters section, it asks us for some information. These are as follows:
- S3 Bucket with sources: S3 Bucket name summarizing all AWS resources used. If you cannot provide this information, you can leave it as default.
- Prefix for S3 bucket with sources: This is the setting where you can specify the Prefix for your S3 bucket objects.
- Security IR Role Name: The name of the IAM role to be given to Lambda functions for actions to be taken automatically.
- Security Exception Tag: This is the setting where you specify the name of the Tag you should use when you want to define an exception.
- Organization Id: As a Best Practice, your security account should be a different account. This setting is your AWS organization ID, which is used to authorize CloudWatch data to be forwarded to the security account.
- Allowed Network Range IPv4/IPv6: This is the setting used to limit all security groups that are not defined as exceptions.
- Isolate EC2 Findings: This is a list of all GuardDuty findings that should lead to an EC2 instance being isolated.
- Block Printcipal Finding: This is a list of all GuardDuty findings that should lead to blocking this role or user by attaching a deny all policy.

After all these settings, you can start Stack. Once Stack is complete, you will now have an automated IR process. For more details, you can read the AWS Security Blog.
Other Automations
I mentioned that there are many different ways to automate Incident Response processes in AWS. At this point, you should determine the most suitable solution for you. I have linked some other automatizations in the list below.
- Automate incident response and forensics (AWS Doc.)
- How to automate incident response in the AWS Cloud for EC2 instances (AWS Security Blog)
- How to automate incident response to security events with AWS Systems Manager Incident Manager (AWS Security Blog)
Last Word
In this blogpost, I aimed to give you basic information about Indicent Response processes in AWS. I hope it has contributed. Please note that Incident Response processes are not limited to what is described in this document. Incident Response and DFIR processes require expertise on their own. Also make sure to do the following in Incident Response processes in AWS:
- Create CloudWatch alarms to suit your needs and connect them with Incident Manager.
- Follow AWS’s Security Incident Response Guide.
- Don’t forget to use AWS’s other security services.
- Set up different security accounts for use in AWS. Make sure everything is isolated and apply the Least Privilege method.
- Establish a process that complies with NIST’s Incident Response Guidelines.
- Improve your team and yourself Incident Response processes by solving AWS’s Well-Architected Labs
If you have any suggestions for the article, please feel free to contact me through any communication channel (Linkedin, Twitter, Threema, etc.). I am constantly updating the articles in line with your feedback.